Archive for August 31st, 2008
Trim the Tree Challenge- and a giveway!
Aug 31, 2008 Author: mytime | Filed under: Home decor/3-D items, Papertrey NewsletterCan you believe it is already September 1st? Where did the summer go?
Well I guess it is time to begin to accept that it is over and embrace Fall, along with all the holidays to follow. One super perk to being on a design team is that it puts you in the holiday mood early!!
You may have noticed every month, on the first, that Nichole gives her Senior Design Team a special challenge. This month was to create a special holiday ornament, with packaging. Now we are talking! You know how much I LOVE creating packaging!!
She asked we try to incorporate any “other” hobbies/crafts we my have in our repertoire to create a unique ornament. ALL the ornaments on my family tree are special. Each has it’s very own story. Many are handmade, usually from the kids. Their little artwork FILLS out tree. No glass ornaments for me. I feel our Christmas tree becomes more and more special each year because of our decorations. The kids get so excited to see that I saved their little handprints Christmas tree, of felt mouse/candy cane holder.
So I went back to those summer days at my grandmother’s, back when I was about 9, and she taught me cross stitching! I spent the summer making several pillowcases, for everyone! They came out awesome too. My mom still has a couple I believe.
I learned cross stitching with a pattern, which was where you have a pre-printed pattern of X’s to follow, with a photo for color suggestions. I also learned how to do french knots, and the lazy daisy stitch! Later in life I learned counted cross stitch, where you just have a pattern in a book, and you count it out onto your fabric. Not a good idea for those who have poor eye sight. Oh, and if you had good eyesight BEFORE, you won’t after! LOL!
So I decided that would be a great place to revisit.
I was “re-freshed” on the how-to-do’s to create these stitches by Googling them!! I found great instructions/photos at the following place: Primrose Design! She has amazing step by step photos and instructions 😀 She has already done all the hard work, why attempt to recreate what is already perfection?! Seriously check it out!
French Knot-HERE! -for my holly berries
Lazy Daisy-HERE!-for my leaves
Satin Stitch-HERE!-for my tree trunk
I really want to thank Janet McCaffrey at Primrose Design, because her tutorials, I was able to just pick this old past time right back up, and go! I just plucked myself in front of my computer, and began following her instructions 😀
Now I have to say, even if you have NEVER cross stitched in your life, you should try it. It’s truly easy. HELLO, me at age 9 was able to do it, so YOU can too.
Another great thing is you don’t need a bunch of expensive items to start!
A large needle, some embroidery floss, and the embroidery cloth to stitch on, as well as an embroidery ring. All really cheap!
So enough of my blah, blah blah. You know how much I babble when I get excited about something.
So lets start by sharing my ornament and gift box!

Supplies: Believe set, Rustic Branches, simple alphabet, Pure Poppy cardstock, Spring Moss cardstock, Pallete Black ink,Old Olive ink by SU!, Pure Poppy ink, white craft ink by CTMH, polka dot ribbon & satin ribbon in pure poppy, Circle nestabilities, tag nestabilities, Scor-Pal, Cross stitch fabric, wide eye needle, embroidery hoop, embroidery floss, decorative ring, silver cord
I got my concept of my box, from the many engraved ornaments I purchase every year. They are often placed in boxes, with a clear cover. So I measured my finished ornament, and using my Scor-Pal, came up with this box, that is my own different take on what you’d get in a store ! Don’t you love paper-crafting?! Limitless possibilities.
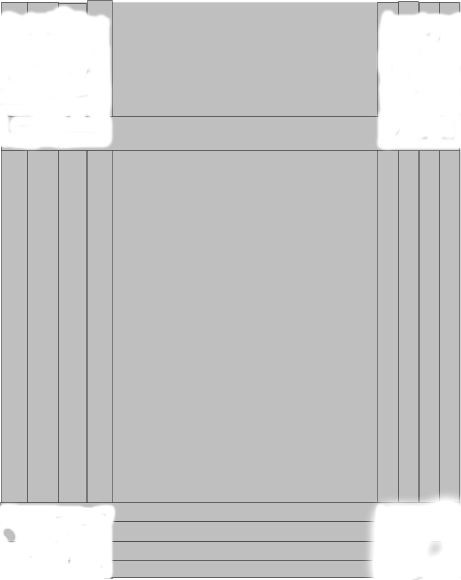
Here is the template I created for my box. Click to enlarge.
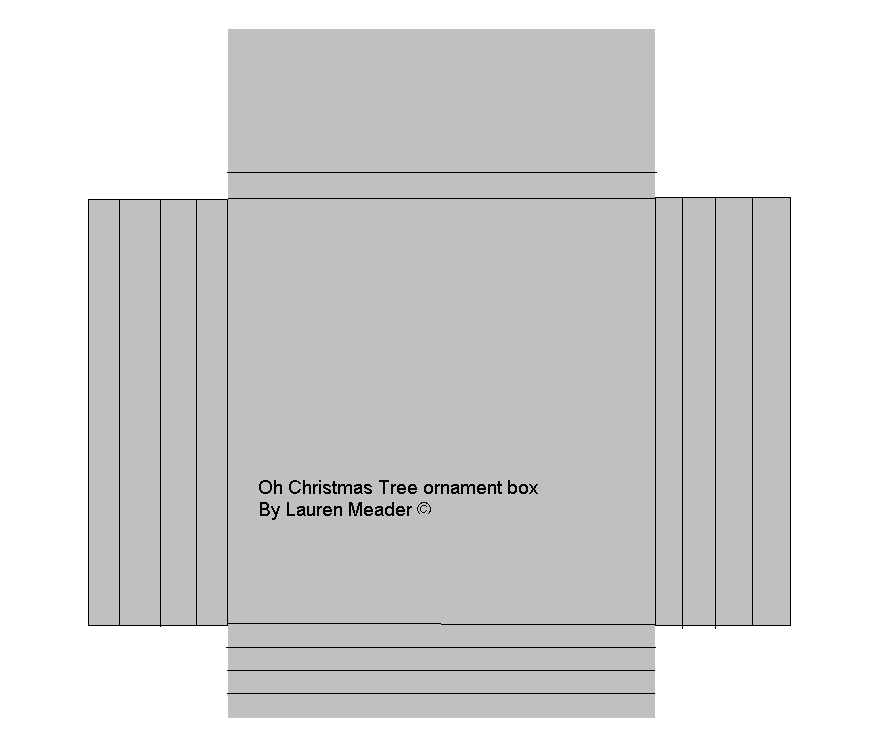
It is NOT to size, it serves as a guideline so you can see how my box came together. Obviously your ornament may be of a different size, so your measurements would be different.
I measured the width of my ornament, then added 2 inches on either side. I scored every 1/2 inch, 4 times-to create the borders, which fold in. I did the same for the bottom flap. I then measured how tall my ornament was, and then scored for my lid. making sure it all fit snuggly. There was room for a little flap. I then made a bottom flap to fold up from the bottom.
My finished box measures 4 inches across, by 6 1/2 inches tall, by 1/2 inch deep.
This is the outside of my ornament box.
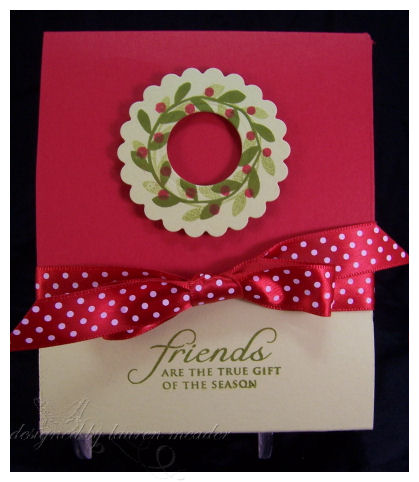
I LOVE Rustic Branches. Its a super set, and I love how quickly I can create a Holly wreath. I just stamped my wreath in Olive ink, onto spring moss cardstock, then -without re-inking, moved, and re-stamped. I stamped my berries in Poppy Red. I used my scallop nestabilities to die cut my wreath, then used a smaller circle to to take the center out.
Here is how the ornament box opens:
Remove the ribbon
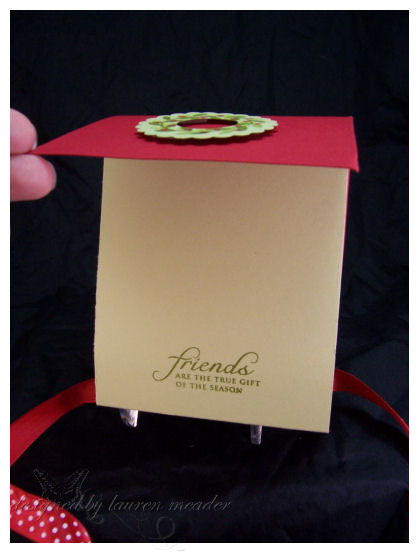
Open the flap
Here you go.
Now you have your ornament sitting snugly in this great box, that will serve as stylish, and treasured storage for the ornament from one year to the next!
It doesn’t have to end there though. you could create a little wall hanging for any time of year, and present it in the same manner!
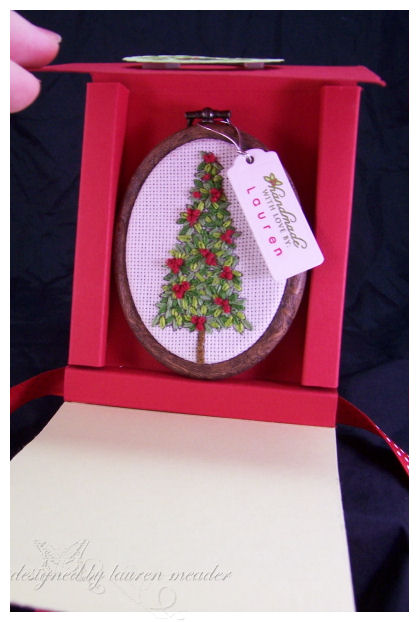
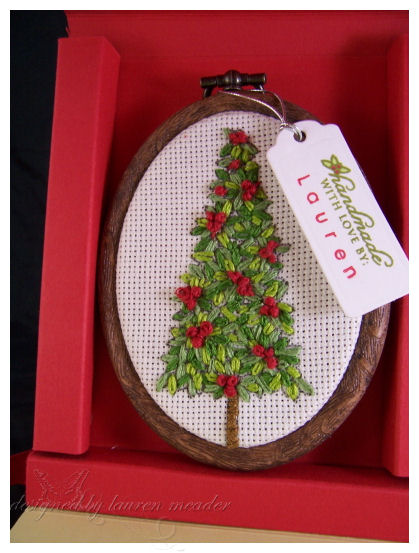
As you will see I used the tree from the Believe set. It was absolutely PERFECT for this challenge!!
I stamped the tree with my Pallette Black ink, onto my cross stitching fabric. Now seriously HOW COOL is it to think that your stamps have a whole new use, and can take you into yet another fun hobby?!! I know I was super excited that it actually worked!
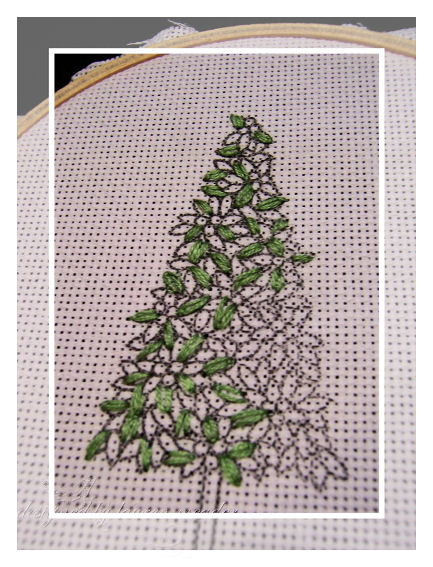
I picked 3 different colors of green embroidery floss for my leaves. I wanted dimension. Not just every leaf to be the same! So I stitched one color of green leaves randomly, on my pattern, staying in the lines. Then onto the second, and the third. Then it was time for my Holly Berries, an my trunk (that uses a silk stitch).
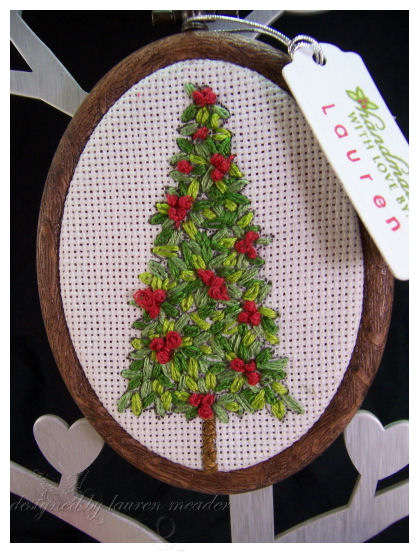
The finished product 😀
I found this faux wooden oval frame at Michaels for about $1.50. I put my finished tree into place, then trimmed off the excess fabric, once I was CERTAIN it was exactly as I wanted it! I created a tag with the “handmade by” and added my name using the simple alphabet set.
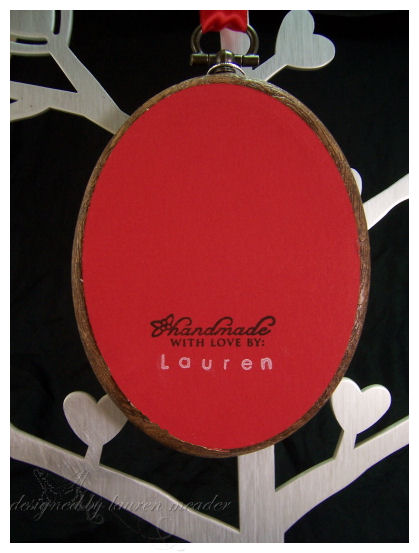
The “problem” with cross stitching is your back is a little “messy”. So I used my oval nestabilities to create a cover for the back, and keep it neat and clean! This allowed me to also put my creative info there as well! I just adhered it with redline tape. It is going NO WHERE!
Now you are most likely wondering HOW LONG DID THAT TAKE? It only took me 1 1/2 hours. I know you are thinking that is crazy, bu it really wasn’t THAT long if you consider HOW LONG some of our card creations take us. Oh, and the fact that my embroidery skills are rusty. That does NOT include the ornament box I created. That took me about the same tp figure out WHAT I wanted, and HOW to get my idea to work. Now you have it done for you!
Now for the FUN part! WHO WANTS IT?!
I would love to give this away to someone! I so appreciate each of you, so it’s my turn to give a little something back. Simply leave me a comment here, telling me what your favorite holiday tradition is! No matter WHAT the holiday, share something your family does together every year!
I will pick a random winner on Wednesday via www.random.org!
I hope you enjoy all the projects today!
Be sure to check out all the folowing Papertrey Ink design team member blogs :
I am sure you will be inspired to start creating those holiday ornaments!
Till tomorrow 😀
You know SOMEBODY had to do it! Why not me?
Aug 31, 2008 Author: mytime | Filed under: Home decor/3-D items, Tutorials, UncategorizedTHANK YOU for your patience as I got this together today. I actually created it the other day, but had family things to do, and camera batteries to charge.
I am excited to share another template with you all today.
Here it is!
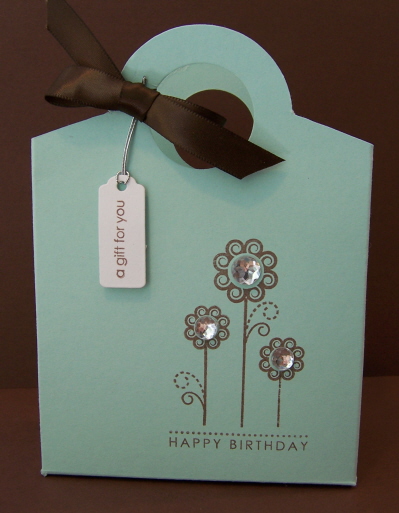
Diamonds are a girls best friend- Bloomin Basket Tutorial 😀 This was totally Tiffany & Co. inspired.
OK I have to say that Stampin Up! has released some MUST have items for me. One being their new Big Shot Baskets & Blooms Bigz XL die that retails for $39.95 US. You can find it on page 29 of the SU! Holiday mini catalog. REALLY CUTE!
“My” problem was, I really didn’t want to buy the die because I am not a huge fan of the round design. I also wanted to be able to make it BIGGER, or smaller. I love versatility and things that actually hold a descent amount of “something”. I am a very visual person, so by just looking at this the light-bulb went off.
I took a look at it and thought “That would be SO EASY to do.” So I did 😀 My design is obviously NOT round, but was definitely inspired by that uber cute die cut.
I hope you all enjoy my little tutorial I have here to share 😀 AND maybe it may save you some $$!! I know I have a good wishlist of items, and limited amount of money. I would like to spend it on consumables 😀
You can make this larger or smaller by changing your starting size and how much you score it! Just remember the sides, and bottom should be the same 😀
Here we go!
My finished Bloomin Basket is about 5 inches tall, 3 inches across, and 2 inches wide.
Supplies I chose
I used Women of Life, Its a Celebration Aqua Mist cardstock, Dark Chocolate ink, Dark Chocolate Satin ribbon, spellbinders tags, coluzzle,scor-pal, score mat,Tim Holtz ruler, Hobby blade, Doodlebug factory Bling (thanks Tracey!), 1 1/4 circle punch, redline tape.
You will need:
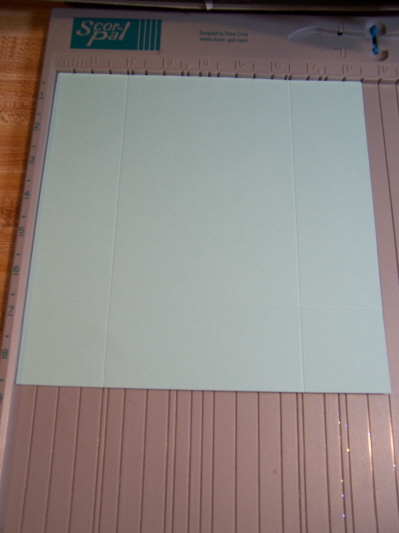
2 pieces of cardstock cut to a square. I chose 8 1/2 X 8 1/2 (if using 12 X 12 you can get a much larger version :D)
A scoring tool, ruler, hobby blade, redline tape, circle tool, circle punch.
Directions
On both squares (8 1/2 shown here)- Score at 2 inches, then again at 6 1/2 inches
Turn cardstock, and score at 2 inches (to create the bottom)
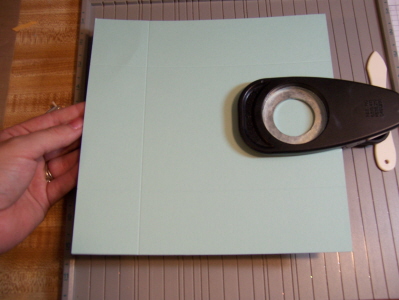
Layer the 2 pieces together, making sure they are the same, and the bottom is to the left, then punch your 1 1/4 circle.
Now you have to pieces that match exactly
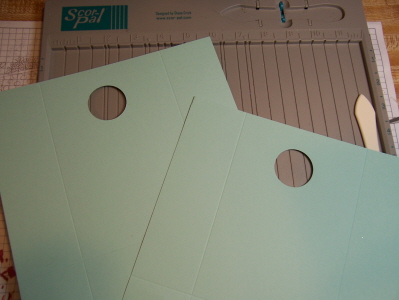
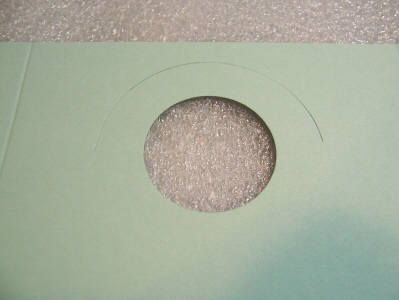
Take your coluzzle (or other circle template) and cut a 1/2 circle.
For this I aligned the hole with one of the cirles, and cut 2 up, on both pieces.
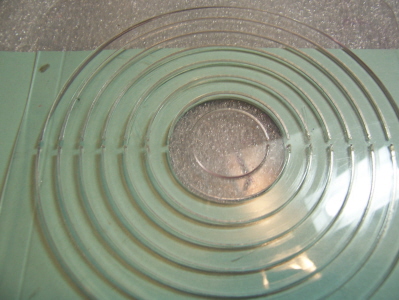
Here is the cut 1/2 circle, when finished
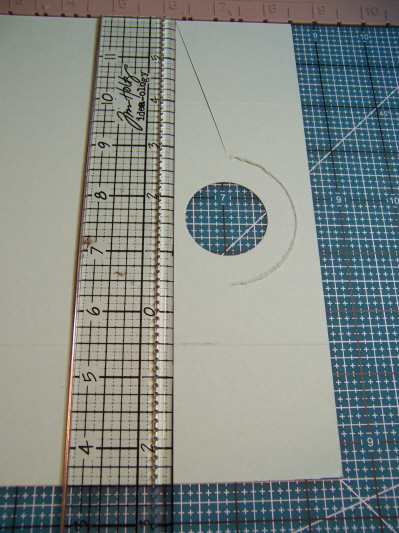
Now comes the cutting angles! I put my cut piece into my scor-pal. Then I just took my ruler to the edge of the 1/2 circle handle, and angled it. I aligned it on my Scor-Pal, with my mat, at about 3 inches, then used a hobby blade to cut.
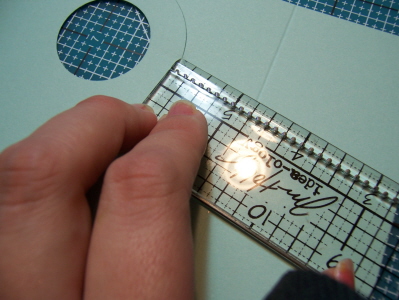
Now this next step is to make sure your angels are EVEN!!
I put my ruler with the edge where my angle ended. I then used my hobby blade to make a tiny mark, to ensure I would be cutting at that same angle. This is just quicker and easy!
Repeated the step above.
This is the finished cut

Now when doing your 2nd piece, if you remember that angled measurement you should be golden. BUT to make it SUPER easy, take the scrap from the first piece, and lay it over the 2nd one! This will ensure PERFECTION on both sides of your box!
Those are my 2 finished pieces.
Now we put it together!
If you WANT to stamp it. NOW is the best time :D, then continue on to assembling.
Just line up the scored edges, and the bottom score marks.
Make sure you cut the bottom panels (as seen in photo)
It then just folds together!
Simple as that! This box takes seriously a whopping 5 minutes to make after your first time. That excludes stamping.
AND the best part is that now you can make it larger or smaller!!
Thanks for reading. I hope you have time to give it a try 😀
Come back tomorrow for our Papertrey Ink Design Team Challenge!!
Well after what seems like a long wait (really on 2 weeks since my class), and many emails later, my Class Kits are ready for purchase!!! TOMORROW is “THE DAY”. A lot of work goes into the kits, and we usually have to wait for the supplies to be delivered, so we know just how many we can sell!! Supplies are limited, as we tend to buy out what is left of whatever it is we need in the kit!
Tomorrow you can purchase your kit (and she accepts PAYPAL!!) from Michelle at The Paper Tree. Contact info is on the site. You can also see more Kit details tomorrow on THIS page. I do believe we have a couple (like 2) left of the kits on the site currently.
So I will share some more photos of what is in each kit, as well as some more information!
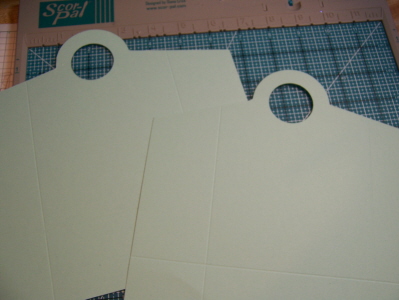
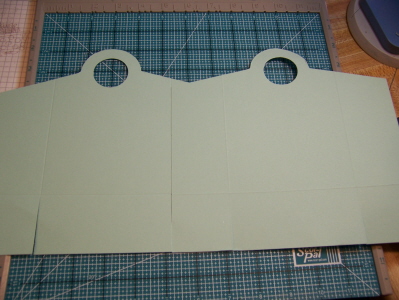
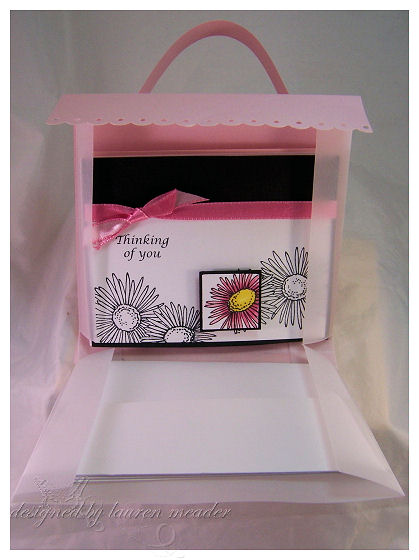
OUT OF THE BOX © by Lauren Meader
This is my favorite box yet!! I will be making these over and over again for teacher gifts this year! Once you get this template in your hot little hands you will be so happy!
The box measures 6 inches across, 3 inches wide, and 4 1/2 inches tall.
This Kit will sell for $35.
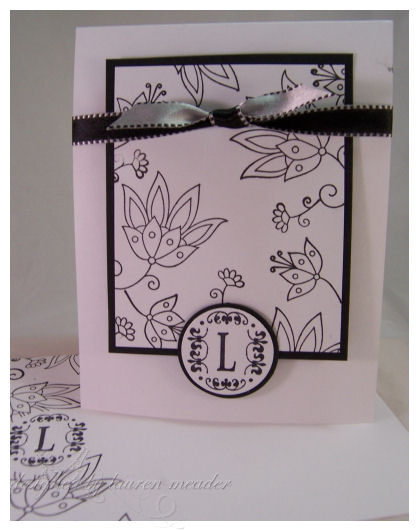
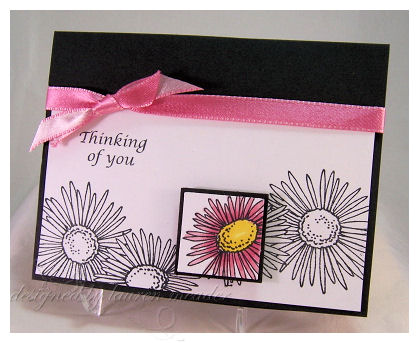
In this Kit you will receive supplies to create this fabulous box, which folds out, and easily holds 8 monogram cards, and 8 envelopes.
You also get the step by step instructions, with photos, and for this kit a visual template that shows you where to make certain cuts, that creates this unique box, using minimal cardstock!
You will be able to have the option of the “add on” with this kit that will include theLe Jardin stamp set, and/or the JustRite Stampers monogram set!
I decided to use these 2 sets again on this box to help those of you who purchased the Make it Monogrammed Kit in August. You can certainly switch out the sets for what you have on-hand.
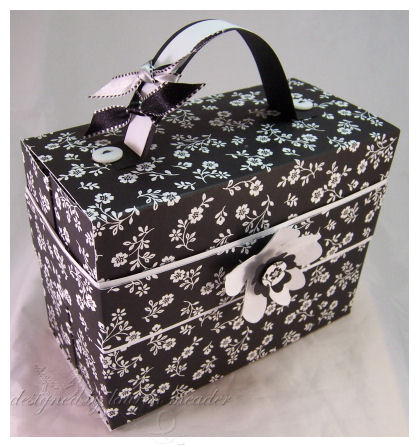
Here is the box outside.
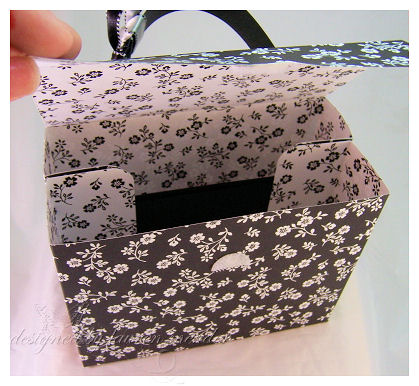
Box top open (you will have a Basic Grey magnetic closure in your kit)
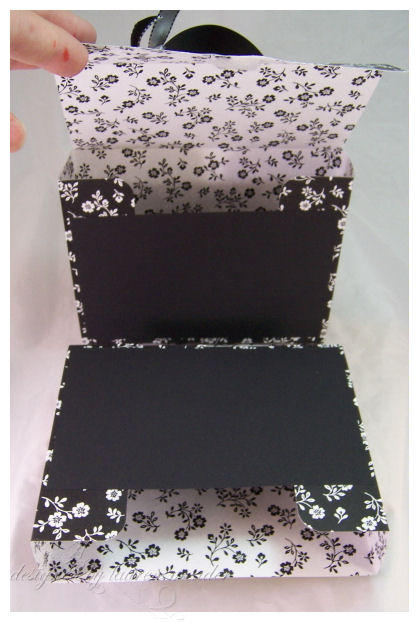
Box 1/2 open
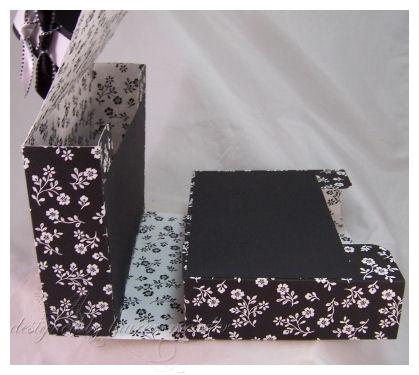
Box 1/2 open side view
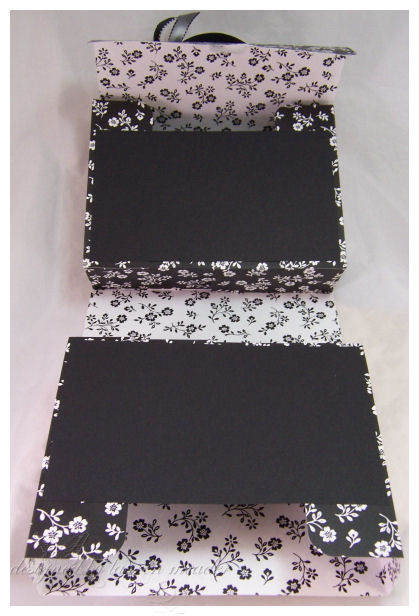
Folded out
Now we have our monogrammed cards/envelopes
All together this makes a really nice gift set!
—————————————————————
Next up we have another Kit for a Cause! This Kit is in ALL pink, in support of Breast Cancer Awareness. This kit uses EVERY image from the Flowers for Daisy set from Gina K Designs. This stamp set was designed by Aslea Hopkins, in honor of her friend Daisy, who is currently battling breast Cancer. All sets purchased in August (which is when we purchased them), will have $4 from every set sold, donated to The American Cancer Society!! A cause very dear to my heart. The stamp set is available as an add on option. Details tomorrow.
You will receive your step by step instructions for creating this fold-out card tote, and supplies to create each card.
Crazy for Daisy © by Lauren Meader
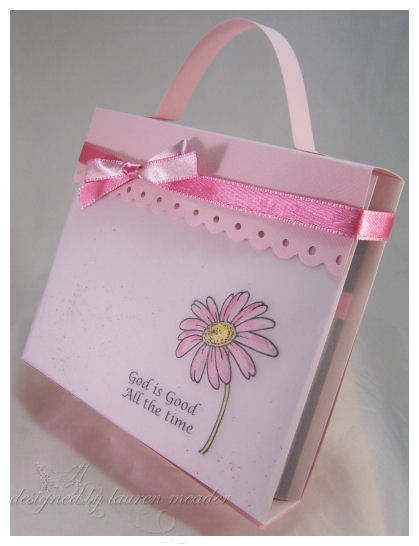
You will make a dry embossed vellum fold-out card tote! This is sure to get OH’s! and AH’s!
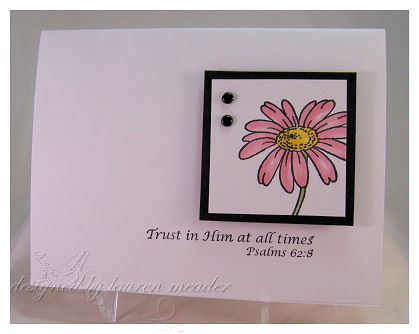
Card one
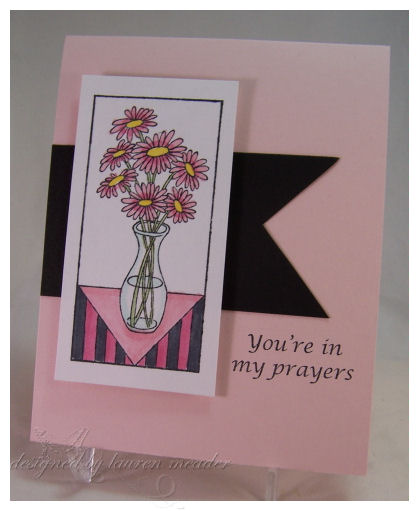
Card two
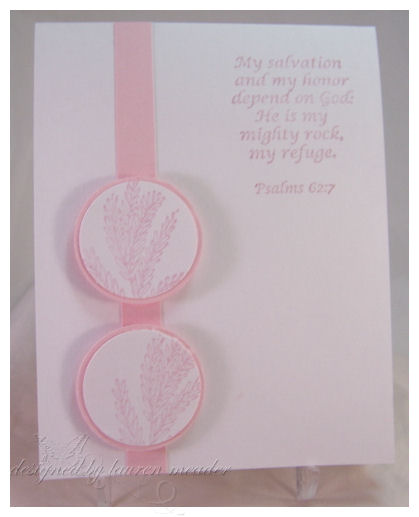
Card three
and Card four
Now we have the tote opened up, where we insert the cards on one side, and the envelopes in the other.
This is just another fun card tote. It is especially nice for anyone you know who may be having a difficult time. These cards presented this way are sure to bring a SMILE to anyone’s face, and lend them a little spiritual lift :D.
So that is all for the Kits. I have to speak with Michelle today about the Not So Tricky Treats. I am unsure we will be able to offer that as a class :C No worries though, as we near Halloween, I can share some of the fun that goes into making those treat here!
Now you may be itching for a template! It has been some time since I shared a template here. Well……………. come back later for a SUPER template!! I am putting the finishing touches on one I created last night, and I am SURE you will be tickled! LOL!
HINT-it may save you from spending $40 + dollars 😀
See you later!!
My Etsy

Who I Designed For
Blogroll
- Alicia
- Alli Miles
- Ally Blankenship
- Amber
- Andi @ crafts on a whim
- Angel R
- Angie Z
- Anne Kranitz
- Becky O
- Bee
- Beth Silaka
- Bethany Paull
- Beverly Nash
- Bobbie
- Cambria
- Cammie
- Card of the Week
- Card Positioning System (CPS)
- Cards for Cancer
- Catherine Doucette
- Charmaine
- Cheryl Sims
- Chriss Rollins
- Christina
- Christine Ewing
- Christine Wooden
- Colleen Schaan
- Craft Critique
- Craft Gossip
- Crystal
- Dawn Easton
- Emily Giovanni
- Geny
- Holly
- Igne Groot
- Inspirational Craft Blogs
- Irene
- Jami Sibley
- Jeanne Streiff
- Jen del Muro
- Jeni Bond
- JenMarie
- Jenn Balcer
- Jenn Diercks
- Jenn O
- Jennifer E
- Jennifer Mick
- Jennifer Pereda
- Jennifer-Sweet Treat
- Joanne Basile
- Jodi Collins
- Julia Stainton
- Julie Masse
- Karen
- Kathryn Berthiaume
- Katie Cotton
- Kelley Holland
- Kendra
- Kim Scholfield
- Kris’s Color Stripes! Get inspired here
- Kristen Dubosque
- Kristin Eberline
- Kristine
- Laura @ Sunshine Stamper
- Laura Turnmire
- Laurie Schmidlin
- Lesa Rapp
- Linda Duke
- Linda-LSN
- Lindsey Botkin
- Lisa (lakind scs)
- Lisa Kind
- Lori Craig
- Maggie
- Mara Campbell
- Maria
- Maria Levine
- Mary
- MaryJo
- Melanie M
- Monique Hansen
- Moxie Fab World
- Pam Imholz
- PaperCrafts Connection
- Peppers and Pollywogs Kids party site
- Rebecca Grohall
- Rita
- Robyn
- Rose Ann
- Sarah Vrolyk
- Sharon Harnist
- Sharon Johnson
- Sharon Rivera (a chemisrty with paper)
- Sherrie
- Sophia Landry
- Storage Units, Ink, & More Blog
- Sue Berker
- Susan (Rainy)
- Tangii Crane
- Tracy
- Tricia Traxler
- Trudee
- Velta
- VivLyn
- Zena
MTME Pretty Palette Color Team
MTME Pretty Patterns Sketch Team
My Time Made Easy TM LLC
Shop till you drop!
Lauren Meader
About Me
Copyrighted material
Subscribe To My Blog
Pages
- About me
- Alexa’s Story!
- My Crafty Corner!
- My Time Made Easy™ LLC
- Our Make A Wish Trip to Disney!
- Resume/Publication List
Calendar
Archives
- August 2013
- July 2013
- June 2013
- May 2013
- April 2013
- March 2013
- February 2013
- January 2013
- December 2012
- November 2012
- October 2012
- September 2012
- August 2012
- July 2012
- June 2012
- May 2012
- April 2012
- March 2012
- February 2012
- January 2012
- December 2011
- November 2011
- October 2011
- September 2011
- August 2011
- July 2011
- June 2011
- May 2011
- April 2011
- March 2011
- February 2011
- January 2011
- December 2010
- November 2010
- October 2010
- September 2010
- August 2010
- July 2010
- June 2010
- May 2010
- April 2010
- March 2010
- February 2010
- January 2010
- December 2009
- November 2009
- October 2009
- September 2009
- August 2009
- July 2009
- June 2009
- May 2009
- April 2009
- March 2009
- February 2009
- January 2009
- December 2008
- November 2008
- October 2008
- September 2008
- August 2008
- July 2008
- June 2008
- May 2008
- April 2008
- March 2008
- February 2008
- January 2008
- December 2007
- November 2007
- October 2007
- September 2007
- August 2007
- July 2007
- June 2007
- May 2007
- April 2007
- March 2007
- January 2007
Categories
- About Me
- All That Scraps
- blogger challenge
- camera/photo play
- Cards
- Contests
- family stuff
- FOR SALE
- Home decor/3-D items
- How to FAKE it!
- Introduction
- JUGS Challenge
- JustRite Stampers
- Lizzie Anne Designs
- My family stuff
- My Stamping Space
- My Time Made Easy
- My Time To Color Challenge
- My Time to Create Challenge
- My Timeless Template Challenge
- My Timeless Templates
- Mytime Mail
- MYTIME MOVIE/VIDEOs
- Papertrey Newsletter
- Pink Cat Studio
- Pretty Palette Challenge
- Pretty Patterns Sketch
- Product Opinions and Must haves
- Recipe's
- Saturday Sketch
- Smilebox Creations
- Stampavie
- Tutorials
- Uncategorized
- videos
Most Popular
- Create your own Onesie Card Tutorial-and important NOTE! PLEASE READ (2529)
- Saturday Sketch-Boxed bag holder (2333)
- Going GREEN! Fancy Flower Flourish-Closure Video (1478)
- Fabulous Favorite - Giveaway! (1336)
- a Prayer Request (1232)
- QUICK-Easter Baskets from Nestabilities-PTI style-and blog challenge (1063)
- Teaser Sketch (999)
- February Release Giveway! (and a little peek) (996)
- Group Post and Rambling Rose Video Tutorial (985)
- GIVEAWAY! Who wants it all?! (895)
Recent Comments (RSS)
- 첫충사이트: 완전히 흥미로운 블로그 게시입니다. 저는
- sarah: Wow, Lauren, what a stunning
- hedie: خرید راهبند
- 야동: Love to read it,Waiting For
- 야동: This seller is in a
- 바카라사이트: 여기 처음 왔어요. 나는이 게시판을
- 야동티비: I was surfing the Internet
- 바카라사이트: 비슷한 주제에 대한 흥미로운 정보를
- 바카라사이트: "여기에 제공해 주신 귀중한 정보와
- 온라인홀덤: 유익한 웹 사이트를 게시하는 데
Copyright © 2007 - My Time, My Creations, My Stampendence - is proudly powered by WordPress
This blog has been Tweaked and Designed by Sara Williams