Archive for July, 2008
Halloween Treats!
Jul 31, 2008 Author: mytime | Filed under: Cards, Papertrey Newsletter, Recipe's, TutorialsThis is post 1 of 3 for today! Please SCROLL down so you see all three!!! PLEASE READ THEM! LOL! I think I developed carpal tunnel typing them all up 😀
It’s the first of August! Can you believe that? WOW! Time is flying by. Before you know it, it WILL be Halloween. I am always looking for cool and fun things to do with my kids and/or for their classmates. Maybe this time I will be ahead of the dash (yeah right! LOL!)
Nichole has challenged the team to come up with some fun Halloween treats.
You can see what everyone else has done here:
I decided to share a cool recipe that is fun, and you can let this kids help with. Hope you like it, and give it a try!
Here goes…………….I would like to share with you my Little Pumpkin Pop-In ©
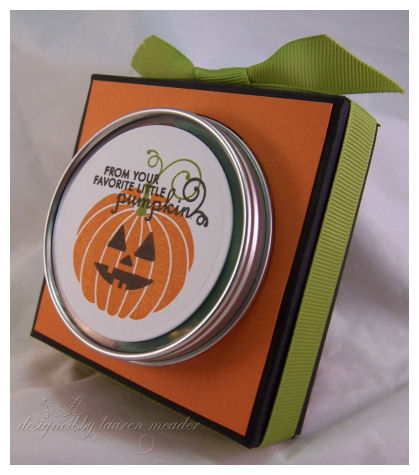
This is a little container cover I made to “pop-in” the super cute 2.5 oz. clear top round tins. Buy them now people! LOL!
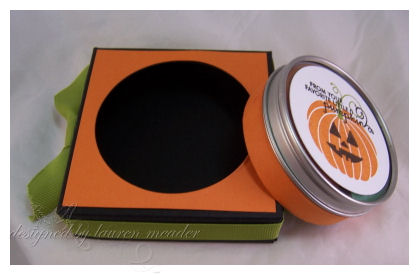 Tin out of the Pop-In ©
I love how it dresses this little tin up. Rather than just having a wrap around the bottom, it really gives you an entirely new gift option.
Please don’t ask me for directions. This is a teaser of more to come!! I am so excited, I can hardly stand it, but that is all I’m saying for now (BHWAHAHAHAHAHA insert my evil little happy laugh). Let’s just say I have been busy, busy, busy.
OK moving on.
I used the Spooky Sweets set for my lid.
I wanted my lids to be super quick and easy to mass produce-think 3 kids……. X’s however many students they have in their classes……………so about 40 kids minimum. SIMPLE.
By now you are saying OK so how is this sharing a fun & cute Halloween treat?
Well its what’s inside that is the FUN part!
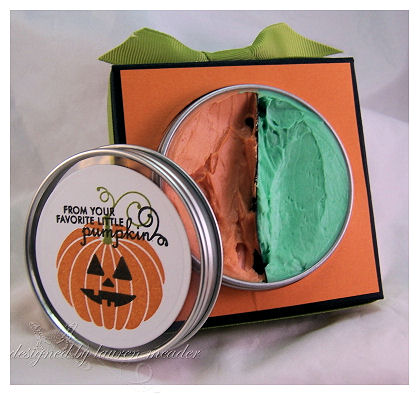
Monster Mash Make-up!
2 TBS solid shortening (AKA Crisco)
1 TBS cornstarch
4-5 drops of food coloring
Make-Up sponges
1) Mix shortening and cornstarch together in a small bowl, until smooth.
2) Add in food coloring. Mix till well blended.
READY TO GO!!
When you are done just rinse off with warm soap & water.
You can whip this up at home in minutes! The kids will love it.
OK I know you are saying EW! But the kids are saying YEAH!!!
Trust me me-Kid tested!! MOM Approved 😀
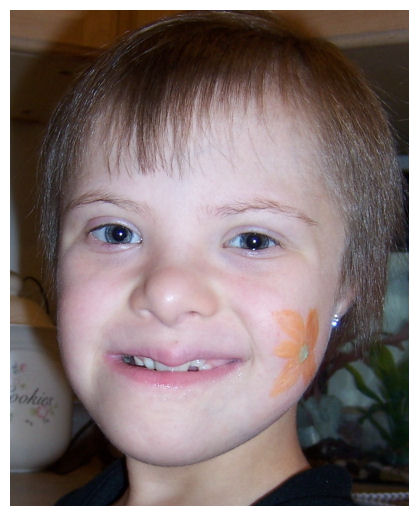
My Little Pumpkin Amber
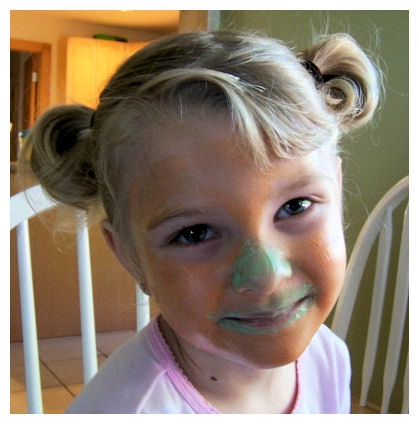
OK I never claimed to be an artist! This is as good as it gets. Amber saw the tin and wanted her face to be painted like the pumpkin stamp. I have to admit I was nervous that her face would be stained orange by the food coloring, but it came right off and NO perma-pumpkin face! LOL!
Next up is Alexa-my flower child. She was not wanting her face painted! She said she just want a little flower on her cheek. UGH! That meant I had to “draw/paint”. YIKES!
Now we have Noah-who wanted to be half “The Hulk”, and half boy.
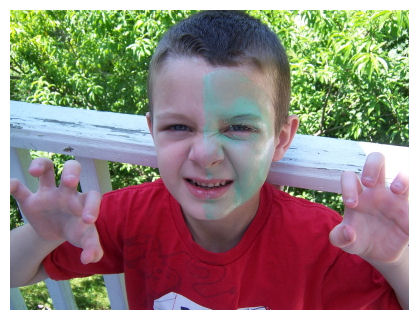
Unfortunately he was “itchy” and scratched it off while I got the camera. It’s one of those things-when you know you can’t touch something you have too! That is his mean face. Still looks cute to me!
All in all it was a super fun & easy afternoon craft and would make great “make-up” for girls or obviously face painting. No expensive paint kits to buy.
I love the idea of making several colors and giving these to the kids classmates. It really whips up quick, just add to the recipe to suit the number of people. The batch above fits perfectly into the tins, if that is any indication. SO each color batch makes a 1/2 of the tin.
So that’s it for me. I hope you like my idea of a fun Halloween treat! Afterall they get PLENTY of candy right?
Thank you again for checking in with me.
Pink Cat Stamps Fabric Challenge
Jul 31, 2008 Author: mytime | Filed under: CardsPlease note this is post #2 of a total of 3 for today!! So be sure to check out THIS POST, and THIS POST as well.
Today in this post I am going to share my card for a Challenge that Dawn from Pink Cat Studio issued for all of us, and I want to challenge you all to try this as well.
Also note you can view more ideas for the challenge on Melissa’s blog 😀 and enter to win a free set HERE
CHALLENGE : Use fabric on our card. No ribbon doesn’t count!!
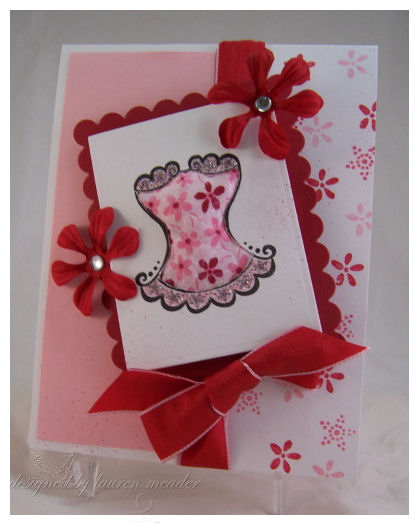 A little lingerie goes a long way
That is what I like to call this! LOL! I have to say I LOVE how this turned out. Its so pretty.
I used the bodice from Lingerie 1 set, and the flowers.
Think bridal shower, wedding night, Valentines day, or thanks for the support, you lift me up (like the sentiments in the set)……….lots a cute things like that.
I got my fabric swatch, and went from there. I stamped the image on my cardstock, then used a hobby blade to cut out the middle portion only. I then put some fabric in the back, and layered batting, making the image pop forward, and look 3D!!
I used the pattern in the fabric as my inspiration to use the floral images in the set to create like a matching paper. CUTE huh? To complete the look we needed stickles, and some ribbon, with a spritz of color.
You should have seen my first card. WOW! What a disaster!! In the trash it went.
As I was making that hot mess, I had this idea pop into my head. THANK GOODNESS because it was going to be quite embarassing to post with that other card.
I guess I am happy that Dawn issued a fabric challenge because I NEVER would have made this. Thanks Dawn!
OK I need to run. Thanks for reading, and if you get some time try this challenge out.
Paper Garden Spring Out Card
Jul 31, 2008 Author: mytime | Filed under: Cards, Papertrey Newsletter, Tutorials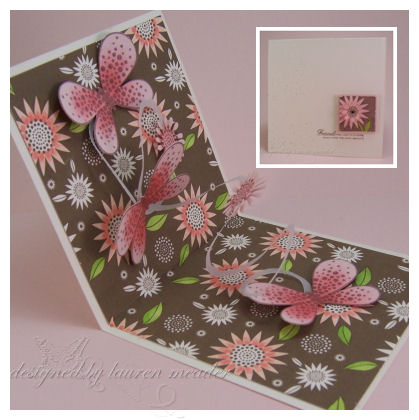
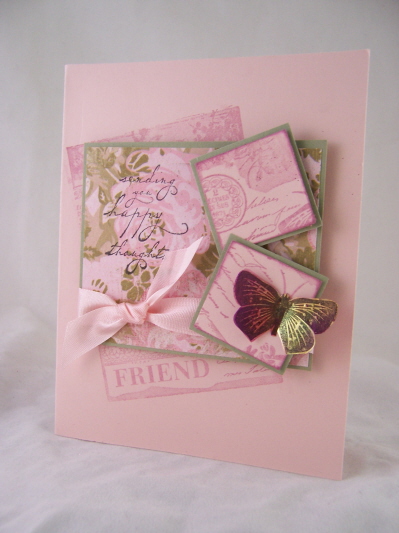
There is nothing better than getting a handmade card in the mail of from someone special, unless that card is interactive! The best surprise is when the unexpected happens! The receiver opens this creation to find a beautiful arrangement of butterflies and flowers, spring out, as it opens. You are sending a virtual paper garden! This style can open so many amazing possibilities.
Let me share how fun and easy this card really is! Then challenge YOU to give it a try!
The idea came to me after Jason and I took a trip to Maine. In one of the stores they had some really elaborate cards, and there was a card that had this swirly piece of paper with butterflies all over it. I told my husband when we get back I would try to re-create this. So I did.
Now I am not sure what the actual name of this style of card is, but I liked Spring Out, due to the way in which it was created.
First let me share my list of supplies. You should have most of these tools on hand.
SUPPLIES:
Stamps:Texted Boxed, Sentiment on card from Just Hatched, Butterflies stamped/cut from Butterfly Kisses
Patterned Paper: Chocolate Remix
Cardstock: Sweet Blush, Vintage Cream, Vellum Cardstock
ink: dark chocolate, berry sorbet
Other: Copic Markers, scissors, circle punch, glue dots, flower punch
 Paper Garden
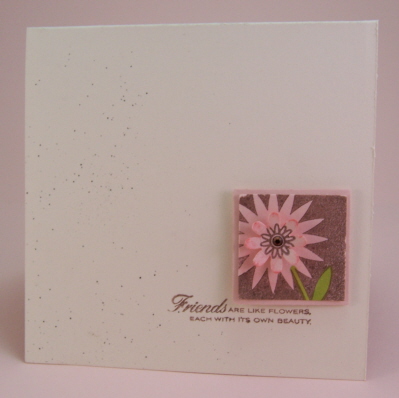
This card measures 4 1/4 squared. This is the front of my Paper Garden card.
I used vintage cream cardstock as my base. Sentiment stamped in dark chocolate ink.
I then stamped the flower from the Texted Boxed set, in dark chocolate ink, onto sweet blush cardstock. I used my 1 1/4 square punch, and punched out portion I wanted. I colored the stem, and punched a flower (stamping a smaller flower from Butterfly Kisses ), to layer in the center. Then layered entire piece onto 1 3/8 square punched from sweet blush cardstock. Used my color spritzer for a splash of color. Perfectly simple, which is what you want for the COVER! This inside is detailed enough.
Now for directions on the Spring Out
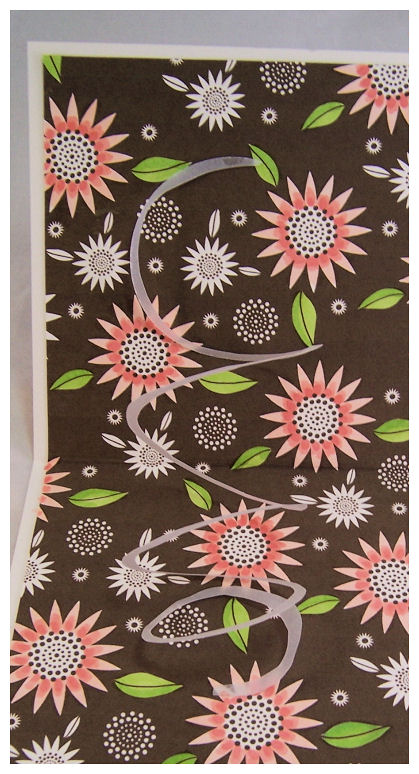
Step 1) I
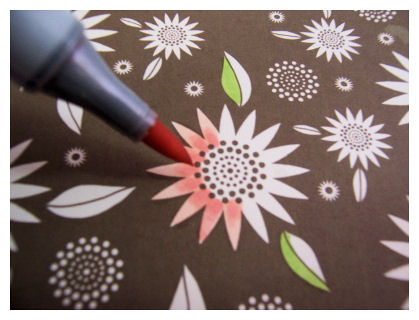
decided to add some color to my chocolate patterned paper, so I chose my colors and away I went. I decided to only color the large flowers and leaves for some POP, and to keep it from getting too busy. I then layered it into my card base.
For my butterflies I stamped them in chocolate, on sweet blush, and then sponged the center’s with Berry Sorbet ink. Then cut them out.
Step 2)
NOTE: This next step I used chocolate cardstock for my demonstration so you can easily see the steps. In my actual creation I used vellum cardstock.
 A
A 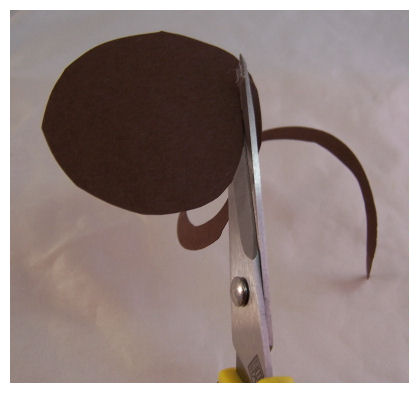 B
B 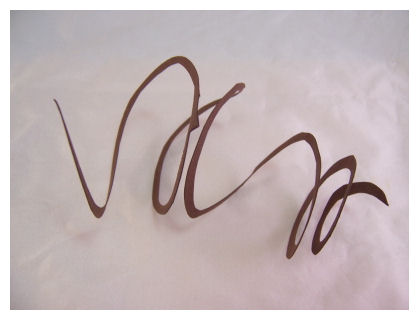 C
C
Choose the size of the circle spiral you want, and cut out circle (photo a). Next trim out the circle, into the center (photo B) to create a curly spring like circle (photo C) you can cut out some of the center so you don’t have too long of a curly spring. The larger the circle the more curls you have.

Step 3)
Collect the layers, and lay cut circle flat. Pick location in card where you want the spiral to be. Attach a glue dot on the back of the LARGEST tail end. This allows it to stick to the top of the card.
Then place a glue dot on the front of the smallest tale. Now close the card.
Step 4)
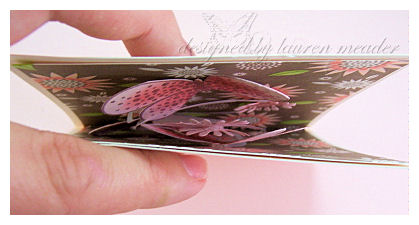
When you open the card, the spring will now be stuck to the bottom on the card, allowing you to have a spring that easily opens and closes FLAT when card needs to close. You don’t want the spring bending!!
See closed photo
Step 5)
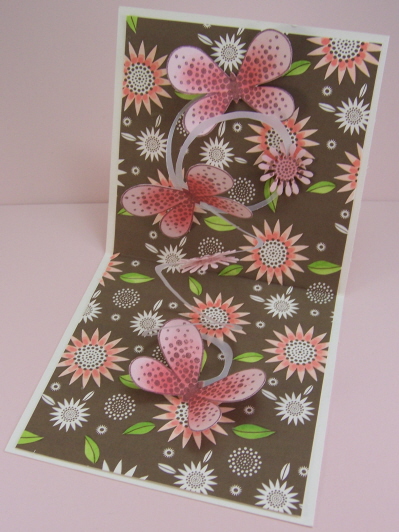
Now comes the FUN part. Adding your 3D elements. You will want to cover the glue dot’s with an item, and the rest is pure creative liberty!!
Imagine opening this up? Who wouldn’t have a HUGE smile? It is like the butterflies are fluttering over the paper garden!
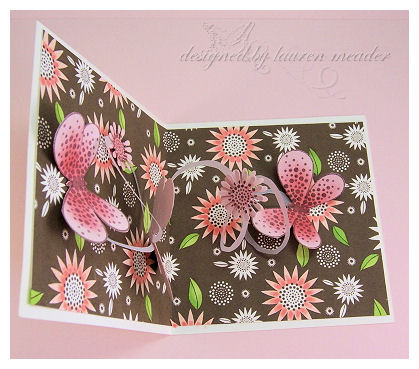
TIP: When using small images put them on both the front and back of the paper spring (see my layered punched flowers?). You don’t want the glue dots sticking to the layers or objects within the card. It would be ruined.
Here is the view from the top!
So that is all there is to it! I hope you enjoyed today’s newsletter project, and that you try to find the time to create your own! If you do, send me a link here.
I know many are going to say how do you mail it?
Well it does close, and lay relatively flat. The pieces may need to be lifted if you do mail it. I always recommend mailing them in out Papertrey Ink Clear Card boxes! It costs a little more to mail, but they are mail-able and it ensures your creation arrive more nicely-rather than SQUISHED! OR hand deliver 😀 Then you can see the reaction!
and I’ll cry if I want to, cry if I want to, cry if I want to…………..you would cry too if it happened to you. Is that going to be stuck in your head all day now?
It’s been stuck in mine!
 It’s my party
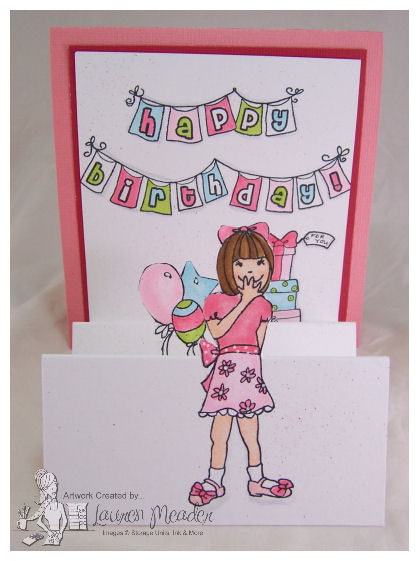
This has to be one the the CUTEST set! I swear! I think by looking at the card, you can just tell I had fun making it.
Doesn’t she look so giddy about her party? I love how her hand covers her mouth. ADORABLE.
This set is called “It’s my party” by Storage Units, Ink & More and it goes on sale tomorrow! Lot’s of great elements in the set, and I think I used a good variety of images. I fell in love with theCore’dinations Pretty in Pink collection, and it inspired my colors. She is colored with my Copic markers (just in case you wondered)
What little girl would not LOVE this little card? I did my POP OUT technique, and I think it came out super cute. Plus it folds up FLAT! Gotta love that. Totally mailable.
You can see another version (and instructions) HERE, and HERE.
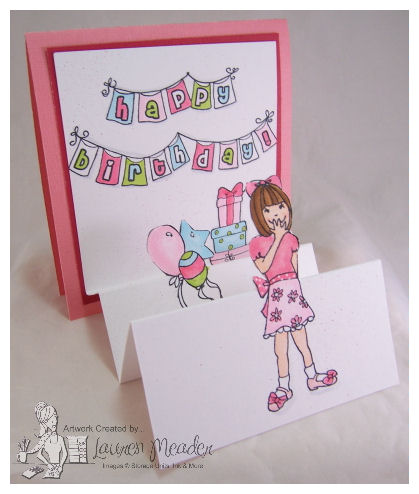 side view
The balloons are behind her back, popped out, and the gifts are waiting to be unwrapped.
This is one of those “Looks better in real life” kind of cards.
If you haven’t tried this yet, I suggest you get to it. Its so much fun.
I HAD to create a little gift box to go with my card, so I did. I used one of my old templates, which I usually NEVER do! LOL! I always just make a new one. You can find that one HERE
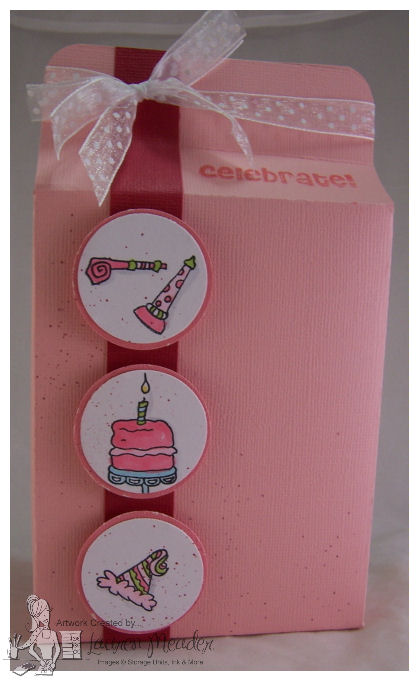 Party Box
Sorry for the SUPER HUGE photo. No idea how that happened. Used more elements from the set for this. I think it’s compliments that card perfectly!
It was just a fun set to play with.
Anywhoooooo, Much to do, so I got to run. Hope you like today’s sample. I’d love to hear what you think 😀
Be sure to check all the peeks out. Pretty awesome stuff I tell you.
I am also excited because my blog is going to be overhauled soon!! I got a MASTER designer giving me a brand spankin new, and fresh look! YEAH!!
OK I really gotta run.
Later
Because I am crazy!
Jul 30, 2008 Author: mytime | Filed under: CardsI am taking on MORE work!! I can never live without deadline and to do’s! I think I have a problem :C
I just made my class schedule for The Paper Tree. I am THINKING it will be Saturday August 9th. I am going to TRY to do 3 classes that Saturday. KEYWORD is TRY!! People seemed to have like the block of classes, since many travel from afar.
Space is limited!!!! We can only seat 12 per class, so call Michelle to sign up 😀 Hope to see you there!
While my exact projects aren’t complete (hence serious lack of info), I can tell you I just got done designing an AMAZING template I like to have named “Out Of The Box” !! Yes, another card holder box. But it can hold so much more. You will get the anme when you see the KIT.
This may hold some gorgeous monogram cards using a Just Rite stamper. Details when the samples are actually done.
I HAVE NEVER SHARED THIS TEMPLATE HERE nor will it be available anywhere else. This is brand spankin new!! My Time Original.
This one is totally fabulous. I am in LOVE! I will also be making sure this is available as a MAIL ORDER KIT, for all my awesome fellow stamper’s who made the first 2 so popular. If you liked the All Tied Up! Kit you are going to FLIP for this one.
I will let you know my class schedule later today, after I pay Michelle a visit (with all 3 kids in tow! YIKES!), to pick out some yummy products to create with.
I also need to get my projects DESIGNED. Add that to a million release deadlines.
YIKES!
Till then, this is a sample from my “Clearly Creative” class I did in May. SEE? How cute!
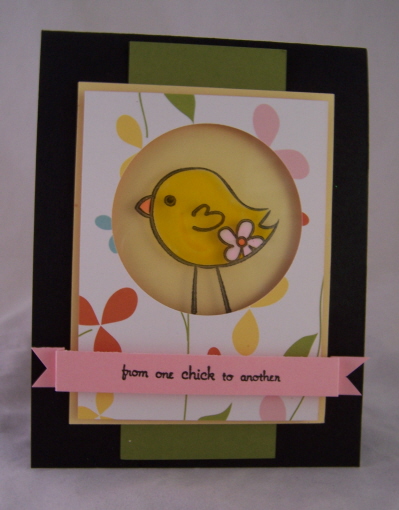
This was done using acetate 😀
Stamp is a $1 chick by imaginesce and sentiment by A Muse. Patterned Paper is American Crafts.
Then this one was one from my “It’s all about the bling” class
FRIEND Block image was from Hero Arts?? (butterfly was taken from the block image)
Sentiment is from Lizzie Anne’s Au Naturale.
Butterfly done using Fantasy Film.
OK on the run.
Be back later with a Unity Stamp Co. peek! They are having a release party tonight—>HERE.
I am no longer designing with Unity, as part of the companies I had to leave for my advancement with Papertrey Ink, but, I still {heart} them so very much! Sometimes we have to make hard decisions to be where we need to be :C Angela is fabulous, and was awesome to work with, as was the entire Unity team!!! I thank her for allowing me to be part of the Unity team for the short time I was able to be. So now I return to a happy customer!!
Samples later-
Till then………………….
Want a chance to win free stamps?
Jul 29, 2008 Author: mytime | Filed under: CardsJust keep stamping……….
Jul 29, 2008 Author: mytime | Filed under: Uncategorizedstamping…..stamping………..just keep stamping (till your fingers fall off). This has been sung to the tune of Finding Nemo.
I have done more stamping in the last few days than I ever have. INSANE! I whipped out more projects than I ever thought possible. My husband is in shock at my projects 😀 SO You know they must be good! LOL!!! He just said “I cannot believe you did it.” then I said ” ME EITHER! ” Well sort of. Once I set my mind to it, there is no stopping me. OK now I need to stop blabbering.
So I got a delivery today! So I made this little card
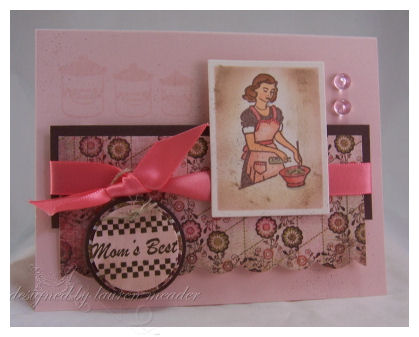 Mom’s Best
I HARDLY got to play with this set Recipes, but am so in love with the images. Very different than most of what I own, and I love that. I am really liking getting out of the “comfort” zone.
The girl was made to look like a vintage postcard image (kind of).I stamped the canisters in sweet blush (my all time favorite pink-ever!! I just got the huge pack of it from Papertrey Ink LOVE IT! Oh and the chocolate-yum!)
This is sort of a shabby/clean card! LOL! I dirtied it up a little bit. Not too over the top. LOVE that Basic Grey paper.
This reminds me of my mom. She is always cooking and baking. A trait my husband wishes I inherited (hehehe). I HATE to cook. Don’t get me wrong I CAN cook, I just despise it. I’d rather do take out in a heart beat.
If you don’t know I ADORE 1950’s images. Not sure why, I just do. I’m drawn to the whole era. Not the women stay home, and have to be like Donna Reed (hair done, dress on, cooking and cleaning all day) Just the colors and style of things. I love the women images. The whole retro sort of thing.
When we were in Maine we went to an Antique shop and I found the prettiest vintage tissue paper! OMG! It was a woman and man on it, and a birthday greeting. Similar style to this stamp. The woman at the store almost fell over when I told her I planned on actually using it! So I hope to do that sometime soon 😀
Anyway just a fun card to share today. I need to go play with my new goodies, before taking the kids to the dentist and swim lessons tonight.
Thanks for checking in here.
PS-I’d LOVE to hear some images that you are drawn to 😀 Like a style or era. OR like me any flowers, butterflies & penguins!
Till tomorrow
I NEVER shared this! LOL!
I was finishing up the end of the year gifts for Alexa’s Special Ed co-ordinator (or whatever she is called-can’t think right now) and I had gotten her a gift card and a box of those YUMMY Starbucks Truffles I love so much (she is a big coffee lover too).
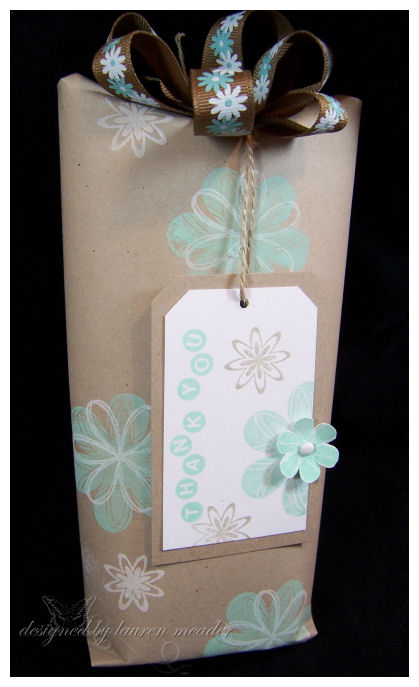
I LOVE simple but THOUGHTFUL packaging, I always say presentation is everything!!
ANYWAY-I didn’t feel like making a bag, or anything else fancy (time was an issue as well) so I used Kraft Wrapping paper (by Stampin Up!) and made my own pretty wrapping paper and tag in UNDER 5 minutes! Yes! UNDER 5 minutes. Would have been less if I didn’t cut out that flower 😀 Get this, I used my ATG gun for the adhesive in place of tape. I was too lazy to go get my tape dispenser, and this worked great. No TAPE marks to ruin my fabulous creation either.
I was so inspired by the ribbon that I re-created it on my gift wrap.
I used the flowers from my Totally Retro set, and layered them to create some fun & funky flowers. I stamped them in some nice versamagic inks. LOVE the POP of color this has. It was just a super simple tag, and wrap but I think it looked so nice. The “thank you” is from the Sentiments set (yes I really like it :D)
I just looped my ribbon and put a brad in the center. This holds together, looks nice and was very simple. Smack on a glue dot and its not goin anywhere. PLUS your receiver had a pretty bow to recycle.
So there you have a simple solution for when you are in a crunch. Don’t bother with the card, just make a tag. It doesn’t have to be an insanely awesome layered tag-just a simple one 😀
Thanks for looking.
Till tomorrow.
Im on the web!
Jul 27, 2008 Author: mytime | Filed under: CardsI thought I would take a few minutes to direct your attention to some other places that I have work published out there in cyber space! LOL!
Crafts N Things online ideas and this one
My Papertrey Wedding favor’s HERE (as well as the other PTI DT members :D) Fun stuff.
Pretty cool huh! Thanks for sharing my excitment 😀
Fill your life with sunshine
Jul 27, 2008 Author: mytime | Filed under: CardsHappy Sunday!
This is late. I have been so busy, its insane. The funny thing is my brain is just turning with ideas, I don’t know how I will sleep! LOL! I have so much I want to do but needed to get in some family time. I normally NEVER stamp on the weekends, but after my vacation was a little behind on the to do list. I am so NOT a procrastinator, so feeling a little behind puts me in a tailspin.
I accomplished a HUGE goal, and am just so flippin happy right now 😀 Still much to do, the the biggest obstacle is over. I am just so proud of myself! LOL! Proof that if you st your mind to it, you can do it! If only dieting were as easy! 😀
It feels SO great to accomplish something you set out to do. Big or small. Now time for MORE goals.
I am going to share a card that shows how I feel in the INSIDE 😀
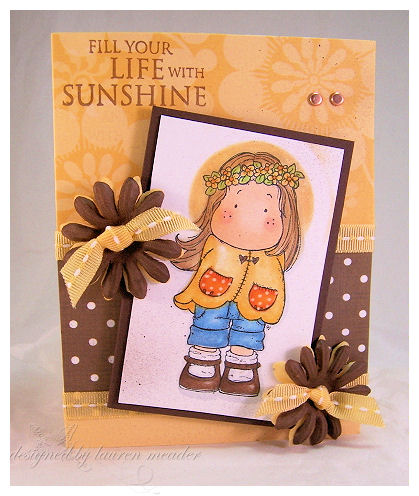
This card is SO bright & cheery it just makes me bounce with happiness!!
This is another one from my MEGA Magnolia stash 😀 (I get mine from Diana. Email her and ask to see the catalog here [email protected] Then good luck narrowing down your order!)
I adore this hippie girl. Total flower child. I had to use Lemon Tart. Lemon and chocolate are just lovely together, don’t you think?
I created a little sunshine behind her head (cute huh?). You can’t see but it shimmers in person. I added some BLING. I really was happy with my coloring on this too. LOVE my Copic markers. I was SO bummed I didn’t get to go to CHA! I would have LOVED to take the Copic Class. Maybe someday.
The paper is by Scenic Route and Autumn Leaves.
I THINK that sentiment is Hero Arts. There is more to it, but I just liked THAT particular part for this card. Isn’t it a great sentiment? We should all find some sort of bright spot in each day. I know I TRY to. Don’t get me wrong-I complain-alot! LOL! But I also like to TRY to be positive too. Key word TRY!
Hope this sunny card somehow brightens your day!
OK so that is it. Short post, because my family is going to KILL me if I don’t S-T-O-P!
SIDE NOTE:
I was so pleased that many of you enjoy the sketches. THANK YOU! I emailed the first few who responded to gather a few people to give you another view of their take on the sketches. So each week I will have several people to share another view of the sketch. If THAT doesn’t inspire you to join in, then I am hopeless! LOL!
OK be back tomorrow.
Thanks for checking in here 😀
My Etsy

Who I Designed For
Blogroll
- Alicia
- Alli Miles
- Ally Blankenship
- Amber
- Andi @ crafts on a whim
- Angel R
- Angie Z
- Anne Kranitz
- Becky O
- Bee
- Beth Silaka
- Bethany Paull
- Beverly Nash
- Bobbie
- Cambria
- Cammie
- Card of the Week
- Card Positioning System (CPS)
- Cards for Cancer
- Catherine Doucette
- Charmaine
- Cheryl Sims
- Chriss Rollins
- Christina
- Christine Ewing
- Christine Wooden
- Colleen Schaan
- Craft Critique
- Craft Gossip
- Crystal
- Dawn Easton
- Emily Giovanni
- Geny
- Holly
- Igne Groot
- Inspirational Craft Blogs
- Irene
- Jami Sibley
- Jeanne Streiff
- Jen del Muro
- Jeni Bond
- JenMarie
- Jenn Balcer
- Jenn Diercks
- Jenn O
- Jennifer E
- Jennifer Mick
- Jennifer Pereda
- Jennifer-Sweet Treat
- Joanne Basile
- Jodi Collins
- Julia Stainton
- Julie Masse
- Karen
- Kathryn Berthiaume
- Katie Cotton
- Kelley Holland
- Kendra
- Kim Scholfield
- Kris’s Color Stripes! Get inspired here
- Kristen Dubosque
- Kristin Eberline
- Kristine
- Laura @ Sunshine Stamper
- Laura Turnmire
- Laurie Schmidlin
- Lesa Rapp
- Linda Duke
- Linda-LSN
- Lindsey Botkin
- Lisa (lakind scs)
- Lisa Kind
- Lori Craig
- Maggie
- Mara Campbell
- Maria
- Maria Levine
- Mary
- MaryJo
- Melanie M
- Monique Hansen
- Moxie Fab World
- Pam Imholz
- PaperCrafts Connection
- Peppers and Pollywogs Kids party site
- Rebecca Grohall
- Rita
- Robyn
- Rose Ann
- Sarah Vrolyk
- Sharon Harnist
- Sharon Johnson
- Sharon Rivera (a chemisrty with paper)
- Sherrie
- Sophia Landry
- Storage Units, Ink, & More Blog
- Sue Berker
- Susan (Rainy)
- Tangii Crane
- Tracy
- Tricia Traxler
- Trudee
- Velta
- VivLyn
- Zena
MTME Pretty Palette Color Team
MTME Pretty Patterns Sketch Team
My Time Made Easy TM LLC
Shop till you drop!
Lauren Meader
About Me
Copyrighted material
Subscribe To My Blog
Pages
- About me
- Alexa’s Story!
- My Crafty Corner!
- My Time Made Easy™ LLC
- Our Make A Wish Trip to Disney!
- Resume/Publication List
Calendar
Archives
- August 2013
- July 2013
- June 2013
- May 2013
- April 2013
- March 2013
- February 2013
- January 2013
- December 2012
- November 2012
- October 2012
- September 2012
- August 2012
- July 2012
- June 2012
- May 2012
- April 2012
- March 2012
- February 2012
- January 2012
- December 2011
- November 2011
- October 2011
- September 2011
- August 2011
- July 2011
- June 2011
- May 2011
- April 2011
- March 2011
- February 2011
- January 2011
- December 2010
- November 2010
- October 2010
- September 2010
- August 2010
- July 2010
- June 2010
- May 2010
- April 2010
- March 2010
- February 2010
- January 2010
- December 2009
- November 2009
- October 2009
- September 2009
- August 2009
- July 2009
- June 2009
- May 2009
- April 2009
- March 2009
- February 2009
- January 2009
- December 2008
- November 2008
- October 2008
- September 2008
- August 2008
- July 2008
- June 2008
- May 2008
- April 2008
- March 2008
- February 2008
- January 2008
- December 2007
- November 2007
- October 2007
- September 2007
- August 2007
- July 2007
- June 2007
- May 2007
- April 2007
- March 2007
- January 2007
Categories
- About Me
- All That Scraps
- blogger challenge
- camera/photo play
- Cards
- Contests
- family stuff
- FOR SALE
- Home decor/3-D items
- How to FAKE it!
- Introduction
- JUGS Challenge
- JustRite Stampers
- Lizzie Anne Designs
- My family stuff
- My Stamping Space
- My Time Made Easy
- My Time To Color Challenge
- My Time to Create Challenge
- My Timeless Template Challenge
- My Timeless Templates
- Mytime Mail
- MYTIME MOVIE/VIDEOs
- Papertrey Newsletter
- Pink Cat Studio
- Pretty Palette Challenge
- Pretty Patterns Sketch
- Product Opinions and Must haves
- Recipe's
- Saturday Sketch
- Smilebox Creations
- Stampavie
- Tutorials
- Uncategorized
- videos
Most Popular
- Create your own Onesie Card Tutorial-and important NOTE! PLEASE READ (2529)
- Saturday Sketch-Boxed bag holder (2333)
- Going GREEN! Fancy Flower Flourish-Closure Video (1478)
- Fabulous Favorite - Giveaway! (1336)
- a Prayer Request (1232)
- QUICK-Easter Baskets from Nestabilities-PTI style-and blog challenge (1063)
- Teaser Sketch (999)
- February Release Giveway! (and a little peek) (996)
- Group Post and Rambling Rose Video Tutorial (985)
- GIVEAWAY! Who wants it all?! (895)
Recent Comments (RSS)
- 첫충사이트: 완전히 흥미로운 블로그 게시입니다. 저는
- sarah: Wow, Lauren, what a stunning
- hedie: خرید راهبند
- 야동: Love to read it,Waiting For
- 야동: This seller is in a
- 바카라사이트: 여기 처음 왔어요. 나는이 게시판을
- 야동티비: I was surfing the Internet
- 바카라사이트: 비슷한 주제에 대한 흥미로운 정보를
- 바카라사이트: "여기에 제공해 주신 귀중한 정보와
- 온라인홀덤: 유익한 웹 사이트를 게시하는 데
Copyright © 2007 - My Time, My Creations, My Stampendence - is proudly powered by WordPress
This blog has been Tweaked and Designed by Sara Williams