Archive for March 31st, 2008
Jack of all trades C.C. Designs peek #3
Mar 31, 2008 Author: mytime | Filed under: Cards, Home decor/3-D items, TutorialsOOPS! I posted this early by mistake! OH WELL!
Now is this set not adorable??? I believe he is called Jack of all trades! He is being released by C.C. Designs on the 4th.
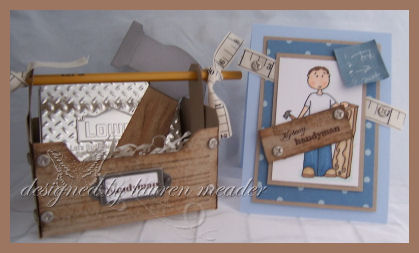
I so needed another cool guy set! I LOVE cutesy. You can’t have a cutesy handyman without a tool box right? I love making boxes and gift items-with cards to match. I had SO MUCH FUN making this tool box 😀 It was perfect with my handmade hammer accessory, and my cool Lowe’s gift card holder tin. I almost altered that, but liked it as is.
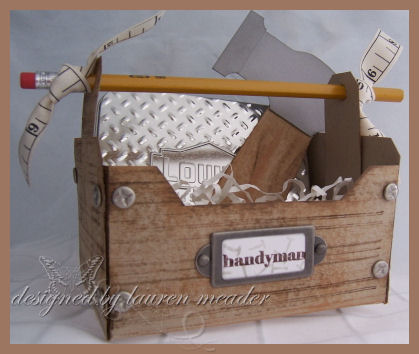
Here is a close up
How cute would it be for your kids to decorate one for their dad? They can make/buy what they think should go inside of it?
There is also a lined background coming out with this release and I used it on my toolbox. Can you see it? I stamped it in Walnut ink. I also used my Tim Holtz distress inks (my faves are linen, tea dye and walnut), and randomly rubbed them side to side on this for a woodgrain look. Added some screw style brads for that added “look” of a real tool box. I liked the pencil handle for a more handyman feel. The measuring tape ribbon was another cute touch.
I created the hammer just for FUN, as another thing to add to the box. It’s good size. Made with some punches. No biggie.
I made the tool box using a 8 1/2 X 11 sheet of Kraft cardstock.
Here is the template below-CLICK IT TO ENLARGE. Keep in mind Im NOT a pro making this-is just a little guideline to help you a bit, if you need a more visual idea. NOT a print and cut template!
Im no Paint Shop wizard. I recommend making any template with copy paper FIRST, that way you can work out any kink’s or question’s you may have. If you get it perfect first time, then you have a real template to reference in the future 😀
THIS IS FOR PERSONAL USE ONLY PLEASE 😀 No contest or publication submissions.
Directions:
1)Along the 11 inch side – score at 3 and 8. This will be the SIDE panels of your toolbox and will be LONGER than the front/back piece.
2) Along the 8 1/2 side – score at 2 and 6 1/2. This becomes the front of you tool box.
3) Trim along scored edges to center. In photo you will see a little extra left on either side of the 3 and 8 mark. That is so you have excess on your panels that adhere the ends together. Cut away the X’s-that is excess cardstock
4) Use tag corner punch on tool box sides. I also cut 2 pieces of cardstock 1 1/2 wide by 3 inches long. Use tag corner on those as well. Punch 2 holes large enough to fit a pencil through. Adhere to inner side panels-as seen in photo.
5) For front of box cut away from panel as you see fit. I just used my ruler and hobby blade for an even look.
Decorate as desired!
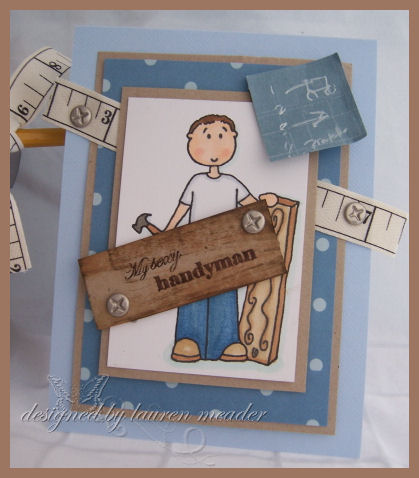
Now for the card 😀
The little square at the top is suppose to be like blueprints. I stamped the bkgd going across, then up and down for a grid paper appearance. I then scribbled 1 2 3 4-for like steps in the project. Scribbled a picture too.
Just a fun card.
Well I hope you likey!
Thanks for checkin in with me here.
Till tomorrow.
Lauren
Butterfly-C.C Designs set prieview #2
Mar 31, 2008 Author: mytime | Filed under: CardsOK another “quickie” post for the new peek. Tomorrow I have another EASY template, so you won’t want to miss that 😀
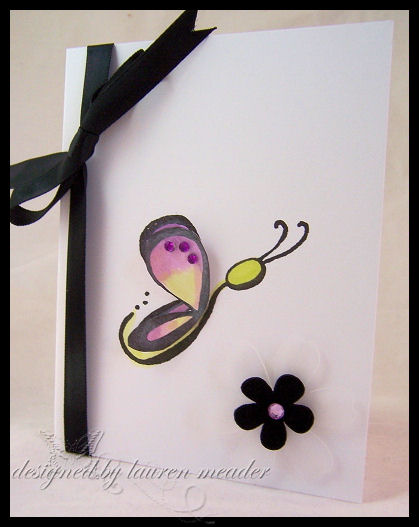
You know I LOVE butterflies. I have so many more ideas for this set, I hope I get time to implement them. Like I said my mojo was compromised in the creation of my first few samples, and time escaped me to make more “worthy” stuff. I did get BETTER, I promise!!! We all have off days, and working with a headache, well just isn’t fun.
This is another peek at the butterfly set from C.C. Designs. It will be released on the 4th. The DT made a bunch of samples! PRETTY!!!!
You can enter to win a free set —->HERE<—-
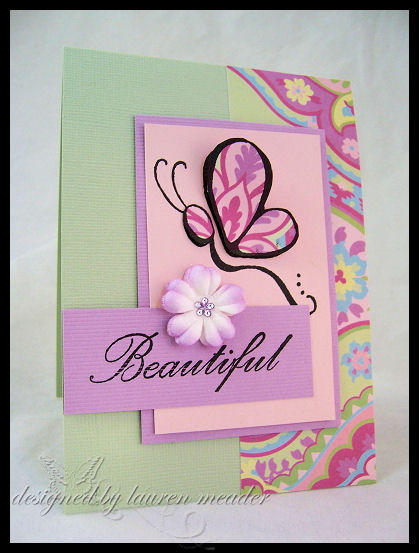
The top card is paper pieced again using a slab by K & Co.
This next card is done using twinkling H20’s. You can’t tell much by the photo, but the 3D wings are very shimmery.
There is a Maya Road clear flower, and a Maya Road velvet flower in the corner.
Again both of these are very SIMPLE. Hope you like the new set.
Till tomorrow.
MFT Sketch 24 is Dino-Mite.
Mar 31, 2008 Author: mytime | Filed under: CardsMonday-HMMMM. Not fond of Monday. It’s a very busy day for me here. I dread getting everyone up, fed, teeth brushed, lunches packed, breakfast eaten, and all dressed in time for the bus, and ensuring they have all they need. After 2 days “off”, its always tough getting back into it. PLUS I always get to my coffee when it’s cold on Monday. NO FUN!!! Then it’s onto chores-dust, vacuum, dishes, laundry, feed/walk the dog….the list goes on. I am sure I am NOT alone in this. Weekend’s are just better cause Jay is home to pitch in. Did I say I don’t like Monday’s? :C
This week, I have so many new releases to share WOW! The first week of the month is alway’s crazy for me here. I’m still asking WHERE did March go? I really can’t believe it is the LAST day. Here in New England not a sign of Spring.
GOOD NEWS! My body is adjusting to lack of caffiene and my headaches are no more 😀 My mojo on the other hand is still not feeling so well.
OK back to the card stuff-sorry, you know how I just ramble on & on.
This week I was determined to use an OLDIE-but GOODIE, amongst my new stuff.
If you didn’t know Cindy post’s a MFT Sketch challenge every week, on Monday. So I guess not EVERY aspect of Monday is awful right? You can find it by going into theMFT Forum on SCS. I rarely get to play, but I totally got it done this week! My take varied a little bit.
For you newbie stamper’s out there, as I have said before, the MORE sketches/challenges you participate in, the better you get!
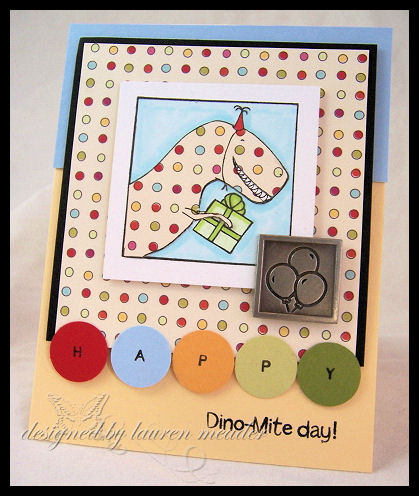
Doing this week’s challenge gave me chance to use my first MFT set called Dino-Mite .
I so love this set. I can never just color the dino-I have to cuttlebug him, or paper piece him. I don’t know WHY, I just do. I think its more fun that way.
Dawn’s card inspired my circles on the bottom of this card. I {heart} her! She is just so great.
I used my super AWESOME Simple Alphabet by PTI, to spell the “happy” on my circles. They are the 3/4 size. The paper that inspired the colors-is by Scenic Route (love it). The metal charm was a Target find.
I’m missing some ribbon on this! I didn’t want to OVER do it, so I left it off. Poor naked card :C
Anyway I hope you like it. It was a fun sketch. Pretty simple.
OK I’ll return later with the C.C. Designs peek, after my errands.
Till then!
My Etsy
My Time Made Easy © LLC
Who I Designed For
Blogroll
- Alicia
- Alli Miles
- Ally Blankenship
- Amber
- Andi @ crafts on a whim
- Angel R
- Angie Z
- Anne Kranitz
- Becky O
- Bee
- Beth Silaka
- Bethany Paull
- Beverly Nash
- Bobbie
- Cambria
- Cammie
- Card of the Week
- Card Positioning System (CPS)
- Cards for Cancer
- Catherine Doucette
- Charmaine
- Cheryl Sims
- Chriss Rollins
- Christina
- Christine Ewing
- Christine Wooden
- Colleen Schaan
- Craft Critique
- Craft Gossip
- Crystal
- Dawn Easton
- Emily Giovanni
- Geny
- Holly
- Igne Groot
- Inspirational Craft Blogs
- Irene
- Jami Sibley
- Jeanne Streiff
- Jen del Muro
- Jeni Bond
- JenMarie
- Jenn Balcer
- Jenn Diercks
- Jenn O
- Jennifer E
- Jennifer Mick
- Jennifer Pereda
- Jennifer-Sweet Treat
- Joanne Basile
- Jodi Collins
- Julia Stainton
- Julie Masse
- Karen
- Kathryn Berthiaume
- Katie Cotton
- Kelley Holland
- Kendra
- Kim Scholfield
- Kris’s Color Stripes! Get inspired here
- Kristen Dubosque
- Kristin Eberline
- Kristine
- Laura @ Sunshine Stamper
- Laura Turnmire
- Laurie Schmidlin
- Lesa Rapp
- Linda Duke
- Linda-LSN
- Lindsey Botkin
- Lisa (lakind scs)
- Lisa Kind
- Lori Craig
- Maggie
- Mara Campbell
- Maria
- Maria Levine
- Mary
- MaryJo
- Melanie M
- Monique Hansen
- Moxie Fab World
- Pam Imholz
- PaperCrafts Connection
- Peppers and Pollywogs Kids party site
- Rebecca Grohall
- Rita
- Robyn
- Rose Ann
- Sarah Vrolyk
- Sharon Harnist
- Sharon Johnson
- Sharon Rivera (a chemisrty with paper)
- Sherrie
- Sophia Landry
- Storage Units, Ink, & More Blog
- Sue Berker
- Susan (Rainy)
- Tangii Crane
- Tracy
- Tricia Traxler
- Trudee
- Velta
- VivLyn
- Zena
MTME Pretty Palette Color Team
MTME Pretty Patterns Sketch Team
My Time Made Easy TM LLC
Shop till you drop!
Lauren Meader
About Me
Copyrighted material
Subscribe To My Blog
Pages
- About me
- Alexa’s Story!
- My Crafty Corner!
- My Time Made Easy™ LLC
- Our Make A Wish Trip to Disney!
- Resume/Publication List
Calendar
Archives
- August 2013
- July 2013
- June 2013
- May 2013
- April 2013
- March 2013
- February 2013
- January 2013
- December 2012
- November 2012
- October 2012
- September 2012
- August 2012
- July 2012
- June 2012
- May 2012
- April 2012
- March 2012
- February 2012
- January 2012
- December 2011
- November 2011
- October 2011
- September 2011
- August 2011
- July 2011
- June 2011
- May 2011
- April 2011
- March 2011
- February 2011
- January 2011
- December 2010
- November 2010
- October 2010
- September 2010
- August 2010
- July 2010
- June 2010
- May 2010
- April 2010
- March 2010
- February 2010
- January 2010
- December 2009
- November 2009
- October 2009
- September 2009
- August 2009
- July 2009
- June 2009
- May 2009
- April 2009
- March 2009
- February 2009
- January 2009
- December 2008
- November 2008
- October 2008
- September 2008
- August 2008
- July 2008
- June 2008
- May 2008
- April 2008
- March 2008
- February 2008
- January 2008
- December 2007
- November 2007
- October 2007
- September 2007
- August 2007
- July 2007
- June 2007
- May 2007
- April 2007
- March 2007
- January 2007
Categories
- About Me
- All That Scraps
- blogger challenge
- camera/photo play
- Cards
- Contests
- family stuff
- FOR SALE
- Home decor/3-D items
- How to FAKE it!
- Introduction
- JUGS Challenge
- JustRite Stampers
- Lizzie Anne Designs
- My family stuff
- My Stamping Space
- My Time Made Easy
- My Time To Color Challenge
- My Time to Create Challenge
- My Timeless Template Challenge
- My Timeless Templates
- Mytime Mail
- MYTIME MOVIE/VIDEOs
- Papertrey Newsletter
- Pink Cat Studio
- Pretty Palette Challenge
- Pretty Patterns Sketch
- Product Opinions and Must haves
- Recipe's
- Saturday Sketch
- Smilebox Creations
- Stampavie
- Tutorials
- Uncategorized
- videos
Most Popular
- Create your own Onesie Card Tutorial-and important NOTE! PLEASE READ (2529)
- Saturday Sketch-Boxed bag holder (2333)
- Going GREEN! Fancy Flower Flourish-Closure Video (1478)
- Fabulous Favorite - Giveaway! (1336)
- a Prayer Request (1232)
- QUICK-Easter Baskets from Nestabilities-PTI style-and blog challenge (1063)
- Teaser Sketch (999)
- February Release Giveway! (and a little peek) (996)
- Group Post and Rambling Rose Video Tutorial (985)
- GIVEAWAY! Who wants it all?! (895)
Recent Comments (RSS)
- 첫충사이트: 완전히 흥미로운 블로그 게시입니다. 저는
- sarah: Wow, Lauren, what a stunning
- hedie: خرید راهبند
- 야동: Love to read it,Waiting For
- 야동: This seller is in a
- 바카라사이트: 여기 처음 왔어요. 나는이 게시판을
- 야동티비: I was surfing the Internet
- 바카라사이트: 비슷한 주제에 대한 흥미로운 정보를
- 바카라사이트: "여기에 제공해 주신 귀중한 정보와
- 온라인홀덤: 유익한 웹 사이트를 게시하는 데
