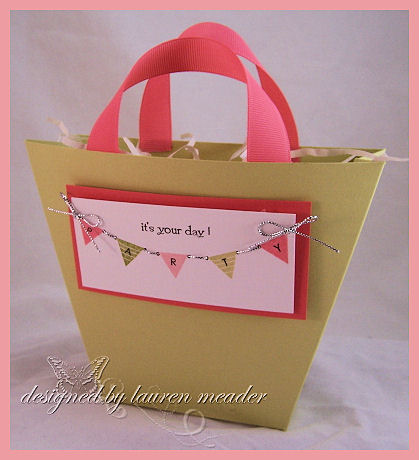
3-Papertrey Party Package PEEK!
Mar 12, 2008Are you enjoying the peeks of the upcoming Papertrey Ink Release?
I cannot tell you how excited I am to be able to share in Day 3 of the PARTY!!!
As you may have read, this month is a Celebration theme for the release. What better way to celebrate than an all occasion party themed card and matching gift bag!
You know how much I love co-ordinating cards/gifts. I especially love one’s that can be easily created.
Papertrey Party Package

When I saw the set’s to be released this month I was absolutely ecstatic! (OK I know that is every month, but seriously!)
I fell in love with It’s a Celebration by Candice Agulair.
The adorable pennants just screamed PERSONALIZE ME!
Then, when I saw the Simple Alphabet- I screeched! YEAH! This is just perfect. I have been dying for a quality mini clear alphabet set. This has upper & lower case letter’s, as well as number’s and punctuations. It will retail for only $15! A MUST have. It stamps like a DREAM! No squishy unclear letters. FINALLY!
Throw in the New! Color’s Sweet Blush & Berry Sorbet, and I can’t get any happier! Well I can ,once I saw the patterned paper………………..:D
OK enough rambling! Let’s get to the details!
Party Pocket
Now this one is FUN!!
Supplies for Pocket
Scor-Pal, 8 1/2 X 11 piece of Spring Moss card-stock, ruler, hobby blade, redline tape, and Berry Sorbet grosgrain.
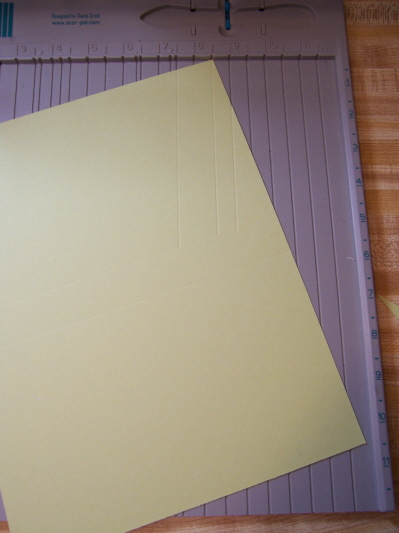
Directions for Pocket-click photos to enlarge
1) Take Spring Moss card-stock, and along the 11 inch side-score at 5, and 6 inches.

2) Turn paper to 8 1/2 inch side, and put top corner at the 8 1/2 inc mark, while bottom corner is at an angle, against the edge of the Scor-Pal (or 101/2 inch mark if you don’t have a Scor-Pal). Score at 7 1/2, 8 1/2, then 9 to the center score line for bottom. Turn card-stock and repeat step for all 4 corners.
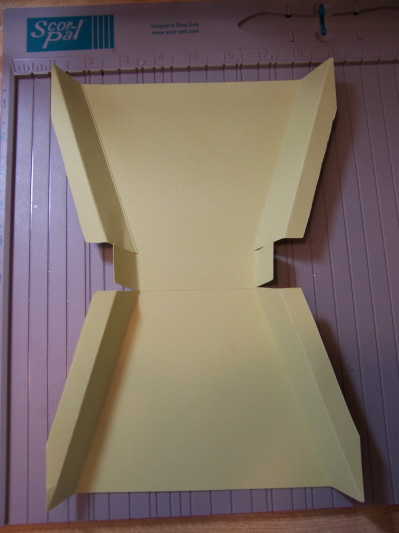
3) Cut excess cardstock away. Score bag edges. The wide end, folds in, and the little fold, folds out. Trim excess at bottom panel as well.
NOTE: PrintableTemplate below for quick reference-click and print.
 If you are unsure what to cut off get rid of the dark gray!
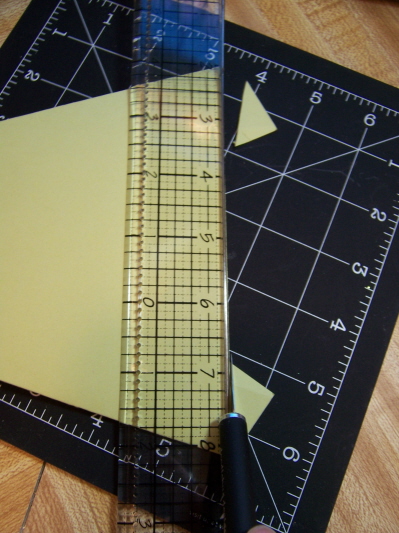
4) Fold the ends, into the center. Take a ruler, and hobby blade. Trim excess card-stock. This is so you get even sides.
5) Apply adhesive to sides. Tuck in bottom folds first. Then fold pocket in half to adhere end pieces evenly.


6) Cut 2 even pieces of wide Berry Sorbet Grosgrain, and apply red-line tape to bottoms. Adhere inside bag. Then attach your pennant to the front.
Supplies for Pennant
Banner stamp in plain and stripped, ink of choice (spring moss, berry sorbet, sweet blush, old olive, and black), 1/16 hole punch or paper piecer, Needle, silver cord (or color of choice)and glue dots.
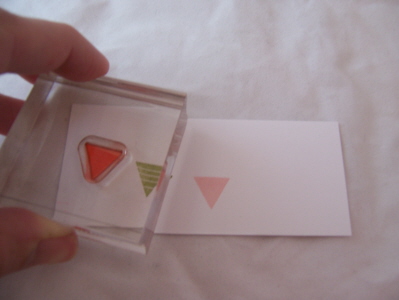
Directions for Pennant-click to enlarge
Figure out how many pennants you want for your banner. Choose your colors/and or word to be spelled.
1) Stamp the MIDDLE pennant FIRST! Then work your way from there out. This will ensure an even banner.
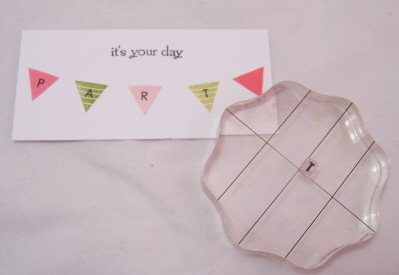
2) Use your Simple Alphabet, then stamp desired word. In our case P A R T Y.
3) Use a 1/16 hole punch, and punch holes on either side on the pennant corners. You may also use a paper piercer. You want your holes to remain small, so it appears that your pennants are hanging from the cord!
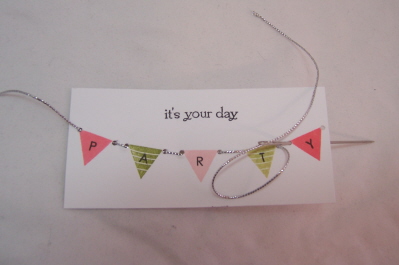
4) Thread your cord through the holes. Adhere to back.
5) Tie 2 separate bows using silver cord, then adhere to banner ends with glue dots.
6) Layer onto Berry Sorbet card-stock with dimensionals, then attach to the bag! DONE!
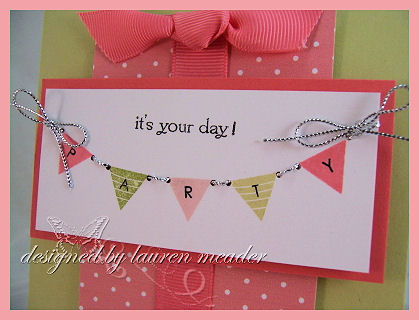
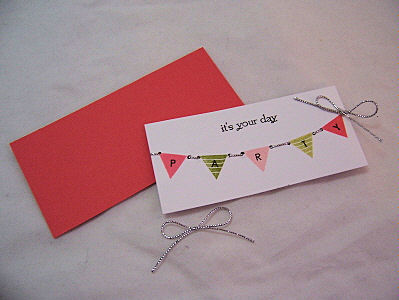
For the card!
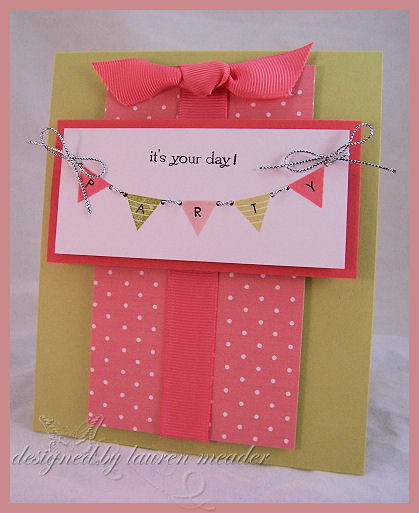
Finished size- 4 1/2 X 5 1/2. Card base made with Spring Moss card-stock.
I followed the directions above, and created the exact same banner for this card.
I used the Pretty Pink Polka Dots, from the Pink Patterns Collection. I thought it made the perfect “gift”, tied nicely with my Berry Sorbet grosgrain.
The patterned paper is YUMMY!!! You know how much I LOVE pink!!
Once the reveal hits, you will be able to see just how much I enjoyed using it. FYI-MORE tutorial’s to follow too!
I LOVE the color’s and assortment of design’s offered in the set. I especially LOVE the option of buying 6×6 or the 12 x 12. As you can see by the photo, the paper is a Perfect Match (HE!HE!HE!) to the ribbon and ink.
One question I have been asked is how does the Berry Sorbet’s paper/ink/ribbon compare to Stampin’ Up! Groovy Guava-since that was not a color compared on Nichole’s original post.
Here is a photo:
Top Layer on Left is Papertrey Ink Berry Sorbet.
Bottom Layer on Right is Stampin Up! Groovy Guava

As you can see they are VERY different. Guava being more orange in tone.
Well that is it for me! I am so honored to have been able to take part in this today! I really hope you enjoyed my part of the peek!
Make sure you check Nichole’s blog each day till the release! There will be sneak peeks, as well as an additional daily sample, provided by an assigned Senior Design Team member!
Lisa’s stamped twill-HERE
and
Pine’s scrap page-HERE
Till tomorrow!


My Etsy

Who I Designed For
Blogroll
- Alicia
- Alli Miles
- Ally Blankenship
- Amber
- Andi @ crafts on a whim
- Angel R
- Angie Z
- Anne Kranitz
- Becky O
- Bee
- Beth Silaka
- Bethany Paull
- Beverly Nash
- Bobbie
- Cambria
- Cammie
- Card of the Week
- Card Positioning System (CPS)
- Cards for Cancer
- Catherine Doucette
- Charmaine
- Cheryl Sims
- Chriss Rollins
- Christina
- Christine Ewing
- Christine Wooden
- Colleen Schaan
- Craft Critique
- Craft Gossip
- Crystal
- Dawn Easton
- Emily Giovanni
- Geny
- Holly
- Igne Groot
- Inspirational Craft Blogs
- Irene
- Jami Sibley
- Jeanne Streiff
- Jen del Muro
- Jeni Bond
- JenMarie
- Jenn Balcer
- Jenn Diercks
- Jenn O
- Jennifer E
- Jennifer Mick
- Jennifer Pereda
- Jennifer-Sweet Treat
- Joanne Basile
- Jodi Collins
- Julia Stainton
- Julie Masse
- Karen
- Kathryn Berthiaume
- Katie Cotton
- Kelley Holland
- Kendra
- Kim Scholfield
- Kris’s Color Stripes! Get inspired here
- Kristen Dubosque
- Kristin Eberline
- Kristine
- Laura @ Sunshine Stamper
- Laura Turnmire
- Laurie Schmidlin
- Lesa Rapp
- Linda Duke
- Linda-LSN
- Lindsey Botkin
- Lisa (lakind scs)
- Lisa Kind
- Lori Craig
- Maggie
- Mara Campbell
- Maria
- Maria Levine
- Mary
- MaryJo
- Melanie M
- Monique Hansen
- Moxie Fab World
- Pam Imholz
- PaperCrafts Connection
- Peppers and Pollywogs Kids party site
- Rebecca Grohall
- Rita
- Robyn
- Rose Ann
- Sarah Vrolyk
- Sharon Harnist
- Sharon Johnson
- Sharon Rivera (a chemisrty with paper)
- Sherrie
- Sophia Landry
- Storage Units, Ink, & More Blog
- Sue Berker
- Susan (Rainy)
- Tangii Crane
- Tracy
- Tricia Traxler
- Trudee
- Velta
- VivLyn
- Zena
MTME Pretty Palette Color Team
MTME Pretty Patterns Sketch Team
My Time Made Easy TM LLC
Shop till you drop!
Lauren Meader
About Me
Copyrighted material
Subscribe To My Blog
Pages
- About me
- Alexa’s Story!
- My Crafty Corner!
- My Time Made Easy™ LLC
- Our Make A Wish Trip to Disney!
- Resume/Publication List
Calendar
Archives
- August 2013
- July 2013
- June 2013
- May 2013
- April 2013
- March 2013
- February 2013
- January 2013
- December 2012
- November 2012
- October 2012
- September 2012
- August 2012
- July 2012
- June 2012
- May 2012
- April 2012
- March 2012
- February 2012
- January 2012
- December 2011
- November 2011
- October 2011
- September 2011
- August 2011
- July 2011
- June 2011
- May 2011
- April 2011
- March 2011
- February 2011
- January 2011
- December 2010
- November 2010
- October 2010
- September 2010
- August 2010
- July 2010
- June 2010
- May 2010
- April 2010
- March 2010
- February 2010
- January 2010
- December 2009
- November 2009
- October 2009
- September 2009
- August 2009
- July 2009
- June 2009
- May 2009
- April 2009
- March 2009
- February 2009
- January 2009
- December 2008
- November 2008
- October 2008
- September 2008
- August 2008
- July 2008
- June 2008
- May 2008
- April 2008
- March 2008
- February 2008
- January 2008
- December 2007
- November 2007
- October 2007
- September 2007
- August 2007
- July 2007
- June 2007
- May 2007
- April 2007
- March 2007
- January 2007
Categories
- About Me
- All That Scraps
- blogger challenge
- camera/photo play
- Cards
- Contests
- family stuff
- FOR SALE
- Home decor/3-D items
- How to FAKE it!
- Introduction
- JUGS Challenge
- JustRite Stampers
- Lizzie Anne Designs
- My family stuff
- My Stamping Space
- My Time Made Easy
- My Time To Color Challenge
- My Time to Create Challenge
- My Timeless Template Challenge
- My Timeless Templates
- Mytime Mail
- MYTIME MOVIE/VIDEOs
- Papertrey Newsletter
- Pink Cat Studio
- Pretty Palette Challenge
- Pretty Patterns Sketch
- Product Opinions and Must haves
- Recipe's
- Saturday Sketch
- Smilebox Creations
- Stampavie
- Tutorials
- Uncategorized
- videos
Most Popular
- Create your own Onesie Card Tutorial-and important NOTE! PLEASE READ (2529)
- Saturday Sketch-Boxed bag holder (2333)
- Going GREEN! Fancy Flower Flourish-Closure Video (1478)
- Fabulous Favorite - Giveaway! (1336)
- a Prayer Request (1232)
- QUICK-Easter Baskets from Nestabilities-PTI style-and blog challenge (1063)
- Teaser Sketch (999)
- February Release Giveway! (and a little peek) (996)
- Group Post and Rambling Rose Video Tutorial (985)
- GIVEAWAY! Who wants it all?! (895)
Recent Comments (RSS)
- 첫충사이트: 완전히 흥미로운 블로그 게시입니다. 저는
- sarah: Wow, Lauren, what a stunning
- hedie: خرید راهبند
- 야동: Love to read it,Waiting For
- 야동: This seller is in a
- 바카라사이트: 여기 처음 왔어요. 나는이 게시판을
- 야동티비: I was surfing the Internet
- 바카라사이트: 비슷한 주제에 대한 흥미로운 정보를
- 바카라사이트: "여기에 제공해 주신 귀중한 정보와
- 온라인홀덤: 유익한 웹 사이트를 게시하는 데
Copyright © 2007 - My Time, My Creations, My Stampendence - is proudly powered by WordPress
This blog has been Tweaked and Designed by Sara Williams
74 Responses for "3-Papertrey Party Package PEEK!"
You just made me want everything even more! I cannot wait! Great tutorial…thanks!
Oh how stunning is that. I cant wait to get…well everything! Thanks for a great project today!!
OMG – where do you come up with these ideas? Once again…awesome!!! I love your tutorial and your project on Nichole’s blog. Have a great day. Heather
Your projects amaze me. Your mind must never rest. Can’t wait to order these sets and paper.
Sue
Oh thank you, thank you for showing it next to guava!!!! I absolutely LOVE your project on Nicholes blog and also here, the colors are awesome together! And I love your little box/bag. I can see how you would get so inspired opening up a box with all these goodies!
How vibrant these colors are together. I love the patterns/tutorials! I can see several possibilities for a garden party or a sailing party. Very unique. Great variety for great projects. Thanks for all of the great ideas!
Love this….your work is always so Amazing.
This is just so lovely! Thank-you for sharing this project with us! Wow!
Wonderful! This is an adorable set! Gotta wipe the drool off my computer screen!
What wonderful projects Lauren !! Love em…
Absolutely beautiful Lauren! You have taken a very simple idea and made it SO elegant looking! Wonderful project and tutorial!!! Congrats on your Blossoms Wedding Favor in the April/May editiion of Papercrafts magazine, it is beautiful!!! As soon as I saw it, I had to case it and make a birthday card!! Beautifully done! I love your work and your blog:) Thanks for sharing all your creativity with us!!
Amazing, just amazing! You are one super talented lady.
My PTI list for the 15th just got a lot bigger!
Thank you for sharing, Karen U
OMG! I can’t wait for the release!! What a great card and gift bag, lauren! LOVE them! The colors are fabulous! Thank you for sharing.
Oh, Lauren, these are GREAT! I love the little bag, especially. The slanted sides are perfect! I will have to try this later on today! 🙂
Beautiful! I love love these new colors! I also must get a scorepal soon! Thanks for sharing!
You did such a wonderful job! Your creativity just amazes me because you are so good at coming up with out of the box creations. I feel like I get to stuck into just making cards. I have a Scor-Pal now so I need to try some templates. Do you have a suggestion as to where to start? Again, awesome work!
A fantastic tutorial Lauren, and I love what you made. That small alphabet is a must have for me! Thanks again.
OMG you are a smartie pants! This is too cute!!! I love the cord going through the flags ~ Brillant!!! These are must have sets, can’t wait for this release! 😉
I love this! You are a genius! I cant wait for the new stuff to be released. The paper looks gorgeous!Tfs!Kris
Love this Lauren! Such a clean look and it’s wonderful! You let your design and those paper and stamps show off for sure!!! Thanks for sharing the little bag…it’s adorable!
wow the bag and card are fantastic, love how you did the image, great.
love that pennant card! really cute with the silver cord. Can’t wait to see the new patterned paper in those new colors. did you use both 12×12 and 6×6 patterns or are they both the same patterns (just less paper)? sometimes the scale of the pattern changes so I was just wondering. also – as long as I’m wondering things….how close is the berry sorbet to cameo coral?
Lauren, this is awesome…..I just love it. I can’t wait for the release! I’m also going to purchase the new papers, ink and ribbon. Also, so looking forward to some more of your wonderful, fantastic ideas!
Thank you!
Martha Stewart watch out!!! You really are so creative and every project is one that I really want to make!!! How awesome and not to mention affordable are these!!! I JUST LOVE them!! Thank you so much for the tutorials!!!
You are AMAZING! Your work is jaw droppping!!
Way to go girl!
Jules
SO CUTE! I can’t wait to see all the pieces…I’m a party girl! And your wedding ensemble was awesome!!!! Thanks for sharing!
I luv, luv L-U-V it!! Banners just are the cutest thing and so versatile!
Great tutorial~
Thanks
Tracy *Ü*
Lauren, this card/bag set you made is amazing. I think you have more talent in your bum index finger than I have in my entire body! I made my 16 year old step daughter come look at these first thing this morning. She said “Oh I like that, it’s cute”. not huh, not grunt, not yup. Actual words!!! That might just be the biggest compliment evah! :)Can’t wait to see the rest of your stuff. -Molly B
Lauren, your projects are beautiful, and your tutorial is fabulous!
Lauren, this is PERFECTION! I love the colors, freshness–every single thing!
Wow, wow, wow!!! I can’t wait for the reveal! It makes me so excited every single month to see the PT releases…too fun! We get to have Christmas every month! hehe
Your projects are just awesome, you just amaze me….that head of yours is brimming with an endless flow of ideas….how wonderful! You are SO talented!!! 😀
Home run, Lauren! I love your silver stitching on the banner string – that is just inspired! So well done!
Very pretty Lauren – thank you for stepping up and helping out! 🙂
Awesome Lauren. Your wedding set on Nicoles blog is breathtaking. You continue to amaze all of us with your talent. Have a wonderful day.
Your projects are amazing, Lauren! And the tutorials are the best! Love the way you did the silver stitching! I want to get EVERYTHING!
This is darling, Lauren!! I love the pennants! Oh my, the possibilities! Especially like how you “strung” them up! Too clever!
Love, love love love love this!!!
Lovin this, and thanks for showing us the color difference!
This is a must have. Your did a wonderful job on this set. Thanks for the instructions and pattern. With the 11 yr. old girl I have, this will be perfect for any party she goes to.
Lauren, this is absolutely stunning. You have done a wonderful job yet again!
These are so cute! I agree with the comment above – Martha Stewart doesn’t stand a chance against your work!
These colors are so yummy – I love what you did with them and the Spring Moss looks great with the Berry Sorbet!
Can’t wait to try your adorable gift bag! Thanks for sharing the directions/template!
Great great projects Lauren!! The colors are so pretty and I love your pennant! Thanks for sharing a peek with us! 🙂
Oh my this is ever so cute, you keep this up and I am going to think I need a Scor pal! Love the little stamped flags, too cute!
I love it, its so sweet.
Thanks for sharing!!
Be sure to check out my blog for some candy!!
so very cute…..love the whole color combo too
OMG Lauren…how did one girl get so much talent!! You never cease to amaze me…Love the tutorial!!! You rock!!!!
this took my breathe away… you are remarkable, does your talent have no end …hopefully the answer is a big NO..
thanx for sharing
chriss x
an addicted atcer and paper hoarder
Wowzers! Awesome my friend, just awesome! Of course that ribbon is to die for. I’m thinking that pennant set will be a must on the wish list.
seriously cute!
Perfect bag..
I have had some reserves about the templates out there.
Looooove yours..GOrGeOUS!!!!!!!!!!!!! (sp?)
Am I blind or did I miss the template link for the cute little bag??
I would loooove to down load that..
Hugs, for famous little you!…:)
Kalila
So beautiful and wonderful ideas! Love your creations…and PTI!
Love the pocket! Thanks for sharing!!!
These birthday projects are beautiful and the colors are so striking! Thank you for sharing your tutorial.
Love the card and neat tote, with the fun shape! Lauren, I have a question about the printable template–it shows that one side is scored and cut differently than the other. I haven’t tried it yet, but in the pictures it looks like they’re the same. Thanks for all the wonderful ideas you share!
Darling bag shape!!! Your work is super genius!!! 🙂
Sincerely,
Laurie
God has given you a gift and the rest of us a curse! I want to buy so many products thanks to your incredible talent and all the fabulous stuff you demonstrate. TFS!! What in the world did you do with all this talent before you discovered stamping and papercrafting?
In answer to Sue- The ARE the same. That is just my poor abilities with the Paint program! LOL!
They are the same! Sorry 😀
Lauren
These samples are great. I’m going to have to try one of these cute boxes. Thanks for sharing.
Alicia Weiman
This is Gorgeous Lauren!!
I am so glad you are sharing…
all of these are so amazing..and beautiful!!
This is a very Grand ..card and gift bag set…Wow!!
I absolutely love these colors…sweet!!
Thanks for sharing the directions
Dee
Lauren your projects are just beautiful. LOVE the fun tutorial, thanks so much for sharing with all of us. Have a great weekend, Jennifer 🙂
My parents and brother are coming for dinner tomorrow. I’m thinking about making these GORGEOUS purse boxes for the “girls” place settings. My niece would totally get a kick out of it. She’s nine.
This just makes me want to buy everything this month from Papertrey. What a wonderful fun project. I hope you wont mind when I case this for my daughter’s 6th birthday party! I will give you full credit, promise, you absolutely deserve it!
Another fantastic project, you are incredibly talented!
Victoria
[…] My Papertrey Party Pocket set filled with 6 different Studio G stamp sets. […]
Thanks for the fun party box idea and the great instructions!
Donna
[…] 16, 2008 by mististamps4fun I first saw this tote on Lauren’s blog! She definitely has a talent for papercrafting! I made the base for this tote over Spring Break […]
Your blog is so pretty good and Wait to see the new patterned paper in those new colors. did you use both 12×12 and 6×6 patterns or are they both the same patterns (just less paper)? sometimes the scale of the pattern changes so I was just wondering. also – as long as I’m wondering things….how close is the berry sorbet to cameo coral?
we are just confused with the idea.
he let someone bit on that.
Thank you for your posting! I think your post is very helpful for me.
Hi there might I reference some of the insight here in this blog site if I reference you with a link back again on your site?
Intimately, the submit is definitely the very best on this precious topic. I concur with your conclusions and will eagerly look forward in your coming updates!
Major thankies for the blog.Much thanks again. Great.
Really enjoyed this post.Thanks Again. Great.
chengray key Very noticeably, localisateur d’apex propex just as with most turbo cars, the Supra Twin Turbo can be very temperature sensitive. 100Z
AUTOCOM CDP Pro für LKW ist ein PC-basiertes OBD II Diagnosegerät mit allen Funktionen für das Lesen und Löschen von Diagnose-Fehlercodes (DTC),Echtzeit-Daten,Aktivierungen von lyj
Leave a reply