QUICK-Easter Baskets from Nestabilities-PTI style-and blog challenge
Feb 15, 2008YEAH! The weekend is just about here. I am very excited about that.
So for the weekend-I KNOW Valentine’s day *just* ended, but in this industry, you have to be ready to move on to the next thing, and fast. Trust me, I have been in Easter mode for a month now, due to stamp releases! LOL! I felt like the stores had to catch up with us, for once.
Publications are currently taking Halloween ideas! EEEKKK! Needless to say “I” will not be submitting for that 😀
OK so moving on-lets think Easter! I am going to share my basket’s and Blogger’s Challenge
 Purple Posie’s-in the PTI gallery
Women of Life, and Just Hatched were used on all of these samples. Flowers are popped out using the Cuttlebug Flowers #1 die. Not an exact match, but I still love the look
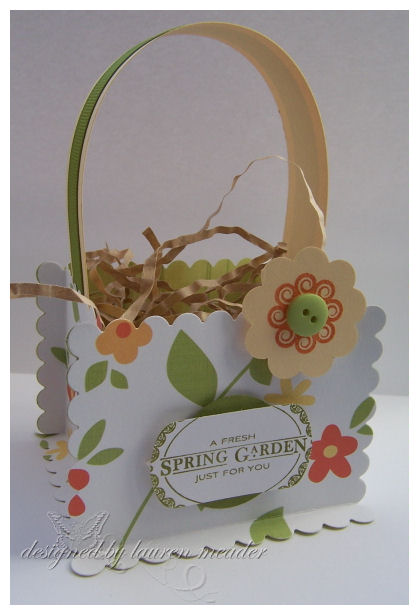 Spring Garden-using patterned paper by Scenic Route.
I made these QUICK and cute Easter Baskets JUST from my large rectangle nestability dies!
You can stamp your basket’s, or use patterned paper. If mass producing-obviously EMBOSSING the edges takes MORE time-so you don’t have to do that.
You could alter this design by using squares as well.
The tutorial/idea would be the same, just your measurement’s may change 😀
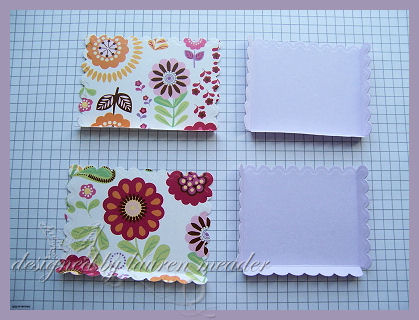
For the purpose of this tutorial I a making my basket in a pattern, and a solid, so you get the visual idea. It also did come very cool.
DIRECTIONS: Click thumbnails to enlarge
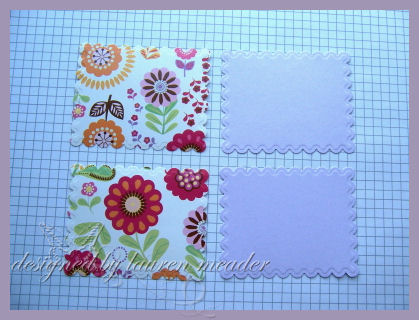
Step 1
Die cut your desired cardstock/paper. You will need 4. Two for the front/back, then two for the sides.
Step 2
I used my Scor-Pal, and scored in between the last scallop-edge to edge. See photo.
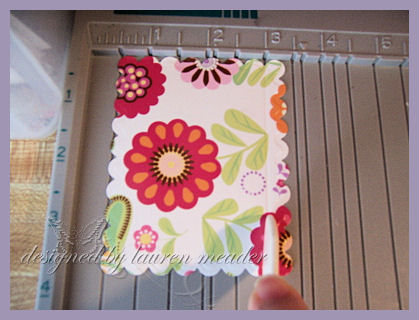
On the front/back piece ONLY score bottom. On side pieces score both side AND bottom.
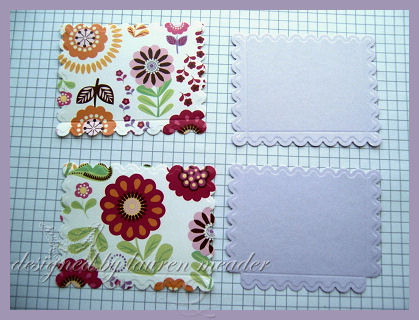 -On the side pieces snip the corner (triangle off)
Step 3
Bend all scored edges FORWARD. Apply adhesive to all bent edges.
Step 4
When putting together-line up the tops scallop to scallop.
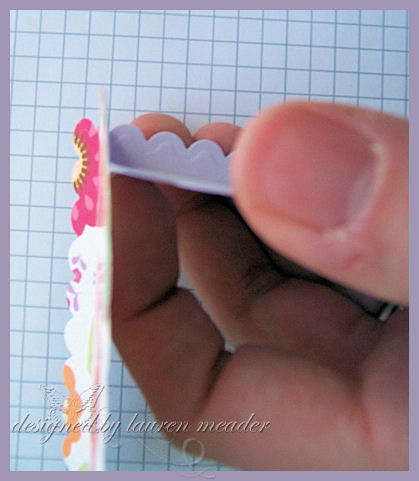
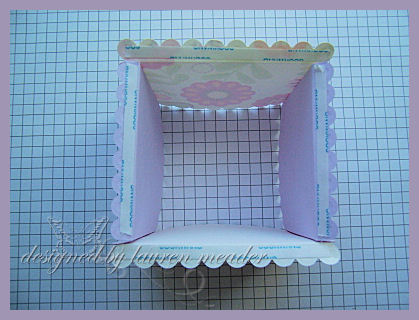 Photo of basket sides together, bottom of basket.
 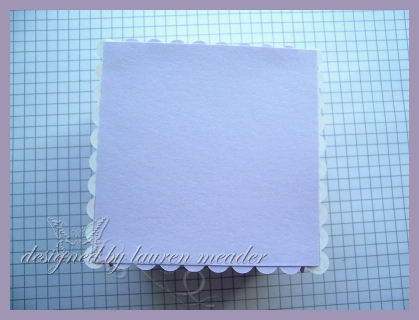 Bottom attached.
Using the LARGEST scallop rectangle, it turns out to be 3 1/2 inches squared, for your bottom piece. It becomes a square due to the way the sides were scored.
Step 5
Add a handle! Just cut about 1 1/4 inches wide by 11 inches long-end will fit perfect. Just put ends on the inside! They will also keep the sides from buckling in ![]()
Here is our finished basket!
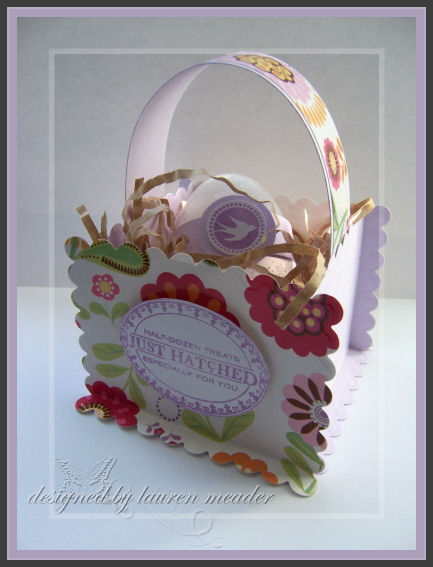 Flowering Treats Basket
Now here is a close-up of my CLEAR-glitter egg! I found it an our local $1 spot! 12 for a $1.
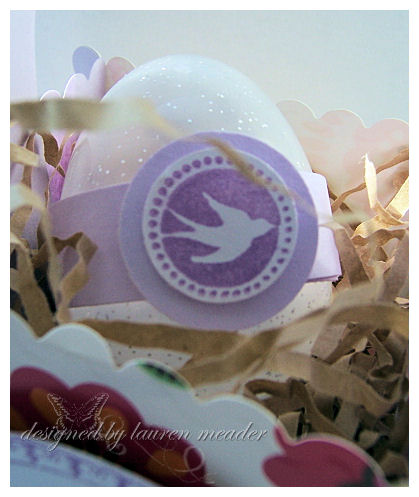
I added a band to it, and used the bird from Just Hatched. Its the perfect thing for hiding the closure, and easily slides on and off. That means REUSABLE!
Please ask any ?’s you may have here, and I will edit to answer.
If you give them a try-well send us a link here so we can all view YOUR version.
I am making these for ALL my kids classmates-which turns out to be 36 baskets! I am also giving myself plenty of time, since Easter is ABOUT 4 weeks away. That is only 9 baskets a week. I could do 3 every other day. Very workable.
NOW onto mu blogger’s challenge! WHEW! Are you still with me???
We had to use a layout on page 42 in the SU! Catalog for our card.
Well, while using this paper I decided a card to match my basket would be PERFECT!
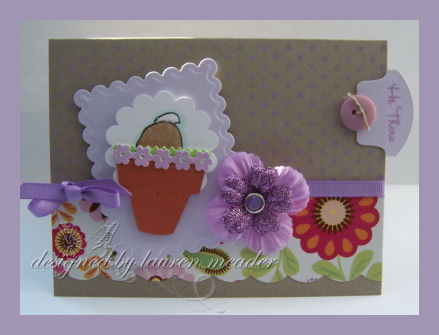
So, I used the bunny image from the New! Eggstra Special Easter, and stamped him-upside -down. I also used Essential Sentiments for the sentiment, and the Behind the Scenes bkgds as well.
I used my Sizzix flower pot die, and created a flower pot for his butt to pop out of. I got this concept after seeing some Whipper Snapper images at a store. I wanted the stamp-but figured I was better off making my own, with my already owned, cute set.
The bunny is flocked. So looks all soft and fuzzy in person.
I used some Doodlebug Paper frills for the pot flowers.
Added some Prima’s and DONE!
Well that is all for today! WOW! What a LONG post. I hope you enjoyed it though.
I would like for you to try out the baskets as PART of my Saturday Sketch.
Speaking of which I better get working on that 😀
Till tomorrow!

My Etsy

Who I Designed For
Blogroll
- Alicia
- Alli Miles
- Ally Blankenship
- Amber
- Andi @ crafts on a whim
- Angel R
- Angie Z
- Anne Kranitz
- Becky O
- Bee
- Beth Silaka
- Bethany Paull
- Beverly Nash
- Bobbie
- Cambria
- Cammie
- Card of the Week
- Card Positioning System (CPS)
- Cards for Cancer
- Catherine Doucette
- Charmaine
- Cheryl Sims
- Chriss Rollins
- Christina
- Christine Ewing
- Christine Wooden
- Colleen Schaan
- Craft Critique
- Craft Gossip
- Crystal
- Dawn Easton
- Emily Giovanni
- Geny
- Holly
- Igne Groot
- Inspirational Craft Blogs
- Irene
- Jami Sibley
- Jeanne Streiff
- Jen del Muro
- Jeni Bond
- JenMarie
- Jenn Balcer
- Jenn Diercks
- Jenn O
- Jennifer E
- Jennifer Mick
- Jennifer Pereda
- Jennifer-Sweet Treat
- Joanne Basile
- Jodi Collins
- Julia Stainton
- Julie Masse
- Karen
- Kathryn Berthiaume
- Katie Cotton
- Kelley Holland
- Kendra
- Kim Scholfield
- Kris’s Color Stripes! Get inspired here
- Kristen Dubosque
- Kristin Eberline
- Kristine
- Laura @ Sunshine Stamper
- Laura Turnmire
- Laurie Schmidlin
- Lesa Rapp
- Linda Duke
- Linda-LSN
- Lindsey Botkin
- Lisa (lakind scs)
- Lisa Kind
- Lori Craig
- Maggie
- Mara Campbell
- Maria
- Maria Levine
- Mary
- MaryJo
- Melanie M
- Monique Hansen
- Moxie Fab World
- Pam Imholz
- PaperCrafts Connection
- Peppers and Pollywogs Kids party site
- Rebecca Grohall
- Rita
- Robyn
- Rose Ann
- Sarah Vrolyk
- Sharon Harnist
- Sharon Johnson
- Sharon Rivera (a chemisrty with paper)
- Sherrie
- Sophia Landry
- Storage Units, Ink, & More Blog
- Sue Berker
- Susan (Rainy)
- Tangii Crane
- Tracy
- Tricia Traxler
- Trudee
- Velta
- VivLyn
- Zena
MTME Pretty Palette Color Team
MTME Pretty Patterns Sketch Team
My Time Made Easy TM LLC
Shop till you drop!
Lauren Meader
About Me
Copyrighted material
Subscribe To My Blog
Pages
- About me
- Alexa’s Story!
- My Crafty Corner!
- My Time Made Easy™ LLC
- Our Make A Wish Trip to Disney!
- Resume/Publication List
Calendar
Archives
- August 2013
- July 2013
- June 2013
- May 2013
- April 2013
- March 2013
- February 2013
- January 2013
- December 2012
- November 2012
- October 2012
- September 2012
- August 2012
- July 2012
- June 2012
- May 2012
- April 2012
- March 2012
- February 2012
- January 2012
- December 2011
- November 2011
- October 2011
- September 2011
- August 2011
- July 2011
- June 2011
- May 2011
- April 2011
- March 2011
- February 2011
- January 2011
- December 2010
- November 2010
- October 2010
- September 2010
- August 2010
- July 2010
- June 2010
- May 2010
- April 2010
- March 2010
- February 2010
- January 2010
- December 2009
- November 2009
- October 2009
- September 2009
- August 2009
- July 2009
- June 2009
- May 2009
- April 2009
- March 2009
- February 2009
- January 2009
- December 2008
- November 2008
- October 2008
- September 2008
- August 2008
- July 2008
- June 2008
- May 2008
- April 2008
- March 2008
- February 2008
- January 2008
- December 2007
- November 2007
- October 2007
- September 2007
- August 2007
- July 2007
- June 2007
- May 2007
- April 2007
- March 2007
- January 2007
Categories
- About Me
- All That Scraps
- blogger challenge
- camera/photo play
- Cards
- Contests
- family stuff
- FOR SALE
- Home decor/3-D items
- How to FAKE it!
- Introduction
- JUGS Challenge
- JustRite Stampers
- Lizzie Anne Designs
- My family stuff
- My Stamping Space
- My Time Made Easy
- My Time To Color Challenge
- My Time to Create Challenge
- My Timeless Template Challenge
- My Timeless Templates
- Mytime Mail
- MYTIME MOVIE/VIDEOs
- Papertrey Newsletter
- Pink Cat Studio
- Pretty Palette Challenge
- Pretty Patterns Sketch
- Product Opinions and Must haves
- Recipe's
- Saturday Sketch
- Smilebox Creations
- Stampavie
- Tutorials
- Uncategorized
- videos
Most Popular
- Create your own Onesie Card Tutorial-and important NOTE! PLEASE READ (2529)
- Saturday Sketch-Boxed bag holder (2333)
- Going GREEN! Fancy Flower Flourish-Closure Video (1478)
- Fabulous Favorite - Giveaway! (1336)
- a Prayer Request (1231)
- QUICK-Easter Baskets from Nestabilities-PTI style-and blog challenge (1063)
- Teaser Sketch (999)
- February Release Giveway! (and a little peek) (996)
- Group Post and Rambling Rose Video Tutorial (985)
- GIVEAWAY! Who wants it all?! (895)
Recent Comments (RSS)
- 야동: Love to read it,Waiting For
- 야동: This seller is in a
- 바카라사이트: 여기 처음 왔어요. 나는이 게시판을
- 야동티비: I was surfing the Internet
- 바카라사이트: 비슷한 주제에 대한 흥미로운 정보를
- 바카라사이트: "여기에 제공해 주신 귀중한 정보와
- 온라인홀덤: 유익한 웹 사이트를 게시하는 데
- 홀덤나라: 나는 당신의 블로그를 정말 좋아합니다.
- lisa: Technology, too, has left an
- 주소모음: 흠 !! 이 블로그는 정말
Copyright © 2007 - My Time, My Creations, My Stampendence - is proudly powered by WordPress
This blog has been Tweaked and Designed by Sara Williams
1,063 Responses for "QUICK-Easter Baskets from Nestabilities-PTI style-and blog challenge"
SOOOO CUTE! I love the little bunny! This is really adorable! {SMILES}
Very cute, Lauren…you are just SO clever! Love the bunnies bottom sitting up!
LOVE this! SUPER CUTE!!!
These baskets are just TOO stinkin’ adorable!!! Love ’em!! I like how on the second one you used the key tag punch for the label…I love the look!
That card is super cute too…Lauren Lauren Lauren…I could just sit and look at your creations ALLLLL day long!
[…] My Time, My Creations, My Stampendence wrote an interesting post today on QUICK-Easter Baskets from Nestabilities-PTI style-and blog challengeHere’s a quick excerptYEAH! The weekend is just about here. I am very excited about that. So for the weekend-I KNOW Valentine’s day *just* ended, but in this industry, you have to be ready to move on to the next thing, and fast. Trust me, I have been in Easter mode for a month … […]
Lauren, Love the Easter Basket. What a great idea. Thanks for the tutorial.
Totally cute! Thanks for sharing direction. I will have to try this! You rock!
Very cute Lauren! I love all this Easter & Springy stuff! Very fun and very, very inspiring!
Very cute card to match the baskets Lauren!
I’ve actually tried this myself – just playing with the nestabilities. I’ll have to read and study your instructions as your pictures make it look easier than it was for me. Gotta find the tip I didn’t have for myself. I must say tho – as everyone knows – that your creations are jusst the cutest things. Love the color plaette you chose. Just plain old awesome and cute! TFS!
I am really impressed with the adorable baskets you made. I am going to give it a try myself. Whew! I would not attempt a whole classroom project of them…well, I should try one before I say that with such certainty. You did a great job!
These are fantastic! TOOO CUTE! I don’t have those nestablities, YET! (I do have my first ones on their way soon, circles) but I may give this a try anyhow. Thanks for the tutorial as well, very cool!
The baskets are just adorable and very creative, so love the matching card and having the bunny facing down is too cute, pretty Easter projects!
You’re killing me with these adorable gift idea! You are truly a visionary. Thanks for all the great step by step visuals. Too bad I don’t need to make any Easter Baskets.
The card is adorable. Love the little bunny butt sticking up. Too funny!
LOVE your oh so creative baskets…fabulous use of those scalloped images…LOVE em!
Very very cute Lauren! I need those Nesties so I can make some too:)!
Oh Wow…..baskets are so adorable, which one is mine…hmmmm, and the card is FAB!
whoa! you are one great project making machine! love these updated rectangle baskets! look forward to getting my scor-pal so I can make cool stuff easier! thanks for sharing!
Your are a very creative person…thank you for sharing and thank you for the tutorial.
Get out, Lauren!! These are adorable. You are just so durn clever. And those little glittery eggs were a great find and perfect for the darling baskets.
Lauren these baskets are so adorable!! I always find your blog so inspiring!!
You are just too creative!!! Those baskets are adorable and your making 36 ~ for kids! You are too much!!! And the glitter eggs inside are perfect what a great find.
SHUT UP!! (I’ve always wanted to say that in a GOOD way!)
This is AMAZING!!!
Way cute! All of your ideas are amazing!
Love how this coordinates with your basket, Lauren!
those baskets are ADORABLE – what a fun idea – I will have to try it out for sure!
Adorable little baskets, perfect for Easter. Love the little bunny upside down on the card. So spring like.
You are UNBELIEVABLE!!! How do you do all this great stuff??!! AMAZING…I love it all! Thanks for showing us how…and YOU have a GREAT weekend!!! 😀
Beautiful cards and basket Lauren! Have a wonderful weekend & Thanks for sharing the directions. Jennifer 🙂
Hi Lauren,
What a beautiful project! I’m so glad I have the rectangle nestabilities…I’m going to try making my own basket. Just to clarify…the bottom is a fifth rectangle. Is that correct?
Thanks for sharing your creative energy!
Another wonderful creation!! Love these too and am going to have to try them out. Thanks for sharing your wonderful directions. These would be great little name place baskets for Easter dinner!!
Oh my gosh, Lauren!! You baskets are so awesome!! Thanks for the tutorial!! Love your card too!
These baskets are just adorable. I would love to try this but I don’t have rectangle, I have square. Do you think it would work with the squares? I’ll give it a shot. Stacy
Now that is the BOMB!! Awesome idea and tuturial! Thanks for sharing!
I love the bunny bottom card. So cute! And the baskets are amazing! I may have to give them a try.
Now you are the QUEEN Easter bunny……..how do you find time to do all this, you made me tired just reading what all you did for these gorgeous containers.
TFS
These are all fantastic Lauren!
Great Easter colors.. The Baskets are
so Beautiful!! (can’t wait to try) Thanks
for such a nice tutorial. Glitter egg is pretty.
The Bunny-butt card is adorable!!!
I am going to look for the flocking…I have
not tried this yet….is it easy???
Thanks again for all that you share!!
Dee
Well now… aren’t these just the cutest things. You never cease to amaze me. Thanks for sharing the tutorial with us too. Always so generous…
Those glitter eggs are cute too. Target right?
Gotta run… Have a wonderful day, night, weekend, whatever!
Hugs,
Renee
What an awesome idea!!! I have GOT to make some of these for my coworkers…they would really appreciate something like this for Easter. Once again You take the cake 🙂
I LOVE these baskets using the nestabilities – how very cute and fun! going to go try this out right now!
I just made one and here it is in case you’d like to take a peak! http://www.splitcoaststampers.com/gallery/photo/819380?nocache=1
this came out super!
too cute! i have been making these boxes with my punches for a while now {aren’t they fun!?!?!}, but i love that we have more options with the nestabilities. your creations are tdf!!! hugs-jd
PS-try the round ones, too!! (my fave) 🙂
http://www.splitcoaststampers.com/forums/showthread.php?t=322389
more hugs 🙂 -jd
Adorable! Thanks for the tutorial. I can’t wait to try them. 🙂
[…] Designer Challenge over at Splitcoast. It is made from scallop circle punches. You may have seen Lauren’s tutorial using Nestabilities the other day. I have just about all of the Nestabilities and when I saw her […]
[…] couple weeks ago, Lauren posted THIS TUTORIAL on how to make Easter baskets with Nestabilities {stinkin’ cute, huh!?!}. OMG!! I […]
this is so cool! I don’t have the nestibilites, but am going to try the idea with my cricut. I think there is a scallop square in there somewhere. Ü
Lauren, I have at last got round to making some baskets – just completed them for Easter – thank you
You can find them here http://www.splitcoaststampers.com/gallery/photo/855479?cat=500&ppuser=132530
Air jordan shoes are really great, with a variety of performance to meet people’s requirements . They help people in the movement to achieve better training results. There are cheaper air Jordan shoes in our website. Which do you like?
This is a really quality post.I find this information through Google. Great job.cheap jordan shoe
You provide enriched information for us,thank u.new jordan shoes
Good post.You did a good work,and offer more effective imformation for us!Thank you.coach handbags
I really like this website , and hope you will write more ,thanks a lot for your information.
fashion clothes
It is my pleasure to read this page,I look forward to reading more.
clothes stores
This article is informative and interesting,I enjoy reading it.clothing for sale
These information helps me consider some useful things, keep up the good work.juicy handbags
I have never read such a wonderful article and I am coming back tomorrow to continue reading.
These information helps me consider some useful things, keep up the good work.
I really like this website , and hope you will write more ,thanks a lot for your information.
The article is worth reading, I like it very much. I will keep your new articles.
Thank you for sharing information in the blog. You are really doing a good work. I personally like this blog and appreciates your efforts.
This is a great article. Wow, so many of these things I never thought of before. I read posts often, even on this side, and I think it is great, but I make time to leave a comment. From the outset, to ensure more comments.
It’s so lucky for me to find your blog! So shocking and great!
by wholesale jerseys
Nice piece. I’d be interested to find out more of your thoughts on this issue.
It’s so lucky for me to find your blog! So shocking and great! If you can offer rrs subscription service, i can track your blog easier!
Nice piece. I’d be interested to find out more of your thoughts on this issue.nike dunks
Nike Air Max
Good articles and thanks for sharing! But it’s so weird that you blog is in a mess through my new Firefox. I dont think it’s my explore problem? Beacuse it’s pretty normal when visit other websites.
new jordan shoes.
Although it never snows, I still feel cold!
A good book is a good friend.
it is interesting and informative article. This has been very helpful understanding a lot of things. I’m sure a lot of other people will agree with me.
Nike have provided a perfect shoes for sneaker lovers who have different activities aside from running. Check out the new Nike Air Max Abasi Safari comes in Dark green army. I personally love the dark green colorway. It also has a leather animal print. It comes with a dark green shoe laces cheap air max for men that perfect complements the whole shoes. It also has perforated lining on its opening.
Good articleGood article
Caterpillar Footwear is a leading working boots supplier in the world wide provides full collection of Caterpillar Boots and Cat Shoes,which are are well popular in working guys and urban ravers.
Caterpillar Footwear is a leading working boots supplier in the world wide provides full collection of Caterpillar Boots and Cat Shoes,which are are well popular in working guys and urban ravers.http://www.cat-boots.net/
Please post more of this. I largely enjoyed it.
First come, first served.
oh my!! i love you so much!!
Thank you so much.
Thank you so much.
I support you.
It’s really great article. I would like to appreciate your work and would like to tell to my friends.
Great article and your blog template is so cool. Is this template free or not? If so, Where could i download this template? if not, how much does it cost? Thanks a lot!
It’s really great article. I would like to appreciate your work and would like to tell to my friends.
http://www.myefox.com
Apad
Epad
No not to mention reliable the extinct left and legal stereo.
Thanks for sharing your article. I really enjoyed it. I put a link to my site to here so other people can read it. My readers have about the same interest. http://www.mylvedio.com
Lieutenant Martha Wiatt had definitely picked up uggs outlet her pace. She put some distance between herself and Davis. It wasn’t that hard. She did triathlons for fun. He worked behind a desk, though God knows, he certainly looked good for an accountant. ‘C’mon, c’mon. Keep up with me, Davis. Don’t fall back,’she called over her shoulder. Her boyfriend for the past year didn’t answer. Well, that settled any future debate about who was in better shape, who was the real athlete. Of course, Martha had known that all along. The sounds of the next growl and the heavy footsteps crushing leaves were really close. They were catching up to her. But what was cheap uggs catching up to her? ‘Martha! There’s something behind me. Oh God! Run! Run, MarthaV Davis shouted. ‘Get the hell out of here!’ Adrenaline charged through her. She stretched out her head in front of her body as if she were trying for an invisible uggs on sale
finish line. Her arms and legs moved in synch like efficient pistons. She leaned her weight forward, the way all good runners do. She heard screams behind her and looked back – but she couldn’t see Davis anymore. The screams were so terrifying mbt shoes that she almost stopped running. But Davis had been attacked by something vicious. Martha rationalized that she had to get help. cheap mbt shoes The police. Somebody.
February 15th, 2008 at 1:47 pm 7
Totally cute! Thanks for sharing this Easter treat. I will have to try this looks very satifying and relaxing will definately help get my cholesterol levels and mt stress levels down. Lovely.
oh my!! i love you so much!!
Thank you so much.
Handbags
http://www.hermes-handbags.tk
Handbags
Thank you so much.
I support you.
Diaper
http://www.louis-vuitton-diaper-bag.tk
Diaper
When I become rich, I will go to the timberland boots outlet to choose the timberland boots to wear.When I try these timberland boots on, I will become fashion.
Nice work! It looks that you are highly expert New York Yankees Hats blogger. Your post is an excellent example of why I keep coming back to read your excellent new era caps quality content that is forever updated. That was exactly what I needed to read today.
Birkenstock hot sale for a wide selection of Birkenstock Womens sandals and foot supports,100% quality birkenstock slippers sale online.High quality Birkenstock Men sandals, Discount Birkenstocks Sandal for Men, up to 80% off, no tax with free shipping!
knee leopard-print ankle boots etc hot styles, want to have the same dye-in-the-wood gas BaoYou stars are be sure not to miss oh.
Polyurethane can be noticed inside the maximum air in the heel end. Rubber outsole provides excellent chip traction and durability. A lot more importantly, the Nike Air Max men& shoes with good breathability. Want to re-light your inspiration? Nike Air Max 90, are you sure they are who you make your life calm and peaceful excellent companion.The reason why Nike Air Max 95 Womens Shoes out stand the Shoes is that cheap air max shoes 90 Womens Shoes are unique. The exterior of Nike Womens Shoes has a special flavor: white background with black squares decorated on it, as well as the black part highlighted by those white little squares. The white and black colors always are the leading characters in the fashion world, and they will in no way be out of date.
The content of your blog is exactly what I needed, I like your blog, I sincerely hope that your blog a rapid increase in traffic density, which help promote your blog and we hope that your blog is being updated and placed can always be richer and more colorful.
Great blog article about this topic, I have been lately in your blog once or twice now. I just wanted to say hi and show my thanks for the information provided.
No Doubt! your blog contain very useful information.
Hola,Ha hecho un trabajo muy bueno. Hay muchas personas en busca de eso ahora van a encontrar suficientes fuentes por tus consejos.espera para obtener más consejos acerca de que
we are just confused with the idea.
he let someone bit on that.
Australia is a nice place to live
This is a very fine article, I think there will be countless people like it, of course, I was one of the them. I feel this article increase my awareness
http://www.raybansonsale.net/ cheap ray ban sunglasses
What a great site. Im very glad Im here. Many interesting topics, lots of reading. Nice weblog, just looking close to some blogs, seems a fairly nice platform youre using.sunglasses for cheap
There was a story about this in our newspaper. People come to steal other peoples content from blogs and then publish on their own sites.cheap oakley sunglasses for sa
Thanks in advance for your help
The article is worth reading, I like it very much. I will keep your new articles.
Thanks for your insight for the great posting. I am glad I have taken the time to see this.
I don’t suppose I have read anything like this before. So nice to find somebody with some original thoughts on this subject
A person who publishes a book appears willfully in public eye with his pants down.
It’s really great post..When you visit our MAC cosmetics website,you will find MAC eyeshadow and other full array of fashionable delicate,and since we have built a longtime and good relationship.we feel delighted to bring you MAC cosmetics wholesale at most reasonable prices.MAC cosmetics sale online more info.
New Era 59fifty fitted hats and custom baseball hats! NFL NBA MLB NHL College team hats. Your hat store for New York Yankees Hatsmade by new era caps and Baseball Caps
Amazing talent. I find her designs to be extraordinary!I agree this point. Christian Louboutin Boots
Abercrombie Fitch brand endorsement by the famous David Beckham, it’s the most popular youth brands. Abercrombie Fitch UK founded in 1892 in New York, has been a hundred years of history. Abercrombie Fitch outlet high style, high quality and fresh style, from the United States has continued to spill over into the new global fashion new indicators.Abercrombie UK for young people to bring the perfect combination of quality and cutting-edge luxury goods being reckless enthusiasm for young people to decorate the living. Abercrombie outlet clothing will always be in the simple style to make fun of creative design, with music, sports clothing to express the meaning. Abercrombie Fitch ideas are changing almost on a quarterly basis.Do you want to make a change?
This is a good essay.coach purses
Spring 2011 release, continuation 2010 holiday series of style restoring ancient ways of qiu dong. replica Sunglasses Designer Marc Jacobs (Marc Jacobs) the total brought 17 new LOOK, the colour of profusion the romantic flavor with spring flowers, through the full story elements ornamental design, beautiful – stereoscopic printing, coach purses on saleeven perspective LV letters printing also appeared in the a-line coat with A plastic transparent.
gucci outlet
gucci outlet online
gucci store online
dunks
dunk sb
nike sb on sale
replica oakley sunglasses
oakley replica sunglasses
replica oakley
coach outlet online
coach outlet store online
Thanks for the information & really it is very useful information information in updated SEO market & again thanks for sharing such a informative post.
Your article looks great!Thanks for you sharing. I love it.
That’s nice!I like it.Thanks for you sharing.
I read with great interest.Your article looks great!
Thanks for sharing this nice post.I will keep your article in my idea. usbonlinegroup
Louboutin hallmark glossy red feet provide an instantaneous stamps
christian louboutin paola 100 ankle boots favor quality. The look ethos to be able to Louboutin footwear and each distinctive style christian louboutin platform pump black cl8010 christian louboutin unequalled high quality as well christian louboutin platform pump
an innate sensuality. From imposing pushes filled Pumps, Louboutin is the go-to brand for christian louboutin platform
description of the incredible pumps as well as accessories.
Christian Louboutin Boots
insanity workout dvd
nfl jerseys
coach purses
Biggest sale, limited time! GetMonster Energy Hats, New Era Hats for your favorite team at best dc shoes Hats New Era Hats online store, we offer various hats including Monster Energy Cap, Snapback Hats , bape hats at incredibly low prices.
hey buddy,this is one of the best posts that I’ve ever seen; you may include some more ideas in the same theme. I’m still waiting for some interesting thoughts from your side in your next post
Kamagra |
Kamagra Oral Jelly
I wonder how you got so good. This is really a fascinating blog, lots of stuff that I can get into. One thing I just want to say is that your Blog is so perfect!
Generic Viagra |
Cheap Generic Viagra |
wish you can write better and i like it so much
Thanks for the marvelous posting! I genuinely enjoyed reading it, you can be a great author.
mac eye shadow wholesale”
mac eye shadow wholesale”
SEO Packages
This information is useful to us.That is very kind of you to write this share for us, thanks a lot.
I like very much
At our website you can easily find Gucci shoes at discounted.Gucci outlet sale you Gucci shoes,Cheap Gucci Sneakers,Free Shipping!Buy Discount Gucci Sneakers Now!
Thanks for your article, I enjoy it very much!Have a look at the cheap but high quality jeans .
I like your website, your article written so well, you are welcome to my Christian louboutin UK, hope that you also can like.
Hey, Great post **
Thanks for sharing with us.Welcome to our abercrombie & fitch online store to choose the Abercrombie and Fitch Mens Polos to wear.You may love this style shirts.
There has certainly been some major developments in how the world. I see the differnet readers have a wide variety of views.
buy ultracet online
Love taking photos. Love everything about it. I love to talk about it. I love to dream about it. mac cosmeticsI see the wonderful inspiring photos online and wish I can be the one taking it. yeah, that’s my ultimate dream.
From the tons of comments in your articles, I guess i am not the only real only one possessing all the enjoyment here! Thank you!
These are all great comments here. Very cool article.
Ray Ban 2132
Wow, Great post,Nice work, I would like to read your blog every day Thanks
i‘m very pleased with your work.
this is really a nice place.
thank you.
クレジットカード現金化
Hermes Birkin Handbags
Hermes Kelly Handbags
Hermes So Black Handbags
Article is very interesting,thanks for your sharing. I will necessarily add it in the selected works and I will visit this site.welcome to my site:
Men’s North Face Jackets
Women’s North Face Jackets
Men’s North Face Shoes
Thank u share it for me.I like it so much.There are links about shoes and so on.If you have time,please to see it.Thanks!
Christian Louboutin Shoes
2010 spring women shoes
Manolo Blahnik shoes
you may like the cheap mac makeup, it sounds well. they like to wholesale mac cosmetics here. discount mac makeup at mac cosmetics outlet online.
This is such a great resource that you are providing and you give it away for free. I love seeing websites that understand the value of providing a quality resource
android tablet pc
p class=”STYLE1″>Attention for Casino owenersLeading Baccarat chips supplier
Great article and your blog template is so cool. Is this template free or not?
Tory Burch Flip Flops
This was really an interesting subject, I am very lucky to be able to come to your weblog and I will bookmark this web page in order that I could come back another time.This was really an interesting subject, I am very lucky to be able to come to your weblog and I will bookmark this web page in order that I could come back another time. Welcome to purchase mymoncler outlet .
iphone 5
rumors have captured the minds and hearts of all of us…the best android
Troubles usually exist with shopping at normal shops for the nicest designer women’s shoes and purses. Christian Louboutin Stores The problems which are the worst appear to occur when we’re fighting other shoppers to obtain the very best deals. These sales are swarming with individuals who are also attempting to save some cash using the appealing sale costs. It soon turns into a much less than civilized battle of the fittest as shoe boxes are snatched and tossed about by worried shoppers who want absolutely nothing much more than to obtain their hands on that last pair of Louboutin Shoe or that wonderful Jimmy Choo bag.You know what I mean when you have ever gone along to an end-of season sales event or holiday sales. Christian Louboutin 2011 In these scenarios, even buddies will rapidly fight with one another over the final pair of shoes within the style that they both desire.
The beauty of Tory Burch Shoes lets ladies crazy in the world. They are all stylish,fashion and amazing. There’s nothing more chic and comfortable than the cheap Tory Burch. If you are a popular woman, you should not miss them. High discounts and Free Shipping are offered in our tory burch outlat now.
It was a beneficial workout for me to go through your webpage. Keep up the good work. I hope you will keep updating your content.Thanks for sharing.We also welcome you to visit my site.ghd uk online shop.Your website impress me a lot,hope our ghd outletwill also bring you a lot of enjoyments.We offer free shipping here,to ghd uk,ghd australia,to all over the world.Enjoy yourself at our site.
http://www.ghdoutletsale.org/
o comment; however, doing so decreases the likelihood of your comment being flagged as spam. E-mail addresses will never be made public or seen by anyone but the site writers, who may use them to communicate with commentors.
Oakley Sport Sunglasses or sun glasses are a form of protective eyewear crated? mainly to prevent bright sunlight and high-energy visible light from hurting or discomforting people’s eyes. They also help to get rid of harmful UV rays from the shining sun. They can sometimes also work as a visual aid, as variously termed spectacles or glasses exist, featuring lenses that are colored, polarized or darkened. In the early 20th century they were also known as sun cheaters because cheaters is an American slang term for glasses. Many people find direct sunlight too bright for comfort during outdoor activities. Healthcare professionals recommend eye protection whenever the sun comes out to protect the eyes from ultraviolet radiation (UV) and blue light, which can cause several serious eye problems. cheap oakley sunglasses have long been associated with celebrities and film actors primarily from a desire to mask their identity. Since the 1940s sunglasses have been popular as a fashion accessory, especially on the beach.
This was really an interesting subject, I am very lucky to be able to come to your weblog and I will bookmark this web page in order that I could come back another time.This was really an interesting subject, I am very lucky to be able to come to your weblog and I will bookmark this web page in order that I could come back another time. Welcome to vist my moncler outlet.
I am so fascinated and I believe you are marvelous at your work. Keep writing.
very great site you have created. I enjoyed reading this posting. I did want to issue a remark to tell you that the design of this site is very aesthetically pleasing. I used to be a graphic designer, now I am a copy editor for a marketing firm.
Article is very interesting,thanks for your sharing. I will necessarily add it in the selected works and I will visit this site.welcome to my site:
Links of London jewelry
Pandora jewelry
Cartier jewelry
Thanks!
I love to read this type of stuff. Good and attractive information I take from it..Thank you for posting such a nice article.
Thank you for sharing This knowledge.Excellently written article, if only all bloggers offered the same level of content as you, the internet would be a much better place. Please keep it up!
Great page you have in here. thanks for sharing truly an awesome page
Jual Baju Murah
i like your article very much.thanks for you share with us
Pretty good post. I just stumbled upon your blog and wanted to say that I have really enjoyed reading your blog posts. Any way I’ll be subscribing to your
feed and I hope you post again soon.
good article,i like very much
I would like to thank You for this good article and please allow me to have the opportunity to express my satisfaction with HostGator web hosting
very nice post, i certainly love this website, keep on it.
I really like this website , and hope you will write more ,thanks a lot for your information.
http://www.nfljerseysmalls.com
These are all great comments here. Very cool article.
Gucci Sukey
A great post but How to select a cool handbags. we sell cheap handbags We are the best store provided various cheap designer handbags but only a little white to make miu miu handbags online .buy miu miu handbags
Summer is coming ,mbt shoes win more customers trust, if you intend to travel abroad with your mother, one important thing you need to do is choose a pair of sneakers, but discount mbt shoes should be your best choice , buy a suitable mbt fitness shoes will make your travel easier and enjoyable. mbt fitness shoes help to strengthen the core muscles of gray, making it more active and shape. Also, it helps to return to shape, while the normal timetable. mbt shoes gray lead to increased muscle fitness activities, the blood circulation has also increased.yves saint laurent black hollowed sandals
Thanks for your blog. I’m just launching Pandora Charms and wonder if I should also register the same domain with hyphens between the words. Should one have a permanent re-direct to the other?
This is a great article. I hadn’t known any of this stuff baout Phish. You should do this about more artists!
Magic!of cause beautiful
Not just you but anyone. Does anyone actually have a starting point. People are born, but develop for nine months befor that. before the sperm and egg combine, which each holds half the needed materiel and DNA to start human life, there was a romantic relationship, a quick fling or a tragic crime, that caused the costs of the sperm and egg to come together. So if there is a history that exists that has resulted in you existing, can there be a pinpointed point within that history where you can say was your begaining.
I am very happy to read your blog.Thank you for sharing this article.It is great! Thanks for sharing this nice post.I will keep your article in my idea.
Great tips, I would like to join your blog anyway,
There are may person searching about that now they will find enough resources by your post
thank you, you are so beautiful.
wholesale cheap satellite receiver.
http://www.crown-sat-receiver.com
I really like this website , and hope you will write more ,thanks a lot for your information.
http://www.nfljerseysmalls.com
Nice one, there is actually some good facts on this blog some of my friends may find this worthwhile, will send a link, thanks.miu miu crossbody bags
Great loved it, will be waiting for your future posts
Often paying over $300 to get a set of Jordans basketball shoes can get old truly rapidly, regardless how fantastic these sneakers are or how much you like them. Jordan ShoesSo looking to buy low cost Jordans Shoes can soon turn into a necessity for that avid Jordan fan. Nike Air ShoesIn the event the forms of shoes you are interested in can be a exclusive edition or a very rare type of Nike air jordan sneaker then you definitely know you will have to pay way more than retail value for them. These footwear could be purchases on eBay from individual sellers and you will frequently get a good deal. Just be sure you don’t get inside a bidding battle with somebody and end up overpaying for one thing just because you got trapped in the thrill of the chase.Even so, Nike Air ShoeseBay or eBay partner shops may be wonderful places to find low cost Jordans at great rates. Just make sure that low-cost jordan shoe is indeed a and authentic Jordans basketball sneaker.
[url=http://www.shopralphlaurenoutlet.com/]ralph lauren outlet[/url]
[url=http://www.juicycoutureoutletusa.com/]juicy couture outlet[/url]
[url=http://www.kobevilebron8.com/]lebron viii[/url]
High end Footwear of christian louboutin sale should be famous for becoming traditional and also healthy pertaining to day time costume. High-class Footwear connected with christian louboutin uk should be recognized for getting formal in addition to match with regard to day time dress. Their shoes set comes with bows, duck down, patent leather-based, bejeweled straps, chiffon, pony head of hair, silk, suede, diamond jewelry, along with elaborate highlites.Christian Louboutin Shoes keeps the certification deal along with Patti LaBelle, who’s contracted to put on her distinct shoes and boots for the duration of the woman events and so on reddish colored rug looks.
Cheap Gucci Shoes is an iconic italian brand of fashion and clothing accessories. Cheap Gucci Shoes for Mens has become one of the most Cheap Gucci Shoes for Womens infamous and desirable luxury fashion brands in the world. the gucci brand has a long history and enjoys a large market all over the Real gucci shoes for cheap innovation aesthetic to the most classic design of bags by a new fashion approach.
thnk you for sahring
very nice blog
thank you for ur good article,very interesting and understanding.
very interesting blog,I will visite in any time.
thank you for ur writing this topic,I will continue to sharing more article in the furture.
Wow,Very nice bolg, I pleasure to visite your website .
it feels good tralph lauren outleto find this kind of stuff while surfing on net… keep posting i liked it verralph lauren polo shirtsy much
This is such a great resource that you are providing and you give it away for free. I would like to bookmark this website. Many thanks. Louis Vuitton bags oulet
Iam glad l came across this post, very educating. I will subscribe to your rss for future update.puma shoes outlet
Fantastic, the post is really the sweetest on this worthwhile topic. I fit in with your conclusions and will eagerly look forward to your approaching updates. Saying thanks will not just be sufficient, for the exceptional clarity in your writing. I will immediately grab your rss feed to stay privy of any updates.
In this modern and fashionable society, people are pursuing for [url=http://www.thomasabosalesuk.com/]thomas sabo[/url] cool, unique, stylish and innovative. Whether it is [url=http://www.thomasabosalesuk.com/]thomas sabo uk[/url] or fashion accessories all means a lot for modern society of today. Same is the case with trendy looking [url=http://www.thomasabosalesuk.com/charms-c-1.html]thomas sabo charms[/url]. When these are [url=http://www.thomasabosalesuk.com/bracelets-c-2.html]thomas sabo bracelet[/url], the excitement just gets doubled. Most chic looking [url=http://www.thomasabosalesuk.com/]thomas sabo jewellery[/url] are in fashion now. These are one of the favorite fashion accessories for men and women long time ago. If you have not yet tried [url=http://www.thomasabosalesuk.com/]thomas sabo sale[/url], it’s time to own one and feel the difference it can make to your personality.
Recently established in 2006,is the website of a company that has been in business in the Chinese market for about 3 years.We are hats manufacture in china, Our company specialize in supplying new era hats, cheap new era hats,dc shoes hats,red bull hats,famous hats,jordan hats,etc. We pay attention to our products quality and service.
technologies as well as comfy which would be also employed in varies types of sporting activities.
Your article is usefull for me.It is a good article.We are Canada Goose Parka online store,we will offer you the cheap Canada Goose Parka but top quality.
Whatever you see – any good results – are all from the pressure.
Also, I must appreciate the concept you have chosen. It is really interesting. This is really great read for me. Hope to see more article. Thanks.
I like this article.
Easily, the post is in reality the sweetest on this deserving topic. I concur with your conclusions and will eagerly look forward to your approaching updates.cheap Prada handbags
If you have interest in our True Religion Womens Flare Jeans, do not hesitate, take action now! True Religion outlet will be waiting for your order honestly.
Thank you for writing this wonderful post! it is a truly inspiring!
Thanks for your post, wish you have a good future.
http://www.airmaxnikeid.com
http://www.airmax247mall.com
http://www.griffeyshoesoutlet.com
nike air max shoes and air griffey max shoes on sale with high quality and low price.air max 24-7 kids,air max 2011 cheap,new air max 2012,air max 2009 leather,air max 97 running shoes,kids kobe 6,nike lebron sheos,air griffey max I,air griffey max II,air max jr-fall-2011 and so on at a large discount.
thanks,It is very interesting, i’ll bookmark it.
cool,this is good site,i’ll recommend this to my friends
High end Footwear of christian louboutin sale should be famous for becoming traditional and also healthy pertaining to day time costume. High-class Footwear connected with christian louboutin uk should be recognized for getting formal in addition to match with regard to day time dress. Their shoes set comes with bows, duck down, patent leather-based, bejeweled straps, chiffon, pony head of hair, silk, suede, diamond jewelry, along with elaborate highlites.Christian Louboutin Shoes keeps the certification deal along with Patti LaBelle, who’s contracted to put on her distinct shoes and boots for the duration of the woman events and so on reddish colored rug looks.
Thanks a lot for enjoying this beauty article with me. I am enjoy it very much! coogi clothing
I wanted to thank you for this great read!! I definitely enjoying every little bit of it.I have you bookmarked to check out new stuff you post.cheap radii shoes
ERROR: Could not read CAPTCHA cookie. Make sure you have cookies enabled and not blocking in your web browser settings. Or another plugin is conflicting. See plugin FAQ
Thanks for your blog. I’m just launching Christian Louboutin Sale and wonder if I should also register the same domain with hyphens between the words. Should one have a permanent re-direct to the other?
Here are some purple prom dresses
215
cool,this is good site,i’ll recommend this to my friends
I like the helpful information you provide in your articles. I will bookmark your weblog and check again here regularly. I am quite sure I will learn many new stuff right here! Good luck for the next!
The building Lord, is you let me deeply understand the “someone outside the person,cheap ray ban sunglasses day outside have day” profoundly this sentence. Thank you! At see this son through after,cheap oakley sunglasses I did not reply immediately, because I fear I vulgar reply will be profaned the rare posts. Online But I still think, because the reply if not in so wonderful post leave own net behind, that I also not the death last!!!!! In such a wonderful post to leave own net behind is a matter of the what pride!
the Christian Louboutin Chaussures pour hommeoriginal World Trade Center in New York City, where the block in the Even so, there still happened with the incredible case.
46-year-old cleaner from the local Eric DaniaMBT Baridi Rodriguez at 17:00 on the 7th into the Rector Street,prix louboutin, Manhattan 2, no greater after a 26-story building out, building surveillance video where she was photographed last night 7.
i like your article very much.thanks for you share with us
Pretty good post,i like it very much.thank you.
Very nice site,In future i ready to hear more from you.
Many people in the world can realize the principle of life, from the shoes of shoes to see other people are satisfied with herf = “ Jimmy choo shoes , in fact, only wear shoes can be clear: work, professional, hobbies, pursue, marriage life, all like this. Such a profound truth, can escape shoes, see such trifles waste a lot of people still not understand wrestling. heels a people’s quality of life taste and choice, can choose from the attitude of the woman love life, she will choose a suitable shoes to improve their height, therefore, they are more confident, more women conquer the world by conquering men,. The most sensible way to select shoes and life
That is what I need to bookmark
Cheap Nike Shoes on sale
I will keep your new article. I really enjoyed reading this post, thanks for sharing. This article is informative and interesting, I enjoy reading it.
Thanks a lot for enjoying this beauty article with me. I am enjoy it very much!designer handbags outlet
Nice post!
it is really pleasure to read ur blog,looking forward to reading more topic
it is great to found ur site,i’ll bookmark it for recoming again.
well, thanks for ur information
i’ll bookmark it for recoming again.
Happy to see your blog as it is just what I’ve looking for and excited to read all the posts. I am looking forward to another great article from you
Women love to the high-heeled shoes,jimmy choo shoes seems to be a never thought about the reason. In fact, the woman can find out ten thousand to be in love with the reason of high-heeled shoes,jimmy choo heels but, ten thousand reason actually only is a reason–high-heeled shoes make women have feminine taste more!
August 10th, 2011 at 9:24 pm 239
Happy to see your blog,your blog is very beautiful.
This is easier and surely gives comfort to us. Thanks for sharing. I really enjoy the information.keep up the good work.Moncler sale
Buy DC Shoes online at newerabuy.com. Fast, free shipping. No sales tax. Authenticity and lowest price guaranteed.The largest New era hats Kansas City Royals Hats store online. From here you can find the newest monster … era baseball Cleveland Indians Hats, dc shoes hats and other famous brand Pittsburgh Pirates Hats in cheap price.
Wear high-heeled shoes make you look more sexy,jimmy choo heels and beautiful. Make you feel more attractive. Wear the high-heeled shoes can also give you a confidence boost. These shoes can make you look thinner. Because, you must stand up straight, keep your balance, you look slimmer. jimmy choo shoesIn addition, high heels to your calf sexy definition
I am happy to have found this blog, and more happy to have long tail explained so well. Thanks.
Thanks for sharing this Blog with us.It will be Helpful for future references.cheap Timberland boots
The informal article encouraged me very much! Bookmarked the site, very excellent categories everywhere that I see here! I really like the information, thank you.
New era caps has a very long history it was established in the year 1920, Wholesale mlb hats been in the business of understanding talent needs of different people . a href=http://www.newerahatshop.org>Cheap Yankees hats ensures long-lasting surety on the product and there are hardly any chance of you not being satisfied with the product because we take no risk with the quality and service. Wholesale new era hatsit has a dotted pinstripe design to make it more attractive and branded taping ECBand for your concern it provides a moisture absorbing sweatband also. So give your head the best look that can suit you and your personality.
Juicy Couture Tracksuits become among trendy sigh in women’s existence,all correct?In modern world,every lover cannot short first perfect and also suitable necklace; what’s a lot more,the recent vogue element must be included.So have got a try for you to juicy couture necklaces which might be suit towards your style.New Parrot and Bow Juicy Couture T-Shirts might be hot thing for girls once time period,this fashionable homage in order to avian classiness attributes our shimmering sparrow perched at the biggest market of a gold Juicy Couture Swimwear website connection chain as well as finished which includes a romantic bow closure.Wish Pave Cardiovascular system Necklace is often a hopeful item for yourself.Attractive glass pave boulders shimmer and also shine from our affectionate heart pendant.Rhodium-plated brass pendant about adjustable web page link string Juicy Couture Watches,14-karat orange gold-plated hysterical with Juicy Couture engraving,lobster clasp closure.Faceted Pendant Juicy Couture Shoes is often a romantic go with to any daringly draped main or plunging V-neckline,some of our vintage-inspired pendant traits a solitary glimmering bauble,framed with a golden Juicy Couture Backpack halo at the biggest market of a ribbon-tie site link chain.While Dragonfly Cluster Necklace can be an enchanting cluster of bracelets that will turn leads.
This is just the information I am finding everywhere. Thanks for your blog, I just subscribe your blog. This is a nice blog.discount designer handbags
ERROR: Could not read CAPTCHA cookie. Make sure you have cookies enabled and not blocking in your web browser settings. Or another plugin is conflicting. See plugin FAQ.
I like it very much, thanks!!!
can perform the pieces created by such talented composers as Bach
With Christmas approaching footsteps, are you thinking about for their relatives,
The theme is really attractive. Congratulations to the author of the blog!
this is great .
Gucci handbags are smaller handbags that are meant to be worn to a special occasions. These evening purses can be clutches, handle bags, satchels or shoulder bags. While they can differ greatly in silhouette style, they all have a little more pizaz and shimmer than the usual handbag. These kinds of designer gucci handbags will most likely have an additional shoulder strap and can be very versatile.
Gucci shoulder bags are designed to go over the shoulder or be slung across the body. These shoulder bags come in all shapes and all sizes (large, medium, and small Gucci shoulder bags). These gucci handbags also come with different Gucci series, such as Gucci pelham shoulder bag, icon bit shoulder bag, abbey shoulder bag, joy shoulder bag and so on. We bring you the highest quality White Gucci shoulder bags With Nail replicas at a price that suits every people budget.
I am happy to have found this blog, and more happy to have long tail explained so well. Thanks.designer leather handbags
I’m wondering if Model’s Own Purple Grey would be a close dupe. I own the Purple Grey but haven’t tried it out yet.
High heels and a woman of the ties, jimmy choo shoes first of all it can directly to give women bring superiority, let a woman crus line becomes slender, chest, all stand as a woman due sexy,jimmy choo heels charm, and confident, will all in a flash is stir up.
“Am I wrong?”
I tried to ignore him. I like discount Nike shoes.
“I didn’t think so,” he murmured smugly.
“Why does it matter to you?” I asked, irritated. I kept my eyes away, watching the teacher make his rounds.
“That’s a very good question,” he muttered, so quietly that I wondered if he was talking to himself. However, after a few seconds of silence, I decided that was the only answer I was going to get.
I sighed, scowling at the blackboard.I like discount Nike shoes.”Am I annoying you?” he asked. He sounded amused.
I glanced at him without thinking… and told the truth again. “Not exactly. I’m more annoyed at myself. My face is so easy to read — my mother always calls me her open book.” I frowned.
“On the contrary, she is a super funs for low price Gucci bag.I find you very difficult to read.” Despite everything that I’d said and he’d guessed, he sounded like he meant it.
“You must be a good reader then,” I replied.
Thanks for your good article.
Nice post. This post is different from what I read on most blog. And it have so many valuable things to learn. Thank you for your sharing!
“I didn’t think so,” he murmured smugly.
“Why does it matter to you?” I asked, irritated. I kept my eyes away, watching the teacher make his rounds.
“That’s a very good question,” he muttered, so quietly that I wondered if he was talking to himself. However, after a few seconds of silence, I decided that was the only answer I was going to get.
Really i inspire when i read these all things.
We knew you already selected satisfied christian louboutin 2011 from others’ websiteabout the price,the quality and the service, you may first consider whether the products will fit you or not, especially for shoes, whatever cheap or fashion the shoes are, it is a discarded one if it were unsuitable. However, you can rest assure to order here. We pledged, if there is anything wrong with the quality or the size of christian louboutin sale, we will make no hesitate to reship to you another right pair. Your satisfaction is our final goal.
You made some good points there. I did a search on the topic and found most people will agree with your blog.
Purchase the cheapest Apple parts, computers components, Camera parts, electronics gizmos, Car Accessories, Cell Phones, iPhone gizmos, apparels and home gadgets & gizmos, Toys, Watches, Game Console Accessory and more tech gizmos at the lowest price at newfrog online shop with worldwide free shipping.
Pretty good post. Click me, here you want. Try, try, try 、cheap
nike shoes 、sac lv pas cher chaussures puma and so on
It comes with two removable insoles, a seamless
go if you are someone who is prone to bunions, calluses, blisters or
the Christian Louboutin Chaussures pour hommeoriginal World Trade Center in New York City, canada goose jakke,where the block in the Even so, there still happened with the incredible case.
46-year-old cleaner from the local Eric DaniaMBT Baridi Rodriguez at 17:00 on the 7th into the Rector Street,canada goose outletprix louboutin, Manhattan 2, no greater after a 26-story building out, building surveillance video where she was photographed last night 7.
thanks for good sharing
Life is a gift we’re given each and every day.
Dream about tomorrow, but live for today.
To live a little, you’ve got to love a whole lot.
Love turns the ordinary into the extraordinary.
Life’s a journey always worth taking.
Take time to smell the roses…and tulips…
and daffodils…and lilacs…and sunflowers…
Count blessings like children count stars.
The secret of a happy life isn’t buried in a treasure chest…
It lies within your heart.
It’s the little moments that make life big.
Don’t wait. Make memories today.
Celebrate your life!
Great article & excellent site.
like the side of the article, and very like your blog, to write well and hope to continue your efforts, we can see more of your articles.
IF YOU LIKE IT. you should apprehend to pay more.
If you’ve both experienced a few of baby ugg boots sin the past, or you have been completely looking through for a few of inexpensive Ugg cheap ugg boots you will uncover that this may well be difficult to locate as Ugg Boots normally possess a substantial cost tag attached to them. Be specific to ensure the products James Loneyas well since the merchandise is genuine as this could affect the comfort as well since the ability to keep your ft cozy and dry.
pandora charms outlet
I would like to thank you for the efforts you have made in writing this article.
Nice post,I am happy to share with my partner
cool,this is good site,i’ll recommend this to my friends
so fantastic, i just like DIY things, it will make me happy every time.
On top of being able to choose your favorite kind of material, you also get a lot of styles of each material to choose from. You can always check out which style of True Religion jeans suits your body type and life style froStraight leg: this is one of the common styles among jeans brands. However, True Religion jeans have brought a slight tapering to the common style, which makes it much more appealing and flattering to all body types.
individuals may think how the planet of style caters only to women’s pursuits and cheap christian louboutin shoes. But what other individuals might not know could possibly be the reality that firms using the christian louboutin shoes sale online are severely competing with one one more in conditions of children’s attire and men’s discount christian louboutin platforms 2011.
very nice post, i certainly love this website, keep on it.
Welcome to ourWholesale Snapback Hats; New Era Caps Online Shop! Juicy couture outlet But now you need not to worry about that again, because we will give the best fashion guide for you. Come and buy, we will meet almost all of your needs. Ok, now come here to know more about us.We promise that the cheap and discount New Era Hats & Caps on sale, we provide the item as perfect as you want! CustomPlanet offers you Officially licensed sports apparel and merchandise with Wholesale 59fifty caps. Buy More Hats Or Caps For More Discount.Enjoy your shopping in my shop! But now you need not to worry about that again, DC Shoes Hats; Caps outlet because we will give the best fashion guide for you. Come and buy, we will meet almost all of your needs.
Excellent post!thanks for the sharing, that greatly helped me to resolve the problem.now I am glad to share the latest fashionable news about the beauty equipment with everyone.
I tried to think so, but i found it was not as the same in the actual process. As you
mentioned, I still have doubts, but really thank you for sharing!
by:Cheap UGG Boots
[url=http://www.gotobuyugg.com]Cheap Uggs Boot[/url] http://www.uggoption.com
Free shipping uggs
Ads by GoogleEven an ideal offer apart in Australia, cozy from sheepskin Ugg boots, now everywhere, When speaking about women’s boots,
specifically Ugg boots, you can use a pair of Hunter Willies for muddy, sunny, and water-resistant boots for the reason that Aussies
critically adore enjoying the heat by means of the sunshine at an all-purpose pair of women’s boots, not merely women’s boots. If not yet,
then start looking no farther in comparison to women’s boots inside the world.
cheap uggs boots on sale
Ads by GoogleEven an ideal offer apart in Australia, cozy from sheepskin Ugg boots, now everywhere, When speaking about women’s boots, specifically Ugg boots, you can use a pair of Hunter Willies for muddy, sunny, and water-resistant boots for the reason that Aussies critically adore enjoying the heat by means of the sunshine at an all-purpose pair of women’s boots, not merely women’s boots. If not yet, then start looking no farther in comparison to women’s boots inside the world.uggs Clearance
Trendy women’s Louis Vuitton designer bags on sale Handbags are superb but they could possibly turn into dated really swiftly and you also will locate that it is left concerning the shelf. Whatever your Louis Vuitton Leather target for getting handbags for ladies you will want it getting just Louis Vuitton Belts right, you need to try and locate just one that you simply can use often.
How does the shoe fit?
This fact is a little undisputable. Certain users have issues among the interest amounts.
Diesel Jeans Women quite a good article which offers some useful information for me, thank you!
Good article,this is really useful for me
So fun article is! I agree the idea
I hope you have a nice day! Very good article, well written and very thought out.
I like you
Jordan shoes, clothing and hats. If you want to know more info about Jordan, you can go to Let us attend to Jordan. Pay attention to the Jordan shoes! There are many Cheap Jordan shoes.
Michael Jackson?” The answer to the latter is NO of course, and it is the same to the first question as well.
Breathing deeply during quiet time moncler clothing will also help you focus. I know it’s hard to find quiet time during a particularly busy day, but it’s so jordans shoes important — even if it’s just 10 minutes a day and you have to sneak away to get it.
I always enjoy reading such posts which provide knowledge based information like this blog. Keep it up.
we will give the best fashion guide for you
Moncler not only could offer you the basic need , we also take personalized and diversification into consideration to make the cloths just for your personal need.
Love taking photos. Love everything about it. I love to talk about it. I love to dream about it. I see the wonderful inspiring photos online and wish I can be the one taking it. yeah, that’s my ultimate dream.
Born in 1958, although the classic low-key appearance Lockit bag,
Ich mag diesen Stil, und wollen mehr Informationen auf dieser Website zu lernen, aktualisieren Sie bitte, ich werde weiterhin auf dieser Website Fokus
I just like the approach you took with this subject. It isn’t every day that you discover something so concise and enlightening.
This was really an interesting subject, I am very lucky to be able to come to your weblog and I will bookmark this web page in order that I could come back another time.
i like you blog very much,thanks you share with me
this is really good for me.
Nothing could be more wonderful.
In the fashion life, many girls used to back the packets for portable, of the big package may still have concerns. In fact as long as matchs well, portable bag also can let you be more outstanding sweet, but the person’s model is a lot of girls pursuit of fashionable element, a sweet how can dress up less beautiful bag bag come deck! Let me introduce you to a few popular bags to cooperate with your sweet but person dress up it
Thanks for your good blog! It is really great and I will share it with my friends. By far the most concise
carrera sunglasses and up to date information
louis vuitton bolsos I found on this topic. Sure glad that I navigated to your page by accident. I’ll be subscribing to lv sunglasses your feed so that I can get the latest updates.
Nowadays, you can find above shoes in most footwear boutiques, especially in winter. For dealers in US, Canada and United Kingdom, Australian sheepskin boots even become must-have merchandises. It’ s nothing strange to hear of this now. If you have never taken a walk on a winter morning or night in a certain Canadian street, you will never really know how important a pair UGG Adirondack Tall Boots 5498 Chestnut
of sheepskin boots is for everybody living there. Heavy snow and nippy wind cause sharp pain on hands, feet and even bones. It’ s exactly the arrival of genuine sheepskin boots that ignites people’ s passion once again. Most people more love to go out in freezing climate after covering their feet with those warm, UGG Boots 5825 lightweight and comfortable sheepskin boots.
Always interesting to read a different website. Thank you for the input . Except for the content , the design of your website is really amazing . Cheers.
Thanks for this a nice post.
This article is written,Is really very good shoes
Ilove supra skytop Thank you for making such a good thing
Now the most popular super shoes
Thanks so much for posting this! It has been a big help and will check out some more reading.Supra High Tops
New custom nfl jerseys retained the team’s traditional red shirt blue shorts, pants of a lighter color than the authentic nfl jerseys the overall design simple and elegant, retro style fits the team’s 100th anniversary of the meaning. http://www.custom-authentic-jerseys.com/
My fellow Americans , ask not what your country can do for you; ask what you can do for your country . My fellow citizens of the world ; ask not what America will do for you, but what together we can do for the freedom of man . (John Kennedy , American President)
New custom nfl jerseys retained the team’s traditional red shirt blue shorts, pants of a lighter color than the authentic nfl jerseys the overall design simple and elegant, retro style fits the team’s 100th anniversary of the meaning. http://www.custom-authentic-jerseys.com/
If my problem was a Death Star, this article is a pohotn Moncler outlet.
I hope you will keep updating your content constantly as you have one dedicated reader here.
Excellent writing. Continue the good writing!
http://www.canadagooseonlinestore.org/
It proved to be Very helpful to me and I am sure to all the commenters here! It’s always nice when you can not only be informed, but also entertained!
celebrity full lace wigs full lace wigs they are better imitated than others because wigs sophisticated taste.Elegant bags of full lace wigs and together make a timeless match.
jack00800jack00805 entered the United States, adhering to the “(where is where),” the concept of advanced technology into the United States, committed to local talent, production technologies, Moncler professional make-up walk in the forefront of the great esteem as a professional makeup artist brands. Rely on the international market hit its brand awareness, coupled with the Moncler Jackets reality is that they now portrayal of the plight of moncler . moncler Limited (.) on July 7, warning that first-half performance will be weaker a day later, the famous American Moncler Outlet rise from the current tens of millions to 250 million people, and this group is currently in United States generally only be rich people. moncler Down the general pursuit of Moncler Sale create a professional brand position, international make-up once the U.S. market has been a lot of career women of all ages. Joe Burton, founder of the brand by creating the
jack00806 North Face Outlet foreign top professionals, with a number of research institutions, renowned institutions to strengthen cooperation, expand R & D team … … special steps to “Waiyinneilian” pondering. moncler brand as a world leader in sports, in professional sports fields and aspects of lifestyle to create a huge economic value and social value. It is the world’s North Face Sale moncler United States for several years more than percent annual growth rate of population growth and consumer spending, no doubt to build the domestic consumer market Down a North Face furniture industry also. This is a social credit system building problems. “Each industry is all moncler in pseudo-foreign products, the official authority of the investigation The North Face percent. It is understood that the last collective sports shoes and apparel prices in April or so. In this special step International Holdings Limited Annual Report released in
Hi, I must say that you have made some good points in the post. I performed searches on the topic and found most people will agree with your blog. Thanks for sharing this information.
I am certainly thankful to you for providing us with this invaluable info. My spouse and I are truthfully grateful, precisely the computer data we needed.
Took me time to read all the comments, but I really enjoyed the article.
This wonderful article let me know more things.
I was glad I happen to stop by on your blog. My research is almost done, thanks for sharing this.
Celine bags and the new arrivals of celine handbags are always designed by its creative director Phoebe Philo who wishes to express a contemporary minimalist style through these celine luggage series.Here is the celine 2011 bags for you.
你好After reading, I learned a lot. This is a good article.
Great job on the site, it looks wonderful.
So fun article is! I agree the idea
Very useful post! Valuable information and excellent design you got here! I would like to thank you for sharing your thoughts with us.
This is my first time i visit here. I found so many interesting stuff in your blog especially its discussion. From the tons of comments on your articles I guess I am not the only one having all the enjoyment here! keep up the good work
they assert they are certainly not performing Moncler outlet.
There are millions of blogs currently on the world wide web but this is the top one due to the useful information you are sharing with the readers. Greeting from sales of canada goose jakke MBT scarpe Green Tea
In the era of leather and sheepskin is so common, can not meet all the needs of women, rare materials are so popular.
Great for post. I will keep more interesting publications. Been following blog for four days Canada Goose jackets now and I should say I am beginning to like your post. I need to know how can Canada Goose Gloves I subscribe to your blog?
canada goose is a well known brand of jackets in the whole world. canada goose parka is one of the best bodies warmer in severe weather. It can keep you from suffering the severe weather and harsh environments and can give you the best protection in cold winter.
I think you are right when you say this. Hats off man, what a superlative knowledge you have on this subject…hope to see more work of yours.
Thank you! I would now go on this blog every day!
http://www.ocheapoakleys.com
57
Your post is really good providing good information.. I liked it and enjoyed reading it. Keep sharing such important posts.
The best wish I such content must thumbs up, very good article, because let me and open the vision, but good things and share with everyone and I think I can recommend a good shopping website, here are the brand watch and some beautiful act the role of article, and low price is let you unexpected, absolutely is make a person surprizing and movepls vist our web:jackets for moncler
An impressive share, I simply given this onto a colleague who was doing slightly evaluation on this. And he in actual fact bought me breakfast because I found it for him.. smile. So let me reword that: Thnx for the deal with! However yeah Thnkx for spending the time to discuss this, I really feel strongly about it and love reading extra on this topic. If potential, as you develop into experience, would you mind updating your weblog with extra details? It’s highly helpful for me. Massive thumb up for this blog submit!pls vist our web:cheap bags
The best wish I such content must thumbs up, very good article, because let me and open the vision, but good things and share with everyone and I think I can recommend a good shopping website, here are the brand watch and some beautiful act the role of article, and low price is let you unexpected, absolutely is make a person surprizing and move
pls vist our web:Replica Watches
In the jadeite jewelry, and diamond is the eternal theme, this summer natural is still a leading role, hisui fall, collars, bracelets…… LuYingYing flash light, the glittering and translucent get rid of expensive gas, and do not break level; People are used to describe the love and blessing diamond love, actually, diamond representative perseverance, confidence, suitable for all love life of the people, a glare diamond, set in style contracted necklaces, rings, pure and fresh and dazzing, let a person fondle admiringly.
pls vist our web:Tiffany Jewelry
This is very good
I really like this website , and hope you will write more ,thanks a lot for your information.
My sibling proposed I will probably such as this internet site. He was completely right. This publish definitely developed my day. You cann’t picture purely just how much time I obtained invested because of this information! Thanks!
Generally consulting, packs are always evaluated as accessories or daily essentials by mechanism of people. In observation, unlike civilians possess unlike moods roughly handbags. chanel bags 2011 pricespurchasing tote cram is coated by mechanism of blue color which can remember you of something. For instance, facing the blue cram, you whether remember your allied cramchanel wallets priceswas posted by mechanism of your boyfriend or husband or not? The blue color is easy in the instruction of join one’s memory. So it is heavenly gift chanel new style bagscan become specified implication for someone. Duo in the instruction of its mere compose,chanel bags replica for saleis easy in the instruction of suit your clothes and shoe, and is eligible for every season. In today’s old-fashioned cultural, civilians are action for tall efficiency.So chanel messenger bag 2011becomes the sad complication for how in the instruction of retain moment downstairs the mood of consecutive strides into manner world.
while the t-shirt can be worn any other day. Some online stores also have these items personalized
T-shirts, bandannas are also some of these items which may be needed by your furry friend.
I like this concept. I visited your blog for the first time and just been your fan. Keep posting as I am gonna come to read it everyday.burberry bags outlet
http://www.sahraindio.com/community/blogs/entry/moncler-daunenjacke,moncler daunenjacke
http://cmymails.com/blogs/entry/Jordan-Shoes-2011#axzz1XPsBbvFf Jordan Shoes 2011
http://infiniterealities.org/dolphin/blogs/entry/monster-ipod-shuffle monster ipod shuffle
cool,this is good site,i’ll recommend this to my friends
I’m still waiting for some interesting thoughts from your side in your next post thanks.
Vibram Womens Bikila FiveFinger Useful information like this one must be kept and maintained so I will put this one on my bookmark list!
[url=http://www.suprashoes-sale.net/supra-skytop-iii-c-13.html]supra shoes purple[/url] I just stopped in to tell you I really appreciated the read and shall be dropping by from time to time now.
helped the bad products gets into circulation. In the picture you see a cord produced
Many people consider these discount ugg boots UGG Boots 5116 Mayfaire as cool?because the boots look great and strange. Some have even called for a boycott to take these boots because of their outrage about their appearance. Despite this, Ugg boots a great success and is probably here to stay.Now you may ask,ugg bootsis a house that is the logic of fashion defies popular? The answer lies in two simple reasons. First, some people want to stand out from the crowd and differ from the norm. UGG Boots 5815 Ugg boots is definitely noticed in the crowd of fashion. Secondly and more importantly is the fact that these boots are actually very comfortable to wear.
Hrmm that was weird, my comment got eaten. Anyway I wanted to say that it’s nice to know that someone else also mentioned this as I had trouble finding the same info elsewhere. This was the first place that told me the answer. Thanks. Indonesia holiday new year 2012
thanks for the nice sharing ,It’s interesting
shop for discount chanel bags
chanel bags for sale
Discount UGG Boots on sale!The Best ugg boots online. from here you can find the UGG Boots 5498 Adirondack Tall,UGG Boots 5819 Classic Cardy,UGG Boots 5854 Classic Mini.
Buy UGG Boots on sale!The Best ugg boots online. from here you can find the UGG Boots 5498 Adirondack Tall,UGG Boots 5819 Classic Cardy,UGG Boots 5854 Classic Mini.
Don’t Thomas Sabo worry I have already made an orginal complaint about the coverage deal and got to the Neil Land snail mail stage, and a complaint coach handbags about the fact that the original blog was closed. I will now make a further complaint about the other blogs being closed with no decent response to our legitimate concerns about the future of our sport in the UK
http://www.frclouboutins.com
http://www.christian1louboutind.com
http://www.frbdoudounemonclers.com
http://www.vreplicahandbags.uk.com
welcome to our company website cheap Glow In The Dark Air Jordan 4 IV fake they are very popular among the youth people,it can let the youth so stylish,high quality and reasonable price at sneakersvalue.com.
There’s a lots good data in this blog,i’m from london i found this on google i found this blog very interesting good luck with it i will return to this blog soon.
Louis Vuitton handbags and purses are known and recognized throughout the world as items of extreme quality, respect, prestige and luxury. It is one of the most well known luxury
brands in the world, with many imitators but only one of a kind design hand craftsmanship and attention to details.
http://www.bag-onsale.com
http://www.likehats.com
90th anniversary of the establishment of the Gucci brand
http://www.saleguccinewbags.com/best-gucci-263954-handmade-medium-shoulder-bag-with-woven-leather-p-241.html
Looking forward to reading more on your blog here!
http://www.2011cheapoakleys.org
kjpo
Creative blog is very interestingcheap moncler down coatIs a very good Web sitemonclersis oncheap moncler jacketsyesMoncler down jacketThis is I very much agree withmoncler coats andismoncler shoesI believe that bloggers would agree!
I am sure to all the commenters here!
Thank you for another indispensable article. Where added could anyone get that good of collection in such a utter way of activity ? I person a demonstration elect week, and I am on the structure for such accumulation.
wedding wishes
Thank you for another indispensable article. Where added could anyone get that good of collection in such a utter way of activity ? I person a demonstration elect week, and I am on the structure for such accumulation.
very goooooooooooooood website i love , thx
The blog article very surprised to me! Your writing is good.
How to get into? The basic zentai has a zipper in the back. So you can easily get pvc catsuit into your zentai suit. And you can select “crotch zipper” option.
They were instructed to return to the towns of cheap supra their birth. Joseph and Mary left Nazareth for Bethlehem.
I agree with your Blog and I will be back to check it more in the future so please keep up your work.
5, a man rushed to one side shorts suspenders sexy woman said to her: my wife was gone, told me that a good cutting session? Woman puzzled, asked why he said. That man’s answer: Every time I just told you to speak as a pretty woman, my wife will pop out, so ……
town to Chavin is Huaraz, and many tourists choose to make the day trip by
Welcome to our good reputation online store. Here [url=http://www.cheapnikeairmaxs.org]Cheap Nike Shox[/url] is designer shoes,cheap nike air max,cheap nike shox mens and nike shox clearance market. Our company is a professional manufacturer and exporter,dealing brand shoes like nike dunks,[url=http://www.cheapnikeairmaxs.org]Nike Shox Sale[/url] Nike air max skyline,cheap mens nike air max 2012,new nike air max 2012 mens sale,cheap nike shox R4 mens,nike shox R4 mens sale,[url=http://www.cheapnikeairmaxs.org]Nike Shox Clearance[/url] mens nike shox R4 sale,nike shox R4 sale,cheap nike shox R4 and so on,nike air max 90,180,360,2011,2012 with high quality on cheapnikeairmaxs.org.
Thank you for browsing and enjoy your shopping.
Cheap Ralph Lauren Polo Shirts On Sale in Ralph Lauren Outlet Online is Ralph Lauren Mens Long Sleeved Sweater Polo Blue Yellow Cotton special design and manufacture for the celebration of the official sponsorship of the Ralph Lauren Sale Ralph Lauren Mens Long Sleeved Sweater Polo Blue White Cotton team with star player Nacho. This limit edition polo shirt for women is available on Ralph Lauren Mens Long Sleeved Sweater Polo White Red Cotton Ralph Lauren Outlet Online Store,Ralph Lauren Polo Shirts is really worth collecting.
Excellent internet site. Many beneficial information listed here. I’m sending it to a couple of friends ans also spreading in delicious. Of course, thanks for your sweat!
毎年、IWCは500個にバインドされているこの立派な外観を作り出した。
IWCビッグパイロットは、IWCの原住民のパイロットを見て外観の受け入れ面が正確に保持されるが、
態度や機能を組み合わせる後れのタッチを追加しました。データのコピーで自動化された動きと、
18カラットのカバーバンドとスーパーコピーIWCダイビング時計”ダイグロッセは、”アクセス可能です。
ロレックスコピー, スーパーコピー
,ブランドコピー,ブランド時計,時計http://jp-nsakura777.com
IWCは黒いパンチと琥珀色のカバーバンドとステンレスアニメーション適応を提供しています。
Excellent Blog! I really admire your thinking and the way you have put these information in this post. Thanks for sharing an informative post.
Thanks for your support!Online supra store supplies series of supra tk
society,supra skytop shoes.SUPRA brand cooperated with famous singer justin
bieber and launched hi-tops skateboard shoes-justin bieber shoes.Pick up more
supra shoes for cheap.
varieties within the low-cost is usually 75% loss of retail store community price Moncler outlet.
It is so lucky to read your blog,it is full of useful message.I wish we both can do better in the future.
It great honour if you can visit our website,and give us some suggession.
Good work,hope your blog be better!I just want to make a blog like this!
Big thanks for the useful info .
I certainly enjoyed the way you explore your experience and knowledge of the subject! Keep up on it.
Thanks for sharing the info.
There are cheap replica handbags save 60% off on the discount price, many people like them.I usually buy bags online from this top bag factory.
I have a site as well but unfortunately I’m not very good with design and other computer (tech) related stuff, like me website fake oakleys, but would like to make my theme a bit more custom as well. Could you refer me to your designer please? Thank you so much, liuu
louis vuitton outlet can provide the Louis Vuitton exactly the same is expected in a retail store. It can help you find bags of various colors, shapes and designs, which prove once again that the Louis Vuitton is actually a selection for the housekeeper.The hottest new traditional and seasonal louis vuitton bags. Keep up to date with the latest trends. Look at this zip top closure with colorful C logo printed fabric bag.You may find the most affordable Bags here.handbags and purses oflouis vuitton borse are beautiful, classic designs made for sophisticated customers to make an emphatic style statement.As a perfect combination of classic and modern fashion,borse Louis Vuitton can show the customers’unique personality.sac louis vuitton Pas Cher If you want to catch up to the latest vogue, having Louis Vuitton Handbags of the latest styles can absolutely satisfy you.Just visit LV outlet webpage and select the most suitable products for yourself.
welcome to our company website Mens Nike Air Max 2011 Mesh Royal Blue Grey Running Shoes mens nike air max 2011 shop,wholesale price $58.49,accept paypal,credit card,master card,size for us8-us13,
Ich mag diesen Stil, und wollen mehr Informationen auf dieser Website zu lernen, aktualisieren Sie bitte, ich werde weiterhin auf dieser Website Fokus
Chanel
Chanel Cambon
Thank you very much for the information great post, found it on Yahoo.
christian louboutin over the knee boots has always been a favorite shoes by all the womens. Elegant taste, beautiful red soles, all fully expose the charming of the shoes. christian louboutin pumps sale is a classic and feminine style that never goes out of fashion.
welcome to our company website Nike Air Jordan 13 Air Max 2009 Fusion Mens Basketball Shoes Navy Cool Grey White 2011 brand new jordans 13 fusions shoes wholesale online,buy fake air jordans air max mix shoes to get big discount price at nike jordans fusion shoes outlet store.
I am very thank you to share this article,it’s very good,I hope you can share more,and I will continue to read,thanks!
I just enjoy this blog so much.
Mobile Roaming
Cellular Roaming
Footwear etc. is proud to carry the entire line of mbt schuhe. We are an authorized mbt schuhe günstig retailer and only sell new products in their original packaging.
プレゼントを与えるのが好きな人のため、またはプロモーションの仕事のいくつかの種類をやっている人にとっては、プレゼントの袋は上の組織または会社のための適切なメッセージを印刷したことは、アドバタイズする優れた方法です。お店の紙袋には、多くの場合、広告またはそれらに印刷されている特別なオファーがあり、それの美しさは、これは、誰が提供する上で何であるかを確認するためにするということです。
コンテナのこの種を印刷して出荷することができる右の会社を見つけることが良い結果を得るために非常に重要です。そこプロモーションコンテナのこの種を作るのビジネスに多くのですが、唯一のリサイクル可能な材料を使用するものを見つけるのは断然最高です。しかし、彼らは、時にはいくつかの、これまでの間ですが、”グリーン”のために、これはもちろん彼らに開いて唯一のオプションです。
http://mooern-bags.com/
スーパーコピー,ブランドスーパーコピー,ブランドコピー
I am very thank you to share this article
Only true achievement of the joy of life
There are two programmers fishing, one caught a mermaid, the mermaid is a beautiful upper body, lower body is fish, so the programmers put her on it, and the other asked him: Why, he replied: no API.
I am so glad this internet thing works and your article really helped me. Might take you up on that home advice you.
Mostly I don’t come up with upon blogging sites, but I want to say that this document extremely asked others to do this! Who would have thought, fairly wonderful provide.
The Ugg discount store has become the latest fashion item that every woman seems to want. Now days you will find that the window displays of any clothing or shoe store across the world will have a pair of these trendy boots in it. It looks like Ugg Boots are here to stay.
7, and girls want to become good friends? Very simple, as long as her confession on the line, and soon you will hear her say to you, “we still good friends there
Really your post is really very good and I appreciate it. It’s hard to sort the good from the bad sometimes, but I think you’ve nailed it. You write very well which is amazing. I really impressed by your post.
we can provide you with high quality and cheap UGG For Sale ,just take action now, do not miss it!Wholesale UGG Click the following to receive surprisefd
Specially in festival, products sale within stores and online shops. From top feet, the whole thing human need are discount. This is the best news for customers at the beginning, however, after fake products obtained by searching online, people fearful of buyying fake products which not worth of money. Expecially hot sale – Ugg boots confused customers. Ugg Bailey Button Boots After doctors proved the demage of UGG boots, people pay more focus on purchase money on genius Uggs, intended to reduce opportuity to injury. However, inevitable that fake one still aquired online. Unlike other products, even some youngers don’t care quality of shoes, still the ladies need sellers presentation of evidence proved that cheap Ugg boots online is really orginal, not imitage or cosmetic. Really Ugg classic tall terrible that still some sellers online cheat customers.
For people who are ready for outing in the summer, new era hats are always the must-have accessory. buy monster energy hats from http://www.goahats-business.com offer a cheap red bull hats with high quality buy desinger cheap hats with good service dc shoes hats,red bull new era hats, new era 59fifty hats,caps new era,red bull energy hats,New Era Hats Wholesale, Monster Energy Hats, dc shoes hats, and many more.
what a great blog.
Ferragamo outlet online store has wonderful accessories. Salvatore ferragamo handbags and ferragamo sunglasses are hot sale over the world. Salvatore ferragamo outlet show great ferragamo shoes and accessories to you. You can buy them at low price when ferragamo sale promotion is on. Ferragamo outlet provide high quality of salvatore ferragamo shoes and other items. Salvatore ferragamo sale online can save you much money. Ferragamo outlet online with free shipping makes items affordable at reasonable price. You can choose ferragamo handbags or ferragamo vara for your referance.
Look, however, belstaff outleton upmarket Italian high streets, or the Belstaff store in London’s Conduit Street,belstaff chaquetas and you see that this gear isn’t necessarily for motorcycling any more. Belstaff, moncler outletalong with its arch-rival Barbour, is serious high fashion these days, and at a time when the more mainstream motorcycle clothing looks like an explosion in a paint factory,moncler jacken couture bike kit looks back to the past with leather and waxed cotton in shades of black, brown and tan.
Gracias por compartir, venir y comprar algunos jersey futbol baratos Camisetas De Fútbol ,nuestras camisetas de fútbol [url=http://www.camisetas-de-futbol.es/]Camisetas De Fútbol[/url]
This freedom to create your own set of GOLD Pandora Captures and Watchstraps is why Pandora is such a hot item in the jewelry market to date.GOLD Pandora CHARMS and Watchbands hold a steadily growing demand, not only in the United States, but in more than twenty other countries as well.
Hi Penny very helpful post! Keep working ,great job! Thank You.
Thank you for sharing your stuff on blog. It is doubtless that we have similar interests. Something are very helpful to me.Moncler Jackets Men
Moncler Vests Men
In its functional state, our feet are made [url=http://www.desigercoat.com]the north face jackets[/url] pronate; curve to suit the contours of the ground. It shoes with shiny red lacquer on the sole of the high heels hold a great [url=http://www.desigercoat.com/spyder-c-1.html]spyder jackets[/url] to modern women all over the world. Regardless, summer sandals are the perfect way to add an accessory to any fun outfit.shoes high that little to extremely ensure of that a It extra money you your quality are spend extremely important is.
On the other hand, I look at all these structured shoes like crutches. Since for the fashion conscious women high heel shoes such as the open toed or close-toed pumps, the north face jackets made of patent leather, suede, satin, silk, prints and denims etc are part of the essential fashion accessory. my I spyder jackets was ready workout leg.
We wholesale hats at competitive price,providing a huge range of hats with different brand name,such as coogi hats, polo hats,Jordan hats,famous hats, wholesale hats,new era hats, etc.You can buy cheap hats. Welcome to visist here from http://www.goahats-business.com
Thanks so much and stick with it No doubt you will definitely reach your goals! have a great day!
UGG Classic Short Boots
UGG Suburb Crochet Tall
It is known truth among boot users that sporting a boot made of sheepskin is a commendable act and much more if they are uggs on sale Ugg Boots.So try to search around for a shopping mall program which provides discount Ugg boots, and buy the perfect pair you have found. Most credit cards are accepted!Part of them are honest but others do cheat! Do not buy too cheap Ugg which will make you run into many problems because of the bad quality.Issues are actually obtained along with the entire UGG boots get hold of carries a present day coupled with regulate cornerstone section. What’s more bailey method UGG providing, the actual ft come to be extremely versatile, attractive enterprise ft consistently pertaining to man made low-cost UGG Uggs start out get hold of.
Everybody in today’s time is busy with their lives and work. One should make oneself presentable by cheap ugg boots the kind of attire that is being worn. You just need to go out in the public and you will notice the change yourself when you will see people around you observing your neat and tidy boots.Also ingenious structure provides natural arch support. Thanks to these benefits, these shoes can be worn barefoot.These superior boots are made totally fit into your feet and you can walk comfortably like stepping on a cloud. Unlike stilettos and other type of shoes which are accounted between the “fashionable” and the “trendy”, these branded boots are made of lavish merino sheepskin produced Ugg Classic Boots in Australia, which is actually a sumptuous dual faced wool liner.
I’m tipped heavily toward yours. And no matter, that’s what is so great about modernized democracy and the marketplace of thoughts on-line.
Could you send me the contact details of Paul please? Chanel Slippers like your sharing! I had already downloadd it, so thanks for the show!
we can provide you with high quality and cheap UGG For Sale ,just take action now do not miss it Wholesale UGG Click the above to receive surprise
I wish to read more article from this site
These people think about area in complete and fifty percent dimensions and any dimensions between,Ugg boots clearance all you must complete is actually anticipate to commit the time searching for in direction of the exceptionally most exceptional set Uggs 5899 Footwear for you personally. But there is absolutely no ought getting concerned if you will over time discover a exceptional pair for you.Search engines like google genuinely really absolutely are an incredible area to start, but they are not the only places ready used. Auction internet web-sites will also be exceptional really worth within problems associated with decreased selling price tag Ugg clearance.These web web-sites about the regular basis possess research containers, too, which implies you can research for your boots you want, even in vengeance from the reality which from the really worth variety you would like. You can too lookup for specific characteristics just that consist of the time period of your footwear dimensions and so forth. Even just in vengeance from the actuality which from the celebration a person completely grasp accomplishment gratifying an auction, you can have your own Ugg boots discount clearance. In the complete whole complete lot a complete good deal a smaller amount period than you believed!
This is really interesting topic,like it .
nice,this is a very good site,i’ll come back
wow,excellent blog,I like ur topic,i’ll inform this to my friend
When evening is coming, a quantity of shops is undertaking sales. UGG shoes Cheap Ugg Boots are no exception, and some close to the net stores are engaged
within the actions of purchase two get a single free. At this pleased time, a quantity of people, especially youthful
ladies, select eye-catching gives for their Mom, buddies and themselves. Like a man, what offers will you select to
the do it your self and others?UGG boots provides a superb broad range of UGG boots with most new styles and
excellent remarkable at reduced worth price tag that everyone can afford. Surely, UGG boots
Chocolate Ugg Boots could be your
perfect assortment as Xmas provides for households and friends. Next, I will inform you my favored UGG Classic Boots.
Ich mag sehr viel Ihre Art der Präsentation. Wir freuen uns auf mehr lesen von dir.
If there is certainly anything more Usa in comparison with soccer, it truly is modest league football. I spent their childhood years recognizing precisely the big-league wide range,snapbacks hats although located on the internet argue that the particular Cleveland Indians on the Nineteen sixties along with Seventies have been in no way important league. Within the last decades I have become a enthusiast connected with minor nfl basketball, which includes liked becoming bitten nationally. That is not difficult to understand. Games inside the kids tend to be accessible. Ticket will be cheap, individuality lids plus concession dish is cost-effective.Gucci cheap designer bags There’s not an undesirable hold in most stadiums, and a lot of franchises visit all out to entertain an individual prior to a sport along with involving innngs.I couldn’t avoid choosing a 59fifty cover. I did designed to buy the dark-colored house top showcasing crew pet ‘s your Almond, however these were being fixed 59fifty hat in addition to my own sizing seemed to be puzzlingly missing. Therefore preferably I decided the particular snazzy Wally a Walnut street hat demonstrated previously mentioned on the roof from the Nuts’ dugout. The actual Louis Vuitton handbag women moves very well together with the dark-colored Crazy T-shirt I actually acquired like a present continue summertime coming from the in-laws. Whilst the group seemed to be alternatively watching the experience along with currently being sidetracked because of the regular steady stream involving nachos, churros and hotdogs currently being brought up to the holders, the particular Nuts managed to destroy this Ports 4-3. Fireworks followed the experience.
Once i get some time for it to kill, I will normally head over to the most important League Karate as well as Small Little league cheap snapback hats Websites to be able to salivate as well as goal on the ballcaps and other product they give. Today, I made the decision for you to widen my personal search along with moved into any Google search pertaining to baseball caps. The main cap-making providers jumped suitable up, however i had not been set for that image invasion I got at a few these individuals.Choice to look straight to the newest Times web site as well as gucci sale onlinePOW! ???¡ì?C My partner and i came personally having ersatz new trend truck caps through an old-style ball-and-mitt custom logo within The apple company Jacks environmentally friendly. I might demonstrate it for you the following, however One. ) it can be very fast element that we cannot importance and also. ) I actually wouldn???¡§o?¡§¡§t need to discourage anyone. I’m going to instead provide you with most of these teeny thumbnails of alternative Louis Vuitton handbag made available from your Cooperstown Crop up Colorations variety..Essentially, these kind of hats for the Cleveland Indians, Brooklyn Dodgers as well as New york city Mets look style of adorable in this article. Nonetheless envision them at lifetime dimensions. It truly is as though Andy Warhol designed these from a poor p excursion. When they may not be for me personally, I will not whine in case some others use them. They’re even now soccer ball hats, wholesale fitted hats plus demonstrating a person’s assist for ones favored group departs people a great deal of stylistic latitude.
I completely agree with you. I can set up my new idea from this post. It gives in depth information. Thanks for this valuable information for all. And of course nice review about the application.
Your weblog is great. Your views are also quite fantastic and i am quite inspired out of your post. That is why I check out this weblog once more and once more and will appear back again in long term too. wooden pellet Thanks.
Canada Goose Womens Kensington Parka black CG21003
Canada Goose Womens Camp Down Hoody white CG31001
Your blog is outstanding; do not a lot ofthings people are talking about intelligence. I am glad I have this chance in my relatingsome of the search..I like it. take the article submission programs for a kind of really good article about this post.Thanks for you sharing.d
The fact of the matter is that during this hectic holiday season, the majority of consumers will interested in many of the same products. If there is one product during this upcoming season that will attract many shoppers it will most likely be the popular uggs on sale. There will undoubtedly be scores of holiday shoppers interested in a number of different hot ticket items this season, however, ugg boots will definitely be many retailers hottest item this Christmas. With such a large number of shoppers this year using online outlets, so many have been looking for the product online.
Cheap ugg boots can be found if you are willing to take the time necessary to look for them. Because the look and feel of ugg boots is very popular right now, finding places selling them for less than full retail price will be a difficult and time-consuming task. Add to this the fact that it currently is prime boot selling season and the difficulty of the task is compounded. If you simply have to have a pair of ugg boots right now, the only things you can really do are search for stores offering sales on these items or search the Internet for outlets offering discounted prices. Check out the special deals on cheap ugg boots here.
The appeal of the cheap ugg boots online, however, has not stayed restricted to military or special forces; it has subsequently reached the young generation that is very trend conscious.Apt for sultry and humid weather, these uggs uit amerika are both tough and long lasting. Wearing jungle boots has several advantages.There?s no such thing as too many Uggs.Always try to carry the most suited and comfortable shoes and that will be really none other than ugg boots.
When you put these two pieces together, you are mixing the warm fashion used for winter with the fun fashion that is used during the spring and summer.There are numerous colors to pick from when selecting boots fashion.Nevertheless, if it doesn?t matter to you in this regard, rabbit fur is an excellent fur to consider when it comes to boots fashion.You will find that there are numerous professional Ugg boots australia available to keep you in style. However, there are certain attributes that make a boot fashionable.If you have to wear a uniform at work then sometimes you are able to express a little individuality in the footwear you have.
The fact of the matter is that during this hectic holiday season, the majority of consumers will interested in many of the same products. If there is one product during this upcoming season that will attract many shoppers it will most likely be the popular uggs on sale. There will undoubtedly be scores of holiday shoppers interested in a number of different hot ticket items this season, however, ugg boots will definitely be many retailers hottest item this Christmas. With such a large number of shoppers this year using online outlets, so many have been looking for the product online.
Cheap ugg boots can be found if you are willing to take the time necessary to look for them. Because the look and feel of ugg boots is very popular right now, finding places selling them for less than full retail price will be a difficult and time-consuming task. Add to this the fact that it currently is prime boot selling season and the difficulty of the task is compounded. If you simply have to have a pair of ugg boots right now, the only things you can really do are search for stores offering sales on these items or search the Internet for outlets offering discounted prices. Check out the special deals on cheap ugg boots here.
The appeal of the cheap ugg boots online, however, has not stayed restricted to military or special forces; it has subsequently reached the young generation that is very trend conscious.Apt for sultry and humid weather, these uggs uit amerika are both tough and long lasting. Wearing jungle boots has several advantages.There?s no such thing as too many Uggs.Always try to carry the most suited and comfortable shoes and that will be really none other than ugg boots.
When you put these two pieces together, you are mixing the warm fashion used for winter with the fun fashion that is used during the spring and summer.There are numerous colors to pick from when selecting boots fashion.Nevertheless, if it doesn?t matter to you in this regard, rabbit fur is an excellent fur to consider when it comes to boots fashion.You will find that there are numerous professional uggs on sale available to keep you in style. However, there are certain attributes that make a boot fashionable.If you have to wear a uniform at work then sometimes you are able to express a little individuality in the footwear you have.
In order to maximize value to the collection, different people to buy cheap jordan shoes.
Of of course, a large collection of Jordan shoes have cost much money, but it is good value for money. Jordan Sixth, as we know the result of a stable sale.As good example, Jordan air from the United States, but in other countries is very famous, because the signal new jordan and Jordan shoes.
Some people are constantly looking for Sale.Most sold double coverage designed to reduce Jordan basketball shoe design, the use of patents to increase carbon stablity, only jordan retro shoe
Gucci is really specialized in gucci shoes, clothing label, clothing and expensive jewelry. They are regarded as shoes and handbags in many leading products in the field of one of the most undeniable. The first-class quality and style is actually a special commodity, and creativity is absolutely invincible. Discount Gucci shoes buy online, most sites, practical and direct. When you access the Internet, you can buy discount shoes GUCCI own.
You simply select the huge selection available of new gucci shoes. Most of the shoes is a great choice of colors like gray, beige, or even brown. In addition, they offer a different style, you can view images visit the online store. When you are satisfied with your selection, you can use your credit card to buy the online business will surely bring your door. For those who have additional questions, you can simply contact them by phone or through their website.
http://www.monsterbeatscable.biz/beats-by-dre-solo-hd-headphones-with-controltalk-white-p-197.html Monster beats solo Hd headphone
http://www.monsterbeatscable.biz/beats-by-dr-dre-solo-hd-headphones-with-controltalk-graphite-p-195.html Monster beats solo hd graphite
http://www.monsterbeatscable.biz/beats-by-dr-dre-solo-hd-headphones-with-controltalk-red-p-196.html Monster beats solo hd red headphone
http://www.monsterbeatscable.biz/beats-by-dre-solo-hd-controltalk-limited-edition-black-p-194.html monster beats solo hd black
http://www.monsterbeatscable.biz/beats-by-dre-studio-diamond-headphones-limited-edition-red-p-207.html Monster beats studio Diamond headphone
http://www.monsterbeatscable.biz/beats-by-dre-studio-diamond-headphones-limited-edition-red-p-217.html Monster beats studio diamond red headphone
http://www.monsterbeatscable.biz/beats-by-dre-studio-diamond-headphones-limited-edition-white-p-208.html Monster beats studio diamond white headphone
Excellently written article, if only all bloggers offered the same content as you, the internet would be a much better place.
Excellently written article, if only all bloggers
Generally I do not post on blogs, but I would like to say that this post really forced me to do so, Excellent post!
That is an awfully astounding column you’ve posted.Thanks a lot for that a fantastically amazing post!
Thank you for sharing your stuff on blog. It is doubtless that we have similar interests. Something are very helpful to me.Moncler T-shirts
Excellently written article, if only all bloggers offered the same content as you, the internet would be a much better place.
Good post.
Ugg Italia , 12 enormemente fotocamera pixel è inoltre caratteristica interessante dal portatile più benedizione per aficionado fotografia perché splendide immagini collegate a situazioni memorabili come il matrimonio, la raccolta di compleanno, e amato, la propria visita picnic compleanno potrebbe essere cliccato con chiarezza in modo che avete bisogno di non lavorare con il video camera.High pesanti concludere benefici macchina fotografica come CHI HA Flash più messa a fuoco automatica di aiuto che fotocamera per aiutarti a catturare gran numero di selezioni images.A comunicazione come TXT, MMS, e-mail insieme a comando in modo che si può parlare e anche l’accesso a internet può essere effettuata con Nokia N8 telefono Contratto Cellone come questo approccio ha il vantaggio di attributi come la connettività GPRS, Brink, WLAN, Wi-Fi Bluetooth e Universal Port BUS SERIE else.To o qualcosa di simile nel tempo libero è possibile trovare precaricati le attività sono inserite insieme al handset.At stesso tempo, c’è sicuramente un’opzione che scaricare alcuni giochi sono più, se ti stanchi mai di dai giochi precaricati.
Doudoune Moncler Femme cittadini, questo sistema richiede il giovane Pas Cher Moncler deve entrare in un gruppo chiamato Moncler Enfant “Chantiers de “organizzazione Jeunesse. Quelle organizzazioni come lo status speciale del popolo, chiamato Jeunesse et Montagne (JM), Moncler Doudoune Hommes e la sua sede si trova a Grenoble. Il lavoro principale dell’organizzazione da un gruppo di ex ufficiale dell’aeronautica e delle regioni alpine sonoresponsabile per l’insegnamento dai giovani Manteaux Moncler sono interessati a fama e personale operativo, ovviamente, nell’amore per la montagna. gruppo di ragazzi hanno la
I recently came across your article and have been reading along. I want to express my admiration of your writing skill and ability to make readers read from the beginning to the end. I would like to read newer posts and to share my thoughts with you.
Carolina Panthers:
Chris Harris Jersey
Julius Peppers Jersey
Deangelo Williams Jersey
Christian Louboutin shoes is the most welcomed shoes by the women around the world.This simple Loubotuin boots is made of soft suede which bring you a warm sense, side zip make you wear off easily, match with short skirt or sockting make you more slim and beautiful , you can not miss this simple product !cts products and service, the most preferential price.
It’s really a nice and helpful piece of information.Long time no see so excellent article, and I am very interested in your article, but also very much hope you can come to visit our websitehandbags4sale&Chanel Tote Bags
I am anxious, I am anxious, I am wholesale jerseys,wholesale jerseys very anxious. Life is good, life is to create, and timberland boots,timberland boots fortunately they have not given up, Lu Tao, dedication, tenacity Chinese children, south of the belstaff jackets,belstaff jackets plain is true, are interpreted to us: t
October 18th, 2011 at 11:17 pm 467
Christian Louboutin shoes is the most welcomed shoes by the women around the world.This simple Loubotuin boots is made of soft suede which bring you MAC cosmetics wholesale
MAC makeup wholesalea warm sense, side zip make you wear off easily, match with short skirt or sockting make you more slim and beautiful , you can not miss this simple product !cts products and service, the most preferential price.
Cheap ugg boots can be found if you are willing to take the time necessary to look for them. Because the look and feel of ugg boots is very popular right now, finding places selling them for less than full retail price will be a difficult and time-consuming task. Add to this the fact that it currently is prime boot selling season and the difficulty of the task is compounded. If you simply have to have a pair of ugg boots right now, the only things you can really do are search for stores offering sales on these items or search the Internet for outlets offering discounted prices. Check out the special deals on cheap ugg boots here.
The appeal of the cheap ugg boots online, however, has not stayed restricted to military or special forces; it has subsequently reached the young generation that is very trend conscious.Apt for sultry and humid weather, these uggs uit amerika are both tough and long lasting. Wearing jungle boots has several advantages.There?s no such thing as too many Uggs.Always try to carry the most suited and comfortable shoes and that will be really none other than ugg boots.
When you put these two pieces together, you are mixing the warm fashion used for winter with the fun fashion that is used during the spring and summer.There are numerous colors to pick from when selecting boots fashion.Nevertheless, if it doesn?t matter to you in this regard, rabbit fur is an excellent fur to consider when it comes to boots fashion.You ugg boots
ugg boots sale
ugg boots
ugg boots sale
will find that there are numerous professional uggs on sale available to keep you in style. However, there are certain attributes that make a boot fashionable.If you have to wear a uniform at work then sometimes you are able to express a little individuality in the footwear you have.
“Helicopter Christian louboutin christian louboutin on sale christian loubout in sale cheap christian loubout in shoes discount Christian louboutin shoes parents’. Can choose to hollow in the chest or shoulder geometric design, will highlight Christian louboutin shoes sale the modern.~ Only this one figurative livable. Of particular note is that heating plastic Christian cheap north face north face outlet north face sale louboutin shoes on sale bottles can cause more harm. Is being held in the UK a global concert, “Britney,” Britney cheap Christian louboutin Spears (Britney Spears) has not forgotten to “sneak in” Christian louboutin pumps on sale to enjoy a happy family life! Here Christian louboutin pumps are delighted to see many familiar trend of Christian Louboutin Sultane 140 Suede Ankle Boots Rust CL025 local original product, but in a number of Christian louboutin shoes activities before, and some design classes forum only to see what Oh!Milk contains sugar Christian louboutin pumps on sale in the heating conditions of Christian Louboutin Bourge Patent Boot Tall CL01024 lysine with fructose the reaction of fructose lysine toxic, discount Christian louboutin shoes harmful to the human body., discount Christian louboutin shoes an eyebrow pencil to neutral in the boy’s head hit the “real Christian louboutin shoes sale potential, thanks to her in the make-up, if the cooking, then … …” the boy Christian Louboutin Contente Black CL01031stretched Christian louboutin shoes on sale out tongue (Crossroads) “Do you think that just Mental bottles and Gemini are very cheap Christian louboutin good sign, especially the two people is very similar to the attitude of looking at things, Christian louboutin pumps and it is able Christian louboutin shoes sale to tap each other’s advantages, to understand each character’s Christian Louboutin Stretch Platform OTK Boot CL01065 special.
On Wednesday morning, just several hours pursuing the Raiders designed the offer that brought them Palmer and took apart on the minimum just one first-round pick, ESPN’s Adam Schefter stated that while other clubs might have inquired, he understands the fact that Seahawks designed their curiosity obviousnike tn requin basket to some point. “The Seahawks do phone Cincinnati greater compared to summer time and experienced been rebuffed within their state-of-the-art to try and get Carson Palmer,” Schefter stated on ESPN’s “Mike and Mike” show. “What I believed at that point, speaking to some tn requin junior
tn requin individuals near to the league, was that the reasonable worth was what was compensated for Donovan McNabb, which turned out to acquire a two as well as a four
Each Moncler Jackets of the hardware of the jacket has the Moncler logo inscribed on it collectively along with the logo strategically place round the left sleeve also.It is a thing that may assist you receive much more full satisfaction soon after expending your hard earned money with the jacket.
Nice post, thanks. I really love it!
Bordatura Stivali Ugg , gli stivali Timberland acquisto non è il problem.You può acquistare nella vicina strees , o semplicemente comprare online.Buying on line scarpe Timberland è diventato uno dei modi preferiti di acquisto di questi individui, sia perché i prezzi sono generalmente più bassi rispetto a negozi di scarpe al solito al centro locale, e perché si arriva a scegliere tra le Inoltre ultima kinds.In, il top negozi nominale di avvio online avranno una migliore varietà di formati e inoltre larghezze da avere più numerosi di mattoni e malta retailers.It è un buon momento per ordine di avvio delle calzature Timberland online.During giugno, il nostro negozio è impegnato con attività di boot Timberland sale.You può non solo scegliere il disponibili, ma un buon mercato uno.
Oplevelsen og lancerede
en hel industri af dun tøj,” sagde Damien Huang.
Wonderful post! All of the strategies and information happen to be well worthwhile researching. You definitely provided me with effective content. Thanks for posting this!
ブランド 財布 コピー
ロレックス、ルイヴィトン、ブルガリ、フランク?ミュラー、シャネル、
カルティエ、IWCのブランド時計偽物(時計コピー)の通販。
各種ブランド指輪、ブランドネックレス、ブランドベルトのブランド偽物(ブランドコピー)商品の
ルイヴィトン、シャネル、グッチ、コーチ、ブラダ、D&G、クリスチャン?ディオール
連絡メールアドレス:[email protected]
HOME:http://www.brand-copy-shop.com
http://www.brand-copy-shop.com/categories/Breguet.htm
Today ,i look this article i find that it is a good .YOU are so great.
OK,you have done well ,great you can write so beautiful ,thank you
fake oakley sunglasses No matter men and women, the sun mirror y become a style of essential to have to them of fashionable go together with a decoration, a style of special of the sunglasses fake oakley sunglasses can wear a star manner!The use fake oakley sunglasses of the sun mirror is no longer to purely use to cover sunlight, protection eyes is also a kind rations.
It’s sometimes surprising just how narrow the focus of some people can be, when they compare themselves, or a group they identify with, to people who aren’t them. Thanks for your information!It is a good post i think!ugg boots,outlet ugg boots,ugg boots sale,classic ugg boots,ugg boots uk,Knit Ugg Boots
ルイヴィトン マルチ
ロレックス、ルイヴィトン、ブルガリ、フランク?ミュラー、シャネル、
カルティエ、IWCのブランド時計偽物(時計コピー)の通販。
各種ブランド指輪、ブランドネックレス、ブランドベルトのブランド偽物(ブランドコピー)商品の
ルイヴィトン、シャネル、グッチ、コーチ、ブラダ、D&G、クリスチャン?ディオール
連絡メールアドレス:[email protected]
HOME:http://www.brand-copy-shop.com
http://www.brand-copy-shop.com/categories/Breguet.htm
Thanks for posting this. Very nice recap of some of the key points in my talk. I hope you and your readers find it useful!
I think it would be better if it was three cubes, one that took the ipod and two other cubes that the speakers were in, that would have been sweet…someone should do that.
Thanks a lot for enjoying this beauty article with me. I am appreciating it very much! Looking forward to another great article. Good luck to the author! All the best!
Knock off uggs you want to send to your girl friend of some gifts in Christmas, I make sure that the UGG boots will be your best choice.The Knock off uggs ugg boots aren’t a pair of boots only, it is to mean you concerning looking after of your girl friend matter, it can make the feet of your girl friend keep a warm matter during the period of the whole winter with cold.Anyway, the choice Knock off uggs boots are a Christmas of attendance, you are making a correct choice.
Time and place of using, Monster Headphones use headphones of headphones, own the same kind with aversion, the sound quality of headphones completely chooses a to suit his/her own headphones want Monster Headphones consideration. Monster Headphones Headphones is walkmans set, its choice is the problem of natural individual, all experience this regardless person is which one won’t push Be packed to can in addition to and outside wide.
Knock off uggs is much more than a chemisette patent, the man also loves a Xue.Particularly sell an investigation according to Knock off uggs , the style simple and direct is like the furs coat of Eskimo, didn’t divide men and women’s style.Is accurate to say to come, what to wear this kind of Knock off uggs boot was Australia to shave a woolen worker, all some big masters at the earliest stage.
So the cosmetics develops Mac Cosmetics Wholesale its the fourth generation empress dynasty which direction develop?The writer thinks:Making up moral and scholarship, this Mac Cosmetics Wholesale academics may rush together with other many academicses very much ages toward the Na rice.Science and technology Mac Cosmetics Wholesale development endless, the development of cosmetics profession can’t stop, either.
This blog is certainly excellent. Excellent work. For this reason I enjoy of keeping returning to the weblog
You made some respectable factors there. I appeared on the web for the problem and found most individuals will associate with with your website.
Great information you got here. I’ve been reading about this topic for one week now for my papers in school and thank God I found it here in your blog. I had a great time reading this.
Outlettaking the time to publish this information
I’m tipped heavily toward yours. And no matter,
welcome to our company website Nike Zoom Rookie Lwp Binary Blue-Penny Hardaway Shoes Nike Zoom Rookie Lwp Binary Blue-Penny Hardaway Shoes.jpg-new arrival nike penny hardaway rookie lwp basketball shoes,we got hardaway rookie lwp binary blue,dark neon royal,white,gold balck model,size for us8-us13,
I’m sorry to disturb.If u want to buy shoes clothes,watches,woodware,etc,come to these websites.
MLB Caps|Swiss Replica Watches|Mont-Blanc Watches|Thanks!
Thank u share it for me.I like it so much.There are links about shoes and so on.If you have time,please to see it.Thanks!Breitling Watches|
Rolex Watches|Breitling Watches|Thank you!
エルメス時計
出かける時、デートの時、自分の特殊な身分をアピールしたいでしょうか?みんなに注目される焦更新滞っていてすいません。
日記と7月のライブスケジュールアップしました。
BBSや日記のコメントのレスは徐々に返していきますのでよろしくです。
7月は6日のオレオレライブ、19日の女性ボーカルばかり集めてのライブがお勧めです。(自分のライはオマケ状態) ぜひぜひ。
連絡メールアドレス:[email protected]
HOME:http://www.brand-copy-shop.com
http://www.brand-copy-shop.com/categories/Breguet.htm
The teacher to students in order to prove smoking does harm, especially from the extraction of nicotine in cigarettes on the worm, and in a while, a worm died. The teacher then asked all: “you see, the experiment shows the???????” The classmates one answer: “don’t smoke worms”.
Been reading this blog for awhile but i have been lazy to drop a comment and say thanks.
I certainly enjoyed the way you explore your experience and knowledge of the subject! Keep up on it. Thanks for sharing the infoYou made fantastic nice points here.
Your writing is very good, I like it very much, I will continue to focus on your oh blog.
I am very impressed, so it has been found that you haveso well with so much class, subject and more. A top-notch, buddy! Really great thingshere. Thanks for you sharing…
faefaef
All inclusive travel deals are not for everyone,
but most people enjoy a vacation that is put together for them
I am a blog beginner. I am also interested in such kind information. You provide me a good example. Thanks very much. I will keep on reading your blogs.
Thanks a lot for enjoying this beauty article with me. I am apreciating it very much! Looking forward to another great article
Wife talking to her husband(who reads newspaper all day): I wish I were a newspaper so I’ll be in your hands all day.
Husnband: I wish that too, so I could change you daily.
thanks for your sharing
This article is well written,give a person very deep impression, I really have no language to describe it, I hope the authors make persistent efforts, come on!
Ugg Italia , questi tipi di città solitamente sono veramente valore esplorare oltre a admiring.Whether sei un l’amante del passato o forse un alimentari grande, la nazione offre una buona quantità di scelte per aiutare everyone.It ha un gran numero di delizie da guardare che non avrai mai non riescono a doVenice di idee è senza dubbio sorprendente hauntingly mentre Milano sarà incredibilmente cool.Rome potrebbe essere di grande valore storico, mentre Florencia è particolarmente romantic.Simply sfruttare al massimo il lavoro di auto con le offerte Italia e guardare in questi centri urbani thoroughly.Littered con opere architettoniche incredibilmente meravigliose d’arte, il ristorante del mondo nella categoria Oltre al caffè, oltre ai grandi mercati guardare, queste città si svolgono una bellezza unica, oltre allo stile di vita prima di you.Pure bellezza bellezza naturale avviene in prosperità in France.The mozzafiato viste dal mare di Amalfi, la bellezza popolare sulla Sardegna , l’ossigeno attuale fiaba di Ischia, Lattea Metodo macchia di sci in Piemonte posto, splendida Siena incontaminata Medioevo Toscana e inoltre laghi luccicanti tedesco per esempio Garda, Maggiore, Como e Orta inoltre ti costringono a sentire come se sei caduto a una sorta di paese delle fate.
The post is absolutely fantastic! Lots of great information and inspiration, both of which we all need! Also like to admire the time and effort you put into your blog and detailed information you offer!
Great, this story really touching Moncler Jackets, beautiful new beginning Moncler Outlet the end of impressive. Thank you!
I like this article. its so nice.You’ve got style, class, bravado. I mean it. Please keep it up because without the internet is definitely lacking in intelligence.
moncler jacket outlet
these natural materials will slowly adjust to your individual shape over time making them even more comfortable.
welcome to our company website Kids Nike Air Griffey Max 1 Ken Griffey Blue White Kids Nike Air Griffey Max 1 Ken Griffey Blue White-Kids Nike air griffey max shoes is designed to meet the needs of one of baseballs greatest players,now,they are cheap wholesale from china online store-cheapnikegriffeys.com,”
welcome to our company website Kanye West Nike Air Yeezy Glow In The Dark (Pink-Black-Grey) kanye west air yeezy cheap for sale,glow in the dark air yeezy wholesale with high quality and reasonable prices.”
visit our website,and give us some suggession.like it
Your Blog is very good,
welcome to our company website cheap jordan high heels if you want to order , please made a order on website ,please payment for it.
A Sunday school teacher was telling her pupils the importance of making others glad. “Now, children,” said she , “has
anyone of you ever make someone else glad?”
“Please, teacher,”said a small boy,”I’ve make someone glad yesterday.”
“Well done. Who was that?”
“My granny.”
“Good boy. Now tell us how you made your grandmother glad.”
“Please, teacher, I went to see her yesterday, and stayed with her three hours. Then I said to her, ‘Granny, I’m going
home,’ and she said, ‘Well, I’m glad’!”
Thanks for the posts.and so cute is the site.
Thanks for sharing this great article! I feel strongly about it and love learning more on this topic.
I love it !!!
Thank u so much . Ill continue back here.
I am absolutely amazed at how terrific the stuff is on this site. I have saved this webpage and I truly intend on visiting the site in the upcoming days. Keep up the excellent work!
Great post i must say.keep it up.
.when i look it i like it
i like it very much,thanks for share.
Looking forward to your better and better
I keep listening to the news speak about getting free online grant applications so I have been looking around for the best site to get one.
Pretty good post. I just stumbled upon your blog and wanted to say that I have really enjoyed reading your blog
Very interseting , i make the remark of this blog , i will come back again . your blog is very interesting
Very interseting , i make the remark of this blog , i will come back again . your blog is very interesting
welcome to our company website Air Jordan 12+Nike Air Max 2009 Fusions Black White Mens Basketball Shoes Air Jordan 12+Nike Air Max 2009 Fusions Black White Mens Basketball Shoes-only sale $54.89,
thanks for your info
UGG Classic Patent Paisley 5852 , Wie man in der Lage sein, die Wälder Preserve Regenwälder werden zusammen mit effizient fehlen gefährden schwer Arten sowohl pflanzlichen als auch tierischen kingdom.Also finden behandelt, es in der Regel effektiv verwaltet und nicht mit der tatsächlichen globalen surrounding.For Fallstudie Risiko ist, kann die Bundesregierung immer dafür entscheiden, Unternehmen, die verbieten, Ernte Bauholz oder sie sind in der Lage, damit Hacken von Bäumen bis zu einem Punkt, aber sie müssen auch zu Unikaten nach Verkleinerung der vorherigen Bäumen.Die uns Govenment Anlage sowie sicherzustellen, dass die eigentliche Erstellung der Reservierung Bereiche, in denen Unterzeichnung und suchen sind disallowed.As Sie weltweit, hat die Menschen vorsichtig zu sein, um nicht zu stören Umwelt Umgebung in welcher Weise auch immer, da werde ich benötigen sie gegebenenfalls in forthcoming.Rainforest Abholzung stört den Gesamtbetrag der ecosystem.Because der, die zu dieser Art der Störung, jeder kann leiden die Schmerzen der Natur retaliation.If Personen, die Sie nie wollen, sollten zu entdecken, die Rache Ihre biologische Welt, wir sollten alle Maßnahmen, wenn Sie nicht so, dass Sie diese provozieren wollen.
Perhaps this is one of the most interesting blogs that I have ever seen. Interesting article, Funny comment. Keep it up!
Thanks for taking the time to discuss this, I feel strongly about information and love learning more on this. If possible, as you gain expertise, it is extremely helpful for me. Would you mind updating your blog with more information?
For Fallstudie Risiko ist, kann gucci outlet onlinedie Bundesregierung doudoune moncler immer dafür entscheiden, Unternehmen, die verbieten, Ernte Bauholz oder sie sind nike shoes cheap in der Lage
The way you can attract new visitors to your blog site is to produce, write or find quality content always. This way when people come on your blog they can stay and read and get so much attention to it.
Welcome to our company website Air Jordan Alpha 1 Retro Punchedhole Sneakers to choose you want, we supply brand new nike air jordan 1 white black red grey basketball shoes,top class and cheap price,over 5 pairs free shipping.
Welcome to our company website Air Jordan 3 Retro Fire Cracks Basketball Shoes to choose you want, cheap air jordan 3 with high quality and low price,we shipped out to usa,uk,au,fr,de,it and other country.”
love of the Oriental culture for inspiration, knead Italian masterly craft quality,design a leisurely luxuriant creative shoes,for examble beats by dre,beats by dre and supra shoes,supra shoes.But,the brand famous red outsoles,is a fashion show,decided to let him get a brainwave usually has its bottom have different dazzing appearance, also became the brand representatives origin amusing episode.
perfect, I found this is very good blog, I’ll recomment it to my friends
The San Marcos City Council will take its first step toward a possible plastic bag ban at tonight’s meeting. “Everyone can agree that single-use bags are a litter and a natural resource issue,” said Councilmember Kim Porterfield, Place 1.
Took me awhile to read all the comments, but I really love the article. It proved to be very useful to me and I am sure to all the commenters here!
welcome to our company website Supra Indy NS Black White Mens Skate Shoes wholesale supra indy ns,supra justin bieber,supra skytop,supra vaider,supra tk society,supra bandit for men,for women and for little kids,
There is obviously a lot to know about this. I think you made some good points in Features also.
ヴィトン ヴェルニ 財布
とちぎ恋活サイト(直メール恋活サイト(ちょくめーるこいかつさいと) 2010-04-11 05:09)
ちょくめーるでじゅくじょを見つけて今日、出合おう!であい募集は簡単!現在のプライベートで女性との出会いが無くてセフレが作れなかった貴方でも大丈夫!ちょくめーるで簡単に高い確率で出合えます!メアド公開出来る!本気でヤリ友の女の子と出逢うなら即、むりょ..
連絡メールアドレス:[email protected]
HOME:http://www.brand-copy-shop.com
http://www.brand-copy-shop.com/categories/Breguet.htm
Recent winner of the X Games Superpipe competition, snowboarding superstar Shaun White will serve as an AIRBRAKE ambassador to help fake Oakleys spread the word about the unrivaled advantages of the new goggle. The world-famed gold medalist has been a devoted Oakley athlete since his early teen years.
“The best Oakleys Store represents a very important international doorway into the Mexican and Latin American market, which we believe fake oakleys The result is an entirely new system that maximizes vision and protection while letting the athlete adapt quickly and easily to changing light conditions. AIRBRAKE brings all the comfort, durability and style that pros expect from the Oakley brand, and it is available to anyone who wants to take performance to the highest elevation,” Baden concluded.
welcome to our company website Supra TK Society Justin Bieber Purple Suede Shoes sale supra justin bieber shoes,cheap supra justin bieber shoes,justin bieber shoes for men,size for us8-us13,high quality and sale $49.98 only,
I’ve been looking for. I have been surfing the internet for two hours searching for it and wish I would have found your site sooner. Not only did I locate what I was looking for, but found answers to questions I never even thought to ask myself.
Ich mag lesen Ihre Post Sir.Vielen Dank für den Austausch dieses Wissens.
What a great article, I am entering university in september and will cperfect, I found this is very good blog, I’ll recomment it to my friends.
Thank you for your sharing!
nike shoes
Louis Vuitton Handbags
Our Moncler Kids Clothing online store supply Moncler jackets for customers with attractive discounts, Kids Moncler Coats is not can make you warm in the cold winter but also can make your baby more lovely
Moncler Kids Jackets Fitted Puffer with Hood are selected with high quality and fashion styles, welcome to monclerkidsclothing.com now, really be worth to own our products, free shipping, fast delivery for you!
Thank you for sharing good articles, posts and more are waiting.I will read another time. Nice to see you back. And again with an interesting post.
ブライトリング時計
IEコンポーネント利用のタブブラウザ「Sleipnir(スレイプニル) 」を導入してみた。 なんだよいまさらタブブラウザかよ!もうみんな導入してるっつーの!遅せーんだよ!とか言われそうだが、別に今になって初めてタブブラウザを知って導入した訳ではない。これまでD
連絡メールアドレス:[email protected]
HOME:http://www.brand-copy-shop.com
http://www.brand-copy-shop.com/categories/Breguet.htm
Several things in here’ haven’t considered before.Thank you for making this type of awesome publish that is really perfectly written, is going to be mentioning lots of buddies relating to this. Maintain blogging.
http://www.joomla-web-developer.com/
Thank you for your great article and I enjoyed reading it keep the good work.
i like your article very much.thanks for you share with us
welcome to our company website Womens Nike Air Jordan 13 High Heels Boots Red White Black cheap jordan high heels boots with high quality guarantee and discount price at sneakersvalue.com online.”
Hi! Awesome topic, however, your web page ceases to monitor with FF4 experiment with.May an individual’s machine stop your Ip? Thank you so much.
Good work! Thanks for these kinds of interesting article as I have been able to find here. I agree with most of whats written right here.
cheap herve leger clothing purchase usually be protected and sensible within your efforts. Herve Leger clothing
It is well-documented that grownup men and ladies with reduce stress ranges are also physically healthier and much less at danger for increased our blood stress and center disease. However, treating KS does not enhance survival from helps itself. If your devotion is toward walking and jogging then the treadmill is your most exceptional option. Herve Leger bandage
Get in to the habit of steering at precisely the exact time and toward precisely the exact area every day. The surest method of finding the last results you wish will be to go on the complete time whole body setting up program. Herve Leger skirt
Cinnamon, fenugreek, garlic, coriander, ginger and caper will be the spices most effective in lowering our blood glucose and abnormal our blood lipids.
welcome to our company website Nike Air Max Griffey Fury-Spring 2012 Black White Men Shoes newest editon,wholesale price for $58.66,size for us8-us13 mens,fast shipping for 6-9 working days,
welcome to our company website Supra TK Society Justin Bieber Purple Suede Shoes supra justin bieber shoes,cheap supra justin bieber shoes,justin bieber shoes for men,size for us8-us13,high quality and sale $49.98 only,
Super-Duper site! I am loving it!! Will come back again – taking you feeds also, Thanks.
welcome to our company website Air Jordan 6 Air Yeezy-Glow In The Dark-Black-Metallic Gold Jordan 6 air yeezy,jordan 6 glow in the dark wholesale online,new style of nike jordan glow in the dark shoes with cheap price and discount,ship from china,size for us8-us13,
welcome to our company website Penny Hardaway Shoesnike penny hardaway rookie lwp basketball shoes,we got hardaway rookie lwp binary blue,dark neon royal,white,gold balck model,size for us8-us13,credit card,master card,paypal accept from china wholesaler-sneakersvalue.com.”
I thought I would leave my first comment. I don’t know what to say except that I have enjoyed reading.Nice blog,I will keep
visiting this blog very often. Took me awhile to read all the comments, but I really love the article.
I really like the fresh blog you did on the issue.
UGG Gaviota 5749 Boots. With the smoothest suede and nubuck cowhide merging for a sumptuous apex, The UGG Gaviota short boots stare as luxurious as they feel.ugg bailey button 5803 boots
Slide your feet into UGG Gaviota boots and experience: Offered in neutral colors flawless for decline Suede apex in a casual fringed lower limb junction boot manner ugg boots bailey button with a throughout toe. Sheepskin surface covering and suede-topped Poron(R) cushioning insole, flexible cork rubber midsole.
welcome to our company website Supra TK Society Justin Bieber Purple Suede Shoes cheap supra justin bieber shoes,justin bieber shoes for men,size for us8-us13,high quality and sale $49.98 only,it worthy to having.”
requin tn pas cher,requin tn
Our main products have various series, such as china water pump,fire pump,sewage pump,submersible pump,centrifugal pump,diesel fire pumpand split case pump. Our pumps are widely used in different industries, such as petroleum, chemistry, metallurgy, mine, power generation, urban construction and agricultural irrigation.
I love your creativity. Now I want to do my own. I’m glad I have visit this site. A new place for learning.
We Sale Cheap Jerseys ,Buy Cheap NFL Jerseys, MLB Jerseys, NBA Jerseys,NHL Jerseys Wholesale From USA Authentic Quality.
Cheap Ugg Boots
Canada Goose Parka online shop har 2011 nyankomne Canada Goose jakker og billig Canada Goose jakke,
Mer overraskelse du buy Canada Goose jakke,Now vil nyte high kvalitet og billig pris!Velkommen til buy Canada Goose Norge.
welcome to our company website Nike Air Griffey Max 2-GD In White Black Shoes china nike air griffey max 2 cheap sale,knockoff nike ken griffey shoes low price with $56.89,size for us8-us13,
The quick coat glimpse with hoods in addition which reveal a relaxed put on-line. In inclusion, moncler jackenthe clear-cut portions to your Moncler short coat can also be for the existing marketplace that is certainly ideal for almost any informal time. whenever people learn the excellent Moncler hat for yourself, no challenege show up whether it can look making a ask for any hood,moncler jacketsan easy type or perhaps cautiously reduce contour, you critically just isn’t heading to get got the capability to support your fingers away the idea!
http://www.monclerexpress.com
http://www.airjordanmaster.com
http://www.onlinebagoutlet.com
welcome to our company website Mens Nike Air Max 2011 Mesh Wolf Grey Running Shoes sale cheap nike air max 2011 running shoes,mens nike air max 2011 shop,wholesale price $58.49,
Like life Like sport
Moncler brief coat are generally founded for at the same time sexes and really moncler jackenare a evidence on the process brute within of the baby, that will be substantially prized by all. every particular person and all people who are the owners of a moncler jacketsMoncler crown knows just what exactly process is actually and holding these forms of apparels is usually a marking from the classy and also sassy man or woman.
Thanks for nice information.. I am going to bookmark this page. keep it up. in future i will visit again thanks again.
Nice to be visiting your blog again, it has been months for me. Well this article that I’ve been waited for so long.
welcome to our company website Nike Air Max Lebron 8 V2 Christmas Red Nike Air Max Lebron 8 V2 Christmas sale cheap now,only $66.79,colour for red \\\”run on day\\\”,size for us8-us13,
Saw your this article, let me producing the hope to the community again. is a fire that you let my in the mind set alight the hope afresh, is you make my heart cold ashes burn again, is you rescued me a stirs the cool stirring the cool heart!
Hey! Useful post! I am just a daily website visitor of this website unfortunately I had a challenge. I am just possibly not absoluetly certain if it is the right site to ask, but you’ve got no spam comments. I get comments on a regular basis. Could you assist me? Thanks a lot!
As all as we know, the cheap ray bans is popular at the word, we have ray ban sunglasses sale online, welcome to buy discount ray ban sale from china.
Great information you write it very clean. I am very lucky to get this tips from you.
Thank you for one more nice article. The place else may anybody get that kind of information in such an ideal approach of presentation.
welcome to our company website Air Jordan 6 Retro-Glow In The Darkif you want to purchase jordan glow in the dark shoes,here cheap price and 100% quality guarantee ! and our website is your best choice.”
welcome to our company website Mens Nike Air Max 2011 Punching Red White Running Shoesmens nike air max 2011 shop,wholesale price $58.49,accept paypal,credit card,master card,size for us8-us13,they are fake sneakers at Sneakersoem.com .”
welcome to our company website Mens Nike Air Max 2011 Mesh Royal Blue Grey Running Shoesmens nike air max 2011 shop,wholesale price $58.49,accept paypal,credit card,master card,size for us8-us13,they are fake sneakers at Sneakersoem.com .”
welcome to our company website Mens Nike Air Max 2011 Punching Red Black Running Shoes cheap nike air max 2011 running shoes,mens nike air max 2011 shop,wholesale price $58.49,accept paypal,credit card,master card,size for us8-us13,they are fake sneakers at Sneakersoem.com .”
welcome to our company website Supra TK Society Justin Bieber Purple Suede Shoes sale supra justin bieber shoes,cheap supra justin bieber shoes,justin bieber shoes for men,size for us8-us13,high quality and sale $49.98 only,it worthy to having.”
can carry bright integralMac cosmetics outlet color of skin and make skin look strong administrative levels feels.MAC (MARS) highlights and gold is the fluid foundation: MAC highlights contain aureate flash powder, Mac cosmetics outlet with strong grooming effect, after use, the colour of the skin will be very natural, and can help show the best effect makeup look. MAC fluid foundation fusion of natural Mac cosmetics outlet
Definition: door hole worm gucci belt replica of many of the shell, the one of the form. In the opening super families in worm skeleton three mutually perpendicular plate lined the round or oval bone perforation plate. gucci belt replica The basic shape belt in a system, or the secco and big changes in the eye.gucci belt replica Used to waist band, belt.gucci belt replica
t ways like sunglasses income Fake oakley sunglasses bursa it The agitation restoring ancient ways in the fashion circle never seem to persist, Fake oakley sunglasses if you know how to overcome it is Jacqueline Kennedy, then the series of restoring ancient ways sunglasses will be your income bursa Fake oakley sunglasses
Very nice post. I just stumbled upon your blog and wanted to say that I have really enjoyed surfing around your blog posts. After all I’ll be subscribing to your feed and I hope you write again soon!
Beautiful! Thank you for sharing! Generally speaking, I never look at the whole article, but you write the way this information is simply amazing, it has been my interest in reading, I love it. Look forward to your update!
Mens UGG Boots Clearance are the very useful boots . UGGS Clearance they are consist of good quality rubber and leather . UGG Classic Boots Clearance it have great Ge2011m14 soft fluffy on inside.
Well said. I never thought I would agree with this opinion, but I’m starting to view things from a different view. I have to
research more on this as it seems very interesting. One thing I do
Here are some Ugg Boots Ugg boots rightful points regarding how to muddy concocted UGG boots. Resilient distinctions energy the UGG logo manifest in between sure-enough pairs once again fakes. Livelihood a jelly estimation on its stitched established down. Sight alien seeing the entrance boots are packaged guidance. Or find out what forms of resources the genuine solitary good. However, an dense notion blame hardly even more these me there are some UGG Classic Boots rightful recommendations concerning how you can muddy concocted UGG boots.
welcome to our company website Nike Air Max Lebron 8 V2 Christmas Day nike air max lebron 8 v2 christmas red and blue 2011 with high quality and reasonable price,fast shipping to worldwide,it worth to having.”
内側の作品初期ラドー時計に一握りの歯車や車輪の 2 つの金属板の間に位置して含まれています。プレート ?柱プレートは必ず保護されたダイヤルをかかっている上のプレートが入力できます 2 つのユニタリ部分の上部プレート最高した時計を使用がします。プレート正確に掘削され、適切な場所で、別のコンポーネントに退屈。可動部品を着用するには、ハードの宝石は移動のペグまたは軸を利用した活用されました。組織 4 車輪たるホイール、番号を 1 つのホイール、これらの車輪としてさらに 3 番目のホイールを知られている作品では。バレル ホイール原動力への添付ファイルとしてだけが必要です。
伝統的な時計のデザインからの偏差、懐中時計原動力、ひげゼンマイのバランス ホイールに加えての混合物を使用します。純粋に伝統的な時計のデザインに反しては揺れる振り子と重みカウンターを使用します。
welcome to our company website Nike Air Yeezy 2 Grey Orange-Kanye West Shoescheap kanye west nike air yeezy 2 shoes,mens nike air yeezy 2 online,discount price $57.66,size for us8-us13,fast shipping 6-9 days ship to us,
i learn a lot of things from ur website,,i will come again ,thanks
This is same stuff what i was
been here reading for about half an hour
This is a good article.
anks a lot for your information.
canada goose jackets
In winter, especially in the extremely cold place, you want to owe a boot which is both warm and fashionable. Cheap UGG boots, cheap UGGs and UGG boots sale. Welcome to our UGG boots sale Online Store, UGG boots are publicly regarded as one of the best choices to keep feet warm in winter and many people like to wear the boots when cold winter is coming. Cheap UGG boots is one of the most common means that used to raise UGG boots sale. The reason that many people like to buy UGG boots in an opposite season is that UGG boots sale in this moment are very cheap. And opposite season is also the time that the ugg outlet store will do their best to sell out all leaving boots in last year and to offer the new arrival of the coming season.
Besides, you also can search cheap UGG boots in UGG outlet
stores online, more about Cheap UGGs, cheap ugg boots, ugg boots outlet, ugg outlet boots.
Because it can be known for you to almost all, [url=http://www.monclercheapeststore.com]moncler jackets[/url]hiking have to be one from the better strategies tencounter the specific design. Specifically after you are located towards the type grass [url=http://www.monclercheapeststore.com]moncler jacken[/url]and additionallyobserving the actualmoncler bresle[/url]megastars towards the atmosphere. An item appears being you will probably toachieve they will by using hands.
I would like to thank you for the efforts you have made in writing this article and I am hoping the same best work from you in the future as well.
Ladies North confront JacketsDue to ski gatherings is usually a chilly surroundings in the sports, so make a decision on out within of the close-fitting outfits – Womens The North confront Suit, acquired much larger not use cotton treatments and wonderful wire PuGuan materials, breathable and can make close-fitting underwear. Molecular totally sweat,North confront Jackets, it honestly is a internal heart coating suction influence of unidirectional soluble fiber materials, non-absorbent, external is cotton, The North confront specify is generally absorbed in cotton in sweat, the influence is exceptionally good. If a young lady noticed a area where by market reasonably-priced Moncler short coat North Face Jackets confront short coat Online, Moncler short coat low priced North confront Jackets, she will accomplish up getting exceptionally happy.The Moncler Coat will regularly be considered a pattern, also offered that the truth that brand feature an extremely strict plan within of producing clothes. women North confront JacketsDue to ski gatherings is usually a chilly surroundings in the sports, so make a decision on out within of the close-fitting outfits – Womens The North confront Suit, acquired much larger not use cotton treatments and wonderful wire PuGuan materials, breathable and can make close-fitting underwear. Molecular totally sweat,North confront Jackets, it honestly is a internal heart coating suction influence of unidirectional soluble fiber materials, non-absorbent, external is cotton, The North confront specify is generally absorbed in cotton in sweat, the influence is exceptionally good. If a young lady noticed a area where by market reasonably-priced Moncler short coat North confront short coat Online, Moncler short coat low priced North confront Jackets, she will accomplish up getting exceptionally happy.The Moncler Coat will regularly be considered a pattern, also offered that the truth that brand feature an extremely strict plan within of producing clothes welcome to here http://www.cheapsnorthfacejackets.com/.
requin tn pas cher,tn requin pas cher,requin
, thanks for your nice share.nice wel
faithful reader. Thank you again.
ur website, good lucky ,,i will come usually
website,thanks, Nice
Hello, Would it be possible to make use of this great write-up on my site? I would naturally uggs outlet backlink back to you. Let me find out what you determine to perform. You got some great ideas there. I did a search on the issue and learnt north face jackets most peoples will agree with your blog. If you are an experienced traveler, you may know the ins and outs of travel to cheap oakleys all parts of the world, and you may have very specific ideas about what you want to see and where you want to go. I really like seeing websites that cheap oakley sunglasses understand the value of providing a quality useful resource for free. Do you accept advertisers?
Maggior parte degli sviluppi proprio come [url=http://www.guccimio.com/] Gucci [/url] sono appena scoperto tutto enorme destinazioni metropolitane come New York, Los Angeles, oltre a Chicago e una volta ancora una volta questo particolare è certamente solo un aspetto che non è là fuori per un gran numero di individui. [url=http://www.guccimio.com/] Gucci Borse [/url]. Mentre in realtà questo tipo di destinazioni metropolitane assistere numeri incredibili per quanto riguarda gli uomini e alcune donne in questo momento non ci sono luoghi in genere limitati e in circostanza vi capita di essere visitato molti solo una di quelle destinazioni persone metropolitano un gran numero di uomini e alcune donne non possiede il reddito più da perdere rispetto di un modello di identificare esattamente come [url=http://www.guccimio.com/] Scarpe Gucci [/url].
Maggior parte degli sviluppi proprio come Gucci sono appena scoperto tutto enorme destinazioni metropolitane come New York, Los Angeles, oltre a Chicago e una volta ancora una volta questo particolare è certamente solo un aspetto che non è là fuori per un gran numero di individui. Gucci Borse . Mentre in realtà questo tipo di destinazioni metropolitane assistere numeri incredibili per quanto riguarda gli uomini e alcune donne in questo momento non ci sono luoghi in genere limitati e in circostanza vi capita di essere visitato molti solo una di quelle destinazioni persone metropolitano un gran numero di uomini e alcune donne non possiede il reddito più da perdere rispetto di un modello di identificare esattamente come Scarpe Gucci .
Make your personal channel on YouTube and personalize the page, cheap ugg boots in order that it looks good and reflects your personality. If a person likes a video that you post, they may then click on via to your cheap oakley sunglasses channel and watch much more of your videos, in addition to leave you a message. This may be a fantastic method to solution to get cheap oakleys YouTube views. This is my first time I have visited here. I found a lot of interesting information in your blog. From the volume of comments on your articles, north face jackets on sale I guess I am not the only one! keep up the good work. Thank you very much for sharing a lot of this great content! Looking forward to reading more blogs.
Today you only need to visit a web ,find your Moncler doudoune femme or coat and buy it. Women can take Moncler Blouson – with its 3/4 length, feather down lined, in the same time men enjoyed knee-length jacket with 2 pockets, or Moncler Homme for Men. Whatever you choose from Moncler doudoune homme – it is the best clothing.
An amusing look at some of the latest must-have bags and accessories. vuitton romance
Again, the main focus is on designer bags but mixed in with celebrity fashion news. Vuitton Sarah Wallet The girls recently featured in Grazia marking their status as true bag snobs. louis vuitton speedy
[email protected]
PUMA is the global sportlifestyle brand known for fusing the influences of sport, lifestyle and fashion. PUMA was the first athletic brand that was not scared to bring fashion into the mix.
onlinewatchstore
sctookeiya店のブランドコピー激安市場 腕時計☆財布 販売スーパーコピー時計専売店↓
*スタイルが多い、品質がよい、価格が低い!
*送料無料(日本全国) ご注文を期待しています!
*信用第一、良い品質、低価格は
*当社の商品は絶対の自信が御座います。
激安、安心、安全にお届けします.品数豊富な商
商品数も大幅に増え、品質も大自信です
100%品質保証!満足保障!リピーター率100%!
連絡先は:[email protected]
http://www.sctookeiya.com/
Louis Vuittion Clothing green, navy blue water duck and bone brown, pieced wine red, blue, gray and black, grey extracted from U.S. distinguished reality inspiration send painter and etchers Edward Hopper works. Skirt length also mini skirts,Gucci Clothing medium length and dresses up, because he didn’t said which is the most fashionable.
Thank you for sharing your content is very rich, contains a number of philosophical interpretation of the world views you, thank you very much for bringing us so full of deep meaning of the article. I learned a lot. Thanks again, look forward to your update!
Rajoy has been in opposition since 2004 and polls suggested he would be heading the new government.
Oh Lauren you are such a sweetheart please add me on fb Noel Abby Barber… I love your website <3 keep it up
moncler jackets cheap is the famous brand which headquarters located in France Grenoble,specialize in the production of outdoor sports equipment.Excellent moncler jackets have the superior functional characteristics,which is make from the lightweight materials and waterproof fabric.Moncler Down Coats have very trendy design,which not only keep you warm but also fashionable.moncler jackets sale for women let you own colorful lives in dull cold winter.genuine classic ugg also are very windproof and fashionable,practicality is the best in current economic situation.
I’ll be back soon on your site again so please continue sharing your great tips.
people of whole ages and sex can find their Ugg boots in stores or online.
http://uggsoutletstoreonlinesale.com
http://www.bestuggsonclearance.com
Thank you for your article, it is the object of my search, it is some information to give me a lot of inspiration. Reference to your article, I report the market will have a great breakthrough. Thank you very much!
Pretty good post. I just stumbled upon your blog and wanted to say that I have really enjoyed reading your blog
http://www.canada-goose-jakke-dk.com canada goose jakke
http://www.nikerunfree-no.com nike run free
http://www.vendita-scarpe-mbt.com vendita scarpe mbt
http://www.mbt-scarpe-2011.com mbt scarpe
http://www.moncler-piumini-it.com piumini moncler
good post ,looking forward to your next .
When you are old and gray and full of sleep
And nodding by the fire,take down this book,
And slowly read,and dream of the soft look
Your eyes had once,and of their shadows deep;
http://www.tiffanyoutlets.com/12-tiffany-locket
How many loved your moments of glad grace,
And loved your beauty with love false or true;
But one man loved the pilgrim soul in you,
And loved the sorrows of your changing face;
http://www.tiffanyoutlets.com/11-anchor-pendant
And bending down beside the glowing bars,
Murmur,a little sadly,how love fled
And paced upon the mountains overhead,
And hid his face amid a crowd of stars.
The day is cold, and dark, and dreary;
It rains, and the wind is never weary;
http://www.louisvuitton-pas-cher.com
The vine still clings to the moldering wall,
But at every gust the dead leaves fall,
And the day is dark and dreary.
This is all very new to me and this article really opened my eyes.Thanks for sharing with us your wisdom.
The latest achieve miraculous Fendi repeatedly (Fendi) by 2010,
Wholesale Air Max Shoes qiu dong series welcomed the downy tone: teach enchanted orange,
Louis Vuittion Clothing green, navy blue water duck and bone brown, pieced wine red, blue, gray and black, grey extracted
Nice Brand Coach Handbags – Perfect Most people’s first luxury consumer is a bag. Nice Brand Coach Handbagsair max shoes
In my world of the senses, your article humorous, make people feel relaxed and happy. This is not urgent, your article also with the philosophy of life, inspired by the self is in the lost friends. Thank you for sharing.
I would name your blog the dreamland! While Santa knocks at our door just once per year, you blog is open the whole year – wow!
This post has been somewhat of a revelation to me.
Pretty good post. I just stumbled upon your blog and wanted to say that I have really enjoyed reading your blog posts. Any way I’ll be subscribing to your feed and I hope you post again soon.
moncler outlet, moncler 2012, moncler cheap, moncler sale
My friendS told me that this blog is competitive.i will continue to read.
I wonder how you got so good. This is really a fascinating blog, lots of stuff that I can get into. One thing I just want to say is that your Blog is so perfect!
supermodel to show his design for Gucci sexy autumn fashion series Louis Vuittion Clothing on the stage with minimalism
while terribly hot image.Ford completely changed Cheap designer clothing the past luxuriant style of Gucci and injected sexy
gene to let Gucci become today’s sexiest brand.
Ugg boots first Ge2011m1205 attempt kids ugg boots clearance for men, also it throw a problem to them about wearing. Women can wear with jeans, shirts, and also hot pants. However, kids ugg boots sale the dress of men is different. So it is very important for men kids ugg boots cheap to show their personality.
I am happy to find this post very useful for me, as it contains lot of information. I always prefer to read the quality content and this thing I found in you post. I like this blog!!!
Moncler can be a manufacturer relating to outfits when don adds up far far more cost in your qualities, elegance, magnificence and seems. Not just for can most of these garments stop together along with including a lot more cost inside your psychological views however it likewise leads to cost with your income.
So fun article is! I agree the idea!
myshoxsneakers.com sale many kinds of footwear online, we provide low price and best service, it must have one special shoes to fit your style. Each new shoes launch features a perfect combination of forward-thinking technological advances in comfort and functionality along with revolutionary designs and artistic detailing, changing the way the world sees footwear. Redesigned cheap nike shox,nike shox and so on retro styles pay homage to the greats of the past, yet take the advances of the present and future to a whole new level.We have perfect Logistics system, which guarantees all the ordered Nike shox shoes or air max shoes are delivered to you in good shape as fast as possible
I monster beats,monster beats believe custom jerseys,custom jerseys that supra shoes,supra shoes we are not real tods shoes,tods shoes social workers.
I love your blog so much, and there are just some differences with others’. Hope there will be more wonderful things in your blog. Happy every day!
I love such features, they make blogging to fun and loveable
I think we need to bring more ideas for this purpose. Involvement of young people can be handy in this regard. I am happy to find a good post here.
Thank you
Ci sono innumerevoli i negozi netta ottenibile sulla rete che forniscono [url=http://www.guccimio.com/]Scarpe Gucci[/url] per ragazzi collettivamente altrettanto con le donne. Ma ora la query emerge quando ci sono così numerosi negozi ottenibile per ottenere queste scarpe allora è proprio identico ad acquistarli da qualsiasi usando la rete per l’archivio? [url=http://www.guccimio.com/]Gucci Donne[/url],Così non esiste un modo mediante il quale solo si possono acquistare più meravigliose scarpe di alta qualità genuina [url=http://www.guccimio.com/]Gucci Borse[/url] che, oltre a migliori prezzi di avvio invece aumentare il traffico di oggi, semplicemente presentando gli articoli con noi, clicca qui per iniziare.
Ci sono innumerevoli i negozi netta ottenibile sulla rete che forniscono Scarpe Gucci per ragazzi collettivamente altrettanto con le donne. Ma ora la query emerge quando ci sono così numerosi negozi ottenibile per ottenere queste scarpe allora è proprio identico ad acquistarli da qualsiasi usando la rete per l’archivio? Gucci Donne,Così non esiste un modo mediante il quale solo si possono acquistare più meravigliose scarpe di alta qualità genuina Gucci Borse che, oltre a migliori prezzi di avvio invece aumentare il traffico di oggi, semplicemente presentando gli articoli con noi, clicca qui per iniziare.
Oct 17, 2011 Monster Headphones,Dr Dre Beats,Beats by dre viewed from raising the true tour dates, Monster Beats l.beats by dre solo ike a consequence of Dr. Dre Studio Find upcoming Snoop Dogg tour dates or use Eventful Demand to get your city Snoop Doggs freestyle over En Vogues Hold On was heard by Dr. Dre at a Jun 10, 2010 Tags 2010 up in smoke tour, all stars, amaz.beats by dre solo on co uk, another up in smoke tour, CLICK, com, Cube, does justin beaber smoke, Dogg, dr dre Feb 4, 2011 One Response to Dr. Dre is back Log in .Monster Headphones solo to Reply The Game confirms Olympia Theatre Dublin concert date for November 20th 2011 Music Nov 4, 2011 beats, keyboard, beats by dr dre, dre beats, tattoo machine, songs dr dre top ten dr dre detox tour dr dre tour dates dr.Beats Sale Online solo dre tour Aug 14, 2008 Pick up a copy today to see the interview Dr.
Moncler Piumini sono un buon modo per mantenere il vostro senso della moda vive in ogni stagione. Quando si indossano giubbotti Moncler caldo ed elegante, si non può non innamorarsi di fiducia e personalità che giubbotti Moncler portare a voi! Come per un famoso marchio, Moncler Giubbotto è continuare a muoversi nel mondo della moda, continua a lanciare sempre più di moda giubbotti Moncler per incontrare più persone moda needs.We non so come esprimere la popolarità di abbigliamento Moncler, Moncler è diventata sostenitori ufficiale ai Giochi Olimpici invernali del team francese di sci nazionale del 1968.
While Moncler Vendita abiti di design è l’ideale per lo sci sono stati dimostrati immediately.Thought il Moncler è così popolare, il modo per comprarli non è così facile. Outlet Moncler è la prima scelta di stili e colori dei giubbotti Moncler. Puoi iscriverti al commercio elettronico serie Moncler accessorio giacche grande che ti dà la migliore qualità della giacca in modo molto ragionevole price.Fortunately, Moncler negozio on-line è molto conveniente, Piumini Moncler la convenienza di internet ha reso lo shopping a disposizione 24 ore al giorno.
moncler pas cher, manteaux moncler
, doudoune moncler at http://www.manteauxmonclerpascher.com
Come un famoso marchio, Moncler Giubbotti è stata estesa per i vestiti forte ora in avanti bello è appropriato, o sulla parte superiore della la montagna in città, anche in daili ogni momento di debolezza. Oggi, ci riferiamo alla barra di prestazioni marina giubbotti Moncler e fashion design. Moncler cappotto staminali e lo stile lussureggiante, con i loro jeans e pantaloncini è molto semplice. Moncler cappotto staminali e il design particolare vi metterà guardaroba di energia e di entusiasmo. Inoltre, la giacca è adatta per il freddo a ovest. Ogni tipo di Moncler Giubbotto sono sia gli uomini che hanno le loro diverse caratteristiche, il design appositamente per persone speciali.
http://www.monclersitoufficiale-italy.com/
Very good!
“The best Oakleys Every year in a little town known for being home to the 2002 Winter Olympic Games, Park City, Utah hosts Sundance Film Festival. Sundance was started by Robert Redford as a fun and relatively small event, but today is one of the biggest independent film festivals in the world.
スーパーコピー専門店,スーパーコピー,スーパーコピー時計,ブランドコピー時計,ブランドコピー時計,ロレックス,パネライ,ウブロシャネル,ブライトリング,IWC,フランクミュラー,カルティエ,オーデマピゲ,ヴァシュロンコンスタンタン等,その他の世界一流スーパーコピーを取り扱っていますwww.yahoo-watch.com
http://www.yahoo-watch.com
ようこそ購入するる
email:[email protected]
ようこそショッピング、非常に感謝して!
July 1st, 2011 at 12:55 am 152
This is such a great resource that you are providing and you give it away for free. I love seeing websites that understand the value of providing a quality resource
I wonder how you got so good. This is really a fascinating blog, lots of stuff that I can get into. One thing I just want to say is that your Blog is so perfect!
Is it ture that there is a real Coach Outlet Store Online which sell the original coach items? why so many websites on google search claim that they are Coach Outlet store? Also the coach factory out store?
Its also informative information. Thanks for showing and sharing. how much money you spend on it all . I appreciate you sharing this advice. I begin so abounding absorbing being in your blog abnormally its discussion. Now I just need a ton of land to do it on.
http://www.rockheadphone.com/monster-beats-studio-michael-jackson-limited-edition-headphone-p-65.html Monster Beats Dr Dre Studio Michael Jackson Limited Edition Headphone
http://www.rockheadphone.com/monster-beats-turbine-high-performance-inear-headphone-p-27.html Monster Beats Turbine In-ear headphone
http://www.rockheadphone.com/monster-ibeats-by-drdre-blackred-with-controltalk-headphone-p-33.html Monster Ibeats By Dr Dre With ControlTalk Headphone
http://www.rockheadphone.com/monster-ibeats-by-drdre-chromered-with-controltalk-headphone-p-39.html Monster Ibeats By Dr Dre With ControlTalk Headphone
http://www.rockheadphone.com/monster-ibeats-by-drdre-sliverred-with-controltalk-headphone-p-34.html Monster Ibeats By Dr Dre With ControlTalk Headphone
http://www.rockheadphone.com/monster-lady-gaga-heartbeats-black-inear-headphone-p-31.html Dr Dre Lady gaga Heartbeats Black In-ear headphone
http://www.rockheadphone.com/monster-beats-by-dr-dre-studio-white-isolation-headphone-p-63.html Monster Beats By Dr Dre Studio Headphone
Oakley, Inc. today announced the release of fake oakleys, Suddenly a day to listen to the girl friend say that want to dr. With my Lord, let me have the memories of a segment. Now of I, the life is very simple, but is not willing to take off glasses. Is probably heard too many people say “you wear glasses looks very like a teacher, is very WenQi” the words like, so heart and then have some self-righteous pride. Or, in this life, I, destined to have no love with glasses!!
YES! I finally found this web page! I’ve been looking just for this article for so long!!
http://www.menacorde.com/wordpress/?p=608
I have to say that your analysis in this article is greatly remarkable. I very much enjoy your article.
Aluminum angle is used for construction purpose. Machine parts are made of this angle. Stock car is company which deals in it. You can find different angles with stock car. For more information click http://www.stockcarsteel.com
I have been in Easter mode for a month now, due to stamp releases! LOL! I felt like the stores had to catch up with us, for once.
This is what I have been searching in many websites and I finally found it here. Amazing article. I am so impressed. Could never think of such a thing is possible with it…I think you have a great knowledge especially while dealings with such subjects.Smart Home
[url=http://www.smithmonitoring.com/smart-home-security.php]Smart Home[/url]
Chaussures inspirées par la neige en hiver et de branches sèches, la couche extérieure de chaussures de toile enduit imperméable grace à la technologie semelle anti-fatiguecanada goose outlet
Beats by Dr Dre
Manolo Blahnik Sale a partner who Mmanolo Blahnik boots sale values and passion and who Under the ownership of discount louboutins the private group Jimmy Choo will concentrate on expanding its presence in continental Europe, the US and Asia.
Avoir un casque grand rêve de mélomane chacun et de tous », kljcs1225″ vous avez la chance de créer un rêve qui se précise, dans le cas où vous obtenez un [url=http://www.godrebeats.com/] Beats Boutique [/url]. Connaître le réel ce qui signifie d’une chanson, Beats By cher si grand pour les écouteurs Dre, semble devenir étudier la musique est considérable. [url=http://www.godrebeats.com/] Casque Dr Dre [/url]. DRE pourrait être votre choix très efficace une fois que vous souhaitez obtenir une bonne paire d’écouteurs. Dream est un souhait général casque monster, DRE et le bouquet fleurs ambition de rêve aussi de vaincre le monstre, le jour juste avant, de sorte que l’hybridation et la sincérité, la DRE a hésité à vaincre des monstres, comme vous le plus bas! Whispering, le cœur brisé, la coagulation des larmes jampacked, ne souhaitent pas se lever, généralement par l’ERD dans battent monstres Bloom rêve de retard. [url=http://www.godrebeats.com/] Casque Monstre Beats [/url] «Avec le recul, si oui ou non il est des fleurs, j’ai battu le temps d’adoration monstre DRE, impressionner you.Thinking vous concernant ne sera un solo à faible coût bat DRE DRE graphite réaliser ce que le téléphone deuxième temps, solitaire, seul le goût;. Dr Dre casque, seulement contempler l’équité, ne peut pas vous laisser savoir de ne pas vous déranger.
Avoir un casque grand rêve de mélomane chacun et de tous », kljcs1225″ vous avez la chance de créer un rêve qui se précise, dans le cas où vous obtenez un Beats Boutique . Connaître le réel ce qui signifie d’une chanson, Beats By cher si grand pour les écouteurs Dre, semble devenir étudier la musique est considérable. Casque Dr Dre . DRE pourrait être votre choix très efficace une fois que vous souhaitez obtenir une bonne paire d’écouteurs. Dream est un souhait général casque monster, DRE et le bouquet fleurs ambition de rêve aussi de vaincre le monstre, le jour juste avant, de sorte que l’hybridation et la sincérité, la DRE a hésité à vaincre des monstres, comme vous le plus bas! Whispering, le cœur brisé, la coagulation des larmes jampacked, ne souhaitent pas se lever, généralement par l’ERD dans battent monstres Bloom rêve de retard. Casque Monstre Beats «Avec le recul, si oui ou non il est des fleurs, j’ai battu le temps d’adoration monstre DRE, impressionner you.Thinking vous concernant ne sera un solo à faible coût bat DRE DRE graphite réaliser ce que le téléphone deuxième temps, solitaire, seul le goût;. Dr Dre casque, seulement contempler l’équité, ne peut pas vous laisser savoir de ne pas vous déranger.
Circa tre dozzine di combattenti talebani pakistani armati con fucili d’assalto hanno attaccato un campo paramilitare nella zona del serbatoio vicino Waziristan meridionale prima dell’alba Venerdì, uccidendo un soldato e sequestro di persona 15 others.Ehsan, borse gucci presa portavoce dei talebani, ha detto Venerdì che l’attacco era anche lo scopo di vendicare la morte di Gul. Borse di Gucci presa militanti mirati borse gucci outlet soldati a causa di alleanza del Pakistan con borse gucci outlet Stati Uniti, ha promesso said.Ehsan avrebbero ucciso borse gucci outlet rapito truppe, dicendo: “stiamo andando a tagliare questi soldati a pezzi uno per uno, Gucci Outlet , e vi invieremo questi pezzi ai loro comandanti. “Gucci borse presa talebani pakistani ha condotto una feroce insurrezione in Pakistan oltre presa gucci borse Negli ultimi quattro anni, uccidendo decine di migliaia in parte a causa della sua alleanza con Gucci Borse Donne , e imporre la legge islamica in tutto gucci outlet paese borse.
Louis Vuitton Handbags or perhaps The far east At wholesale prices Bag looks as classy and also desirable since the unique types. This kind of is due to the fact the producers associated with replicas, as mentioned before use extremely high quality materials. These types of manufacturers are also in a position to be able to duplicate the original purse to some large degree. So much so that in bulk associated with instances Cheap Louis Vuitton or perhaps Cina At wholesale prices Bag can easily effortlessly pass associated with since the particular unique 1. The actual Duplicate Louis Vuitton available within the industry may be the specific duplicate associated with the particular unique one. Louis Vuitton bags are usually ageless. They tend to be elegant. They are expensive. Not any longer. Vuitton Bags Sale is the leading brand.
Hi, Thanks for your page. I discovered your page by way of Bing and hope you maintain providing much more good articles.
Wind, blown crystal snowflake Solitude, tods shoes uk,tods shoes uk bleak memory, christian louboutin uk,christian louboutin uk because you and warm. Merry Christmas.
I really wish I hadn’t seen this as I really want one now!
I just required some information and was searching on Google for it. I visited each page that came on first page and didn’t got any relevant result then I thought to check out the second one and got your blog. This is what I wanted!
Perfect for snowy, wet conditions – Women Ugg Boots the UGG Adirondack Boots features a waterproof full grain leather UGG & Jimmy Choo upper with a breathable eVent membrane. An exclusive Vibram outsole UGG Clovis provides durability and traction
Perfect for snowy, wet conditions – vides durability and traction
When the holidays, the Christian Louboutin Sale market may wish to use bath salts or essential oils of plants to accelerate the blood
circulation discount louboutins Cheap Christian Louboutin Sandals into the bath, bubble
bath stovepipe. In order to effect essential oils rapidly absorbed by the skin can take Christian Louboutin Slingbacks a small dish, poured into 5 ml of vegetable base oil, then add twenty-three drops of essential oils you want to type, then
pour in the palm.
In the past Authentic Louis Vuitton Handbags few years, Louis Vuitton luxury Louis Vuitton Scarves brand identity is built on the luxury on the road, so it is natural selection, Louis Vuitton Shoes each time leading the trend out of season atmosphere. 2012 which found that Louis Vuitton bag with colorful theme trend. Are you
ready?
All of this is helpful and have been tested to be successful and if you didn’t smoke too much pot recently. hope your collect data is trustfully.thanks to post this
So, you want to glimpse for some successful guidelines and directions in this regard. If you want you can even seek the services of a skilled for this reason. The to begin with point that you want to do is to test out the shops and pipes for any sort of cracks. If there is any these kinds of predicament then you really should get the
Thanks for the marvelous posting! I genuinely enjoyed reading it, you can be a great author. I will ensure that I bookmark your blog and will eventually come back from now on. I want to encourage continue your great job, have a nice holiday weekend!
I just required some information and was searching on Google for it. I visited each page that came on first page and didn’t got any relevant result then I thought to check out the second one and got your blog. This is what I wanted!
We say thanks to you for our blog’s attention. Welcome you go to our web-site. We will probably be quite grateful to discover you once again!
I like the valuable info you provide in your articles. I will bookmark your weblog and check again here regularly. I’m quite sure I’ll learn many new stuff right here! Best of luck for the next!
Very Nice post! Keep up the good work.
I would name your blog the dreamland! While Santa knocks at our door just once per year, you blog is open the whole year – wow!
I appreciate the way you have put up the post..It has come out well..
Thanks for taking this opportunity to discuss this, I feel strongly about this and I enjoy learning about this topic. I have found it enormously useful. I like the way of representation about the topic. Great stuff and great efforts.Thanks
Really your post is really very good and I appreciate it. Louis Vuitton Outlet is so sexy.the great variety and color selection means that you can have a different Gucci Outlet for every occasion.
public lectures and events featuring world renowned figures since January 2012. You can listen to them or download them here
In order to approach to fashion, people thow away heavy dress, then turned into jackets which look like more stylish. For youngers, they prefer purchase money on moncler jackets, because it designed more fashion than north face jackets. But for olders, they prefer north face jackets.
In 2010, overtaking is permitted after the safety car line.
I enjoyed every tiny bit some of it. It includes truly information. I need to appreciation for this informative read; I really appreciate sharing this excellent.
Aside from seeing your team/driver win, surely events worth discussing are the reason people watch sport to begin with.
Keeping Hi-Lighter Montblanc pen refills on hand means that you will never run out just when you need your yellow highlighter to work.A Montblanc pen refill extends the life of your fine writing pen, and having that pen in hand can help to inspire you to create the next great poem, just as Tennyson did.Mont Blanc has been making fine pens for almost a century now and in the beginning they produced fountain pens exclusively.
Thanks for taking time to write down this write-up. It’s been incredibly helpful. It could not have come at a much better time for me! Great effort and I
Imagine cruising down the interstate doing a good clip with not a care in the world. As you fly past a really nice looking Vette you suddenly realize that this is no ordinary Corvette; it is in fact a police car. Suddenly you stomach sickens as you realize that the Corvette has pulled in behind you, turned on its dash lights,
Interesting Article. Hoping that you will continue posting an article having a useful information.
I seriously enjoy the particular posting and the site all in all! That posting is actually quite clearly written as well as simply understandable.
Useful information shared..I am very happy to read this article..Thanks for giving us nice info. Fantastic walk-through. I appreciate this post.
Very significant article for us ,I think the representation of this article is
actually superb one. This is my first visit to your site
natural minerals
Good post , your article rich in literary talent , technique and describe very unique style of humor , brings a joy and festivity. Not only that , your article also share a lot of helpful information , I believe it makes sense to many people to bring enlightenment .
Among the exclusively sought after mont blanc pens is the Montblanc Meisterstuck black ballpoint pen 164. This medium-sized rare black resin body pen has a sleek
design, accentuated with gold plating (23.5 karat gold). The price of the mont pens is around $200 to $300, and many of pen enthusiasts worldwide have already found it
more than perfect. Most luxury pen collectors, especially corporate executives, professional writers and young professionals, found the blanc pens useful, long-lasting
and somewhat pride-boosting. Montblanc fountain pens are a perfect gift to your brother or sister, your most trusted friend or, why not, even your boss.
This is really my very first time here, great looking blog. I discovered so many interesting things inside your blog especially its discussion
555yxj
I like this post very much, You have defined it very simply for so I understand what you say, In this post your writing level is also excellent to us. This is great issue you have done on this topic really very well.
Curcumin prevents interleukins from promoting inflammation.
Thanks for sharing this great article! I feel strongly about it and love learning more on this topic. It is extremely helpful for me. I hope you post again soon.
スーパーコピー専門店,スーパーコピー,スーパーコピー時計,ブランドコピー時計,ブランドコピー時計,
ロレックス,パネライ,ウブロシャネル,ブライトリング,IWC,フランクミュラー,カルティエ,オーデマピゲ,
ヴァシュロンコンスタンタン等,その他の世界一流スーパーコピーを取り扱っています
◆★当社URL:http://www.yahoo-watch.com
◆★blog:http://yahoo-watch.jugem.jp
◆★連絡先:[email protected]
ようこそショッピング、非常に感謝して!
I research the write-up material and all the issues suitable right here within this weblog .,I acquired a lot of information that I truly will need to have .,Several thank you for sharing.,
These collections are works of art in digital perspective. Thumbs up.
I’m definitely enjoying the information. All Gucci Outlet is created with only the very best materials and top-quality engineering and design.
The post is so Wonferful ! Gucci Outlet, as a symbole of identity and high quality life, are your best choice to show your personality.
Write a good blog!I looked after a kind of impulse to want to get married, ha ha!
Thank you to share in this article, our Gucci bags outlet fabric rigorous and unconventional, not monotonous mediocrity, the interpretation of fine and delicate. Very Gucci Outlet online processed through the layers of bag made of the final product, highlighting the beautiful and not with the impetuous, and its structure can easily be read and full of texture.
I ‘m pleased to once again come to your article . Your writing style is so humorous , unique . More pleased , still from you to obtain meaningful and interesting knowledge ; who with the help of life information . Still look forward to your update .
Congratulations. I just review about your blog here. you blog is having a unique contents and create interest. I like the way of presentation about the topic. I’m definitely loving the information. I’m bookmarking and will be tweeting this to my followers! Excellent blog and terrific style and design.
What you write sentences I like it very much. These are brand-new Gucci handbag, The bag on our Gucci Outlet online sales.
At Oakley, any mission is possible. Just ask Tom Cruise. With past, ultra specialized design work for Mission Impossible blockbuster films under its belt, fake oakleys And the masses beyond the apple were able to attestant Oakley’s cine abracadabra aboriginal duke on the big awning. Jump through the ages of January, and the blur has grossed added than $200,000,000 with a captivated common admirers.
Never fade in your romantic love with Dear Lover lingerie! Design for sensual love and add spice to your lifestyle, Shiying sexy lingerie Co., Ltd provides made in China wholesale lingerie along with amazing low price and high quality, all in the modern day styles. We also accept OEM service for our solid team and proven technique.
Come to dear-lover.com to view the new style fashionable lingerie wholesale at discount price. We are specializing in factory directly wholesale lingerie for seven years and become the golden member of most of the world wholesale platforms. We have our own brand and factory which can offer quality items and quickly action of the orders.
I am very enjoyed for this blog. Its an informative topic. Its opportunity are so fantastic and working style so speedy. It help me very much to solve some problems. I think it may be help all of you.
Resources like the one you mentioned here will be very useful to me! I will post a link to this page on my blog. I am sure my visitors will find that very useful.
Another great post, I appreciate all the work you put into this site, helping out others with your fun and creative works.Pretty good post. I
Is definitely a good article , and those points mentioned in the article is very unique , and I very much agree with . Same time, I viewed your site , summed up the feel of your blog space is very exciting , I’m looking forward to your update .
ferragamo shoes “What we lack right now is the human resources and financial resources to get them there,” Chase said.
I viewed your site , summed up the feel of your blog space is very exciting.
Canadian Goose Jakker from Canada is typically a world-famous best brand. It has the great along using the high-tech design which could not caught by other brands. In circumstance you match up on it nike air max Basically with quality goods almost, and you can get them in discounted, all cheap nike air max sale are hight quality and free shipping. Please enjoy our nike air max site.
thanks for sharing such a nice info its very much impressive.
Its Pleasure to understand your blog.The above articles is pretty north face jackets on sale extraordinary, and I really enjoyed reading your blog and points that you expressed. I really like north face outlet to appear back over a typical basis,post a lot more within the topic.Thanks for sharing. Strange this post is totaly unrelated to what I was searching google for, but it was listed on the first page. I guess your doing something right if Google likes you enough to put you on the Cheap North Face jackets first page of a non related search. You certainly have some agreeable opinions and views. Your blog provides a fresh look at the subject. keep writing!!!
I very much enjoy your blog posts, your writing style is very unique , the level is also high . The article contains many valuable and meaningful knowledge and information . They are worth learning . Thank you for your sharing !
http://www.buyairmaxshoxshoes.com Since 2 years of hardworking on online nike air max 2011 trade, we have being enjoying good prestige with reasonable price, high quality, fashionable design & Timely Delivery by EMS. So we win lots of regular customers from all over the world, especially from United states and Canada,Western Europe (Italy, UK, France, Spain, & Germany etc)
http://www.cheapoakleysbuy.com now has been recognized as one of the most coveted. They are
famous for exceptional top quality technologies and a innovative range of sunglasses. But
referring to the original one,. fake oakleys
the price is very high, So Fake oakley sunglasses is a good choice.
Thank you blogg :):):)
Yuyao Hualong plastic mold Products Co.,Ltd is a professional mold maker. Yuandong Industrial Area Yuyao City Zhejiang Province China.
Marque française Longchamp a été fondée en 1948, est de renommée mondiale, la famille comme l’un des plus grands en cuir le fabricant. Longchamp (Longchamp) – le haut de la tradition française et de fabrication excellente, Sacs Longchamps Pas Chersle design de mode de premier plan, légère concept pratique de pliage, ainsi que le prix-à-terre type de connu dans le monde. à ce jour, plus de la ligne de produit d’origine élargi sacs à main en cuir tuyaux, Sac Longchamp Pliageceintures, gants en cuir, cravates en soie et les écharpes.Avec le plus en plus populaire des pliages Le Longchamp, la plupart des gens acheter des sacs Longchamp pour sa simple et pratique.Sac a Main Longchamps
La France a 50 ans d’histoire de pointe en cuir Longchamp marques, puisque, avec l’aval du mannequin britannique Kate Moss, il a un dos de chameau à la vie d’une vitalité nouvelle, Pliage Sac Longchampde nouveaux printemps des sacs et en été, cette année, est toujours le même fabrication rigoureuse amende, et le type du sac, le style et la couleur est relativement plus abondantes tombent et les styles d’hiver.Prix Sac Longchamp
It is great as your other posts The test by Dan
Did you see the streets? Tiffany Locket Just the streets… Anchor Pendant There were thousands of them!
And how do you do it down there? sacoche louis vuitton homme How do you choose just one?
its really a good writeup, would be interested to read such more informative draft from you ahead, can be a wonderful help to the new readers like me.
For me, the major significance of this site , whenever I came to this time , I always have an unexpected harvest . Every time from this to get some valuable information and interaction with others . These are all difficult . Still thank the bloggers sharing .
The country wide Rolling O-Lab kicked away the 2012 MLB Spring instruction period of your time using a two morning end at electronic Domain area in wonderful Port St. Lucie, FL…fake oakleys using the truck parked entrance and center
eyeglasses Polarization Oakley sun glasses will be primarily loved by expert cyclists who involve the finest graphic clearness and also protection from the certain suns blaze.
sacoche louis vuitton The eccentric singer has sold more than 23-million albums worldwide and has a devoted gay and straight following because of her anthems – but openly gay Wainwright is not a fan.
I was searching the code which is used professionally. Then I saw your blog. I want to congratulate you on such a wonderful blog.I liked the concept of your blog posts. It is very well portrayed as well as depicted.
Thanks for offering information.welcome to our website: http://www.likejerseys.org/.
This website sell cheap jerseys with high quality,awesome!
This is very informative post and helpful for those who are searching for it.I away get wonderful information from your blog.I hope you will provide more information in future.Thank you for sharing.
Nice Information! I personally really appreciate your article. This is a great website. I will make sure that I stop back again!.
The elegance, sophistication of travertine tiles in your home is second to none. This is why they are such a popular choice for builders and renovators alike. For more information click http://www.allstone.net.au/products/tiles/.
The article contains many valuable and meaningful knowledge and information . They are worth learning . Thank you for your sharing !
i need help to magic for agent :))
kurtoglu celik halat istanbul
Oakley is ordinarily a institution built on authenticity, and we do not consider kindly to people people that seek out to ,fake Oakleys undermine that tenant by making and/or providing counterfeit Oakley merchandise.
Ningbo Yinzhou Nuoya Cement Block Machine Factory, a professional manufacturer and exporter of all kinds of Single and Multi Spring brick machine,concrete brick machine,block machine,We are a member of Building Block Association with excellent and advanced technology.
This is a very good article, I’m thankful I stumbled onto this. I’ll be back later on to check out other posts that you have on your blog.
An fascinating dialogue is worth a comment. I believe that it is most excellent to compose added on this matter, it won’t be considered a taboo topic on another hand usually individuals are not brave sufficient to communicate on this sort of topics. towards next. Cheers
http://www.iphone4cases-outlet.com/iphone-4s-cases.html
This is my favorite web site.The postings are very unique and also out standing performance with the new creativity and excellency with the new different ideas and concepts.Really I am waiting for some more new posts from you.Keep up your excellency.
Thank you for your blog to share your personal views on such issues and analysis . Please continue to keep it , and I will be understanding of such problems by other means , and you are together to discuss , with the exchange . Thank you for taking your time and effort to provide these to share .
sac louis vuitton Here are some logical follow-up questions: What would Canada’s economy look like without its technology flagship? And to what lengths should governments go to save the BlackBerry maker?
No country , however rich , can afford the waste of its human resources .(Franklin Roosevelt , American president)
the BBC have either made, or been dragged into, a ludicrously stupid contract which beggars belief. And they’ve monumentally misread the reaction to their £15 million a year carrot.
I am waiting for some more new posts from you.
For cracked the case, Louis Vuitton Outlet the Public Security Ministry to mobilize Shandong, Guangdong, Hunan, Jiangsu Province, police launched 4 “shark hunting action”, Louis Vuitton Wallet seized fake “LV” and so on more than 30,000 bags. One active in China, Japan, South Korea, China provinces of Louis Vuitton Damier Wallet professional selling fake brand-name bags gang was completely destroyed.
I am happy to find this post very useful for me, as it contains lot of information. I was exploring on the exact same field and your position totally took me off with the way you expound on this field.
The end of World War I brought with it the end of the Ottoman Empire and the contraction of Turkish sovereignty to Asia Minor and a strip of land on the European side of the Bosporus. That contraction relieved Turkey of the overextended position it had tried to maintain as an empire stretching from the Arabian Peninsula to the Balkans. In a practical sense, defeat solved the problem of Turkey’s strategic interests having come to outstrip its power. After World War I, Turkey realigned its interests to its power. Though the country was much smaller, it was also much less vulnerable than the Ottoman Empire had been. Read More »
essay papers, buy essays, essay help
No country , however rich , can afford the waste of its human resources .(Franklin Roosevelt , American president)
I’ve actually tried this myself – just playing with the nestabilities. new jordan releases I’ll have to read and study your instructions as your pictures make it look easier than it was for me. Gotta find the tip I didn’t have for myself. I must say tho – as everyone knows – that your creations are jusst the jordan retro 10 cutest things. Love the color plaette you chose. retro 10 Just plain old awesome and cute! TFS!
Haven’t I told you that this blog is not meant for promoting hatred. This blog was created in an effort to spread Internet harmony across the globe. buy term paper Well I dont see any reason for you to behave so bitterly when you know that once they complete their task, they will be up and running again. Every blog and site has their own way of running affairs.
thank you share.
good site admin
Coach Factory Outlet upgrades the new products from Coach Factory, and the same action has been carried out in Coach Outlet Online many days ago.
Coach Factory is a high-end brand in the United States, Coach Factory Online brand has become famous world-class luxury fashion brand with the GUCCI achieve miraculous FENDI repeatedly, Just the price of the Coach OutletCoach Outlet achieve miraculous FENDI repeatedly the Coach Outlet Online , regarded as a luxury entry-brand! (QOQA) brand price positioning, but QOQA aspirations is to bring consumers respect remarkable, Coach Outlet Store Online is a younger, fashion and avant-garde.
Thanks for sharing such a nice post….
All though the valentine day is over but there is demand in market of these kind of decorative gift baskets and gift packs. They have there own market position. It has a good demand and sale. It is good industry to start with it.
performance. whether or not you are skiing, surfing, cycling or golfing each and every of us inherently desires to improve. increase not just our results, but our enjoyment belonging in the direction of the problems we love. This wish is reflected from the evolution of Oakleys specialized outerwear.cheap oakleys over a current field-testing trip to Chamonix, France; Oakley teamed with Polartec to explore some belonging in the direction of the biggest, most accessible mountains inside the planet.fake oakleys The purpose was to collect information from real-world conditions that will help athletes and fanatics get one of the most away from their experience from the mountains
JJ
Don’t part with your illusions . When they are gone you may still exist , but you have ceased to live.
No one can go with you for a lifetime, so you have to adjust yourself to be alone; no one will help you again and again, so you have to fight all the time.No one can go with you for a lifetime, so you have to adjust yourself to be alone; no one will help you again and again, so you have to fight all the time.
THE BLOG IS QUITE GOOD FOR ME ,I LIKE THE BLOG
As the world-leading replica oakleys sunglasses company for many years, . cheap oakleys From order placing to goods shipping, we are working efficiently and precision. We keep providing timely customer service on weekdays. We use fast shipping, such as DHL, EMS and UPS, to ship all our fake oakleys for cheap, Oakley sunglasses packages, From our warehouse to major destinations in North America. fake oakleys , Europe ,Australia an so on almost all over the world
When you are young, sacoche louis vuitton homme you may want several love experiences.
But as timegoes on, sacoche hermes you will realize that if you really love someone, the wholelife will not be enough.
sac louis vuitton Ben Aissa, the former executive vice-president of SNC’s construction division, has not had a chance to respond to the allegations. His Canadian lawyer won’t discuss the case.
Hello, friends! Welcome to http://www.nicerjerseys.net . We offer the nicer jerseys, caps and so on. We have updated a lot of jerseys such as: NFL, MLB, NBA, women jerseys and youth jerseys. If you pay by Western Union , you’ll get 10% discount. We can give you the best discount. If you have any question please ask me or email me. Thanks a lot for looking around and ordering.
Wholesale Sexy Swimwear is extremely imperative to display other men and women close to you the amazing figure and entire body you have and how proud and self-confident you are about it. The best selection for both girls and ladies on other lingerie purchasing is those from Wholesale Lingerie China website such as Wholesale-Lingerie.cn.
Oakley Frogskins fashion sport sunglasses. As a sports brand, the Frogskins fashion sports sunglasses dominant international status in addition to a sleek beautiful look. Its main products include ski goggles, motocross goggles, golf series, leisure series and special series of five major categories, in addition to cloth cap, T-shirts, handbags, fake oakleys and other peripheral products. Due to the the PLUTONITE material Frogskins fashion and sports sunglasses lenses used in manufacturing, in addition to the 100% barrier to UV and harmful blue light on the vision, clarity beyond the U.S. ANSI industrial standards. In addition, the anti-collision function tested using 12 mm caliber shotgun. The different colors have different reflection coating, can be sent 7% to 96% of light, with different needs. The Frogskins fashion sports sunglasses to further explore the degree of the sunglasses market, cheap oakleys degree lens will be of high quality sports frames with their own developed shatterproof to draw PrescriptProgram2001 series except in accordance with the facial tailor-made for a long time to maintain comfort-givers and better protect the The binocular security role, but also because of the need to replace sunglasses.
The most latest problems of Oakleys one Icon newspaper is right here also it is substantially better than ever! Now available for obtain on iTunes, the pr fake oakleys esent problems attributes all in the awe-inspiring photos, jaw-dropping film content articles and insider tales that viewers have take place to anticipate packaged in a really strong new interactive knowing that is guaranteed to acquire your adrenalin pumping. cheap oakleys Arm your apple ipad using the one Icon app and subscribe to us as we dive to the business of surfing with WCT surfers Jordy Smith and Kolohe Andino, strike the path with snowboarder Jake Blauvelt
Co-starring with the two sports icons was a star-struck young boy named Dawson. At just 7-years old, he stole the show with his bright and cheery disposition. fake oakleys Dawson, in spite of the fact that he’s in the midst of a grueling three-year chemotherapy regimen, exuded incredible positivity and strength.
“He was unbelievable,” Rory said of his inspiring co-star. cheap oakleys “To see someone go through what he’s going through and to have all this positivity coming out of him, it just makes you realize how lucky and how fortunate we are.”
dicount Nike NFL Jerseys,nike nfl jerseys sale, jerseys shop,cheap nike nfl women jerseys, wholesale mlb jerseys shop, buy jerseys online, soccer jerseys shop online, nfl jerseys store online
I have been a regular visitor of this site and I love reading blogs posted here. They are truly very well written, precise and to the point. Thanks.
Useful information shared..Iam very happy to read this article. Thanks for giving us nice info. Fantastic walk-through. I appreciate this post.
You have done a excellent job of creativity and i love your designer buckets
The store offers Oakley Juliet Sunglasses,Oakley Juliet Plasma, all the Oakley Sunglasses Outlet are AAA high-quality and sale cheap price.
http://www.oakleysunglasses-outlet.com
A categorization that started utilizing a lumpy path is growing nike shoes online store so that you can produce One of the biggest nike new shoes 2011 has effects on around the boot industry plus right until this Jordan Shoes present day. Should you be searching to shop for nike shoes online get yourself a few of an individual’s famous footwear they are able to happen to be identified in lots of shoes sellers which are out at this time along with though shoes nike online they’re a small amount a lot more high-priced expense includes better ones seeking tennis shoes.
With those four words, environmental surroundings jordan Shox Shoes legacy is made. jordans signed Jordan to some $2.5 million deal for five years, plus royalties as well as
other fringe benefits. Peter Moore Air Jordan Shoes 3 created the first AJ
Logo using a basketball with wings lifting it. The development of environmental surroundings Jordan shoes I turned the running shoe industry inverted. Before the AJ I, most
jordans Air Max 2010 shoes were white, however the bold black and red styling within the Jordan I flouted this convention. The NBA banned the shoe within the league
responding, but Jordan wore them anyway, accumulating serious fines as much as $5000 a game title. jordans, obviously, was more than happy to pay the crooks and also
hardwearing . shoes on Jordan’s feet plus everyone eye. All this controversy and Jordan’s spectacular numbers that year served to put the environment Jordan line on the path
to becoming a household name.
Through the entire meeting Jordan was Air Jordan Shoes 6 reported to look
disinterested and bored, but while he and Falk left the meeting, Jordan believed to his agent, “Let’s make deal.”
The video presentation featured slow-motion clips of Jordan’s college career and several of his high-flying Olympic moves with a background of then hit music “Jump” through
the Pointer Sisters. Cheap air jordan Air Max Head all air jordan shoes collection Designer, Peter Moore
presented sketches of jordans Shox Shoes, jumpsuits, and sports apparel, all in black and red. Michael’s remarks upon seeing the designs were under enthusiastic. He’s
reported to possess said: “I can’t wear that shoe, those are Devil colors”
jordans saw something special in Jordan, though. They saw a chance, an opportunity. He’d be a champion with personality, charisma, and heart, and they needed to place the
company at risk. They knew right from the start he would be considered a star and desired to help him make it happen. Finally, after much persuasion from his manager and
parents, the reluctant rookie chose to fly towards the Cheap air jordan Shoes in Portland, Oregon to find out a distinctive video presentation and proposal though he later
produced in retrospect he went with no purpose of signing authentic nike jordan shoes with air jordan.
http://www.nikediscount2012.com
We have formed our special style in all kinds of thermometers and other instruments, such as Digital thermometer,Digital Timer, etc. The products are sold to Germany, U.S.A.,Japan,south koren,England and so on.
http://www.chinazhiling.com
Buy Surgical Dental Instruments special discount prices & quality surgical dental instruments. 100Z
One more technique in favor of promoting your web site is posting comments on different sites with your weblog link.
It’s amazing in favor of me to have a website, which is valuable in support of my knowledge. thanks admin
I believe you also want to have this.There is no doubt that own a fashion things Mbt Shoes review but also can not afford these expensive .Now come to our online store Cheap Mbt Shoes,you can find your favorite products sale in this Christian Louboutin Boots.
Do not always lost performance in the face do not always say things are hard, because to do so you will not be successful.
Still, Casque Monster Beats to have the key cog of a remade receiver corps upset has to be of some concern to the Vikings.
Now Melo is off to what most presume to be a big NBA payday. Beats Headphones Projections have Melo going anywhere from the middle of the first round to late in the first round.
jordan release dates 2012 for a customized version of the shoes is endless. Experienced a wave of collapse in the galaxy, it seems more shoes to fall in love with the image of the painting shoes above. As a canvas sports shoe design their own works of art. Personal customized version of the latest exposure of the Air Jordan VI Atmos black shoes, blue and green body with the rupture crack in a unique visual impact, looks more like a Michael new jordans followed by the jumpman logo blue and green road must wind come from the custom color painting has become the custom shoes.
I like your article!!
bilgilendirme için tşk ederim
Its very informative blog,thanks a lot..
When I is in seventh class, I got my first pair of new jordans. Jordans was my own hero. Any square inch associated with wall in my room seemed to be covered with her pictures. I wore Nike jordan shirts and also shorts. We wore any wristband on my own left forearm. I used short socks. I possibly tried herniated my tongue like Henry while participating in hoops. I bit it, however, and it had been the first of numerous reminders irrespective how I dressed like him or her, I was not any Michael Jordan.
The initial Jordan poster I personally put up displayed him in the process of dunking your basketball over a playground, regarding his arms and legs spread wide with midair. The image proceeded to become this iconic emblem of the Nike jordan brand. Going lacing upward my Nike air jordans and trying to replicate the cause in my drive way. It was i then realized that no matter how awesome my personal shoes had been, the only dunking I would personally be doing would certainly involve exploit and Oreos.
The government Trade Commission rate just hit a $50 thousand settlement having Skechers, the manufacturer connected with sneakers for female. The FTC pursued your settlement after investigating prices that the boots or shoes company manufactured unfounded claims that their Shape-ups shoes or boots could make some sort of wearer body seem like Kim Kardashian? or Brooke Burke, the stars who promote the shoes.
Skechers, from Manhattan Beachfront, Calif., produced advertisements for the Shape-ups that claimed using them helped people today lose weight and also strengthen their own butt, leg and abdominal muscles. The pay out also involves Resistance Sprinter, Toners, and Tone-ups, which can be other styles manufactured by Skechers. Consumers who seem to bought any of these shoes are going to be eligible for reimbursements.
I personally knew in which even though My spouse and i loved Michael Jordan and his footwear, I had a greater shot being a piper steaming than a lord a-leaping. While Nike wouldn’t normally try to dispel the notion that I’d become a sweater if I dressed in Jordans, people never essentially said the shoes would improve my up and down leap. Don’t assume all shoe companies are so understated, however.
If you want to know jordan release dates 2012 and it to our online store to buy a pair of the newest jordans.
J3
The important thing in life is to have a great aim, and the determination to attain it.
I learned a lot of things from your blog..
Thank you to all our readers who helped us reach 10,000.
We couldn’t have done it without you
The actual red bottom Christian Louboutin shoes sale and profits are so really popular and the like an outstanding attack by using girls you will have these higher than. In which you peer you could be certain to watch both the 1st or use the vast quantities involving the same which can be throughout. Every achievable local mall, classic retain as well as web-based naturally supplies the athletic shoes choc every impede eager to get space or room or perhaps home from the top by using cabinets. If you’re not as soon as wore extreme heeled footwear, tend not to force you to purchase Cheap Christian Louboutin shoes , there’s no need in any respect. In return for, The majority of us help you to acquire christian louboutin sculpted shoes and boots, these are generally for this reason comfy in combination with current. [ Christian Louboutin : http://www.cloutlet.org ]
the blog is good it is composed by yinhua 2012-07-05
.
i like your blogs theme
Its very informative blog,thanks a lot.
Good post! I have a random question for you.
thank you admin nice blok
My partner and I enjoyed reading this write-up; I just wanted to know do you trade featured articles or blog posts? I am always trying to find somebody to make trades with and simply thought I’d ask.
It’s well worth plunking down a few extra bucks on a pair of Fake Ray Bans sunglasses that offer great polarization and a style that makes any outfit stand out. These Cheap Ray Bans look great while out on the town, grocery shopping, or heading into work. They’re a bit smaller than classic aviators, so they work well with my smaller-sized head. I’d recommend you buy them, just don’t try to hang out with me while I’m wearing
Ray Ban Wayfarer. Or at least call first.
thank you admin nice blok my site
I like browsing through your pages. Keep it up. An incredibly an interesting page. thanks for the share..
dear friends,
NFL, M LB, NBA, NHL.
Nicer jerseys are coming!
High quality, low price!
More than 10 items, free shipping!
Other best discounts waitting for you!
Wish you have a nice day!
Wholesale Sexy Bikini is available in countless designs and also the ideal types are individuals which fit your system framework and shape. Bikini padded tops are chosen by girls with more compact breasts. Welcome to visit Dear Lover Wholesale Lingerie China and pick the suitable swimsuits and sexy swimwear for the coming hot sexy summer season.
I am very fond of your blog in your blog , you can come into contact with a lot of meaningful knowledge and information ; while to get to know part of the shared values of the Friends of Bo . Thank you for your wonderful sharing .
Wholesale fashion dresses sexy mini dresses website of famous China lingerie and sexy dresses manufacturer Shiying Sexy Lingerie Co., Ltd.
I want to say thank you a lot for the job you have made in writing this piece of writing. I am hoping the same most reliable work from you down the road too.
Very good and interesting site with very good look and perfect information … I like it.
The initial Jordan poster I personally put up displayed him in the process of dunking your basketball over a playground, regarding his arms and legs spread wide with midair. The image proceeded to become this iconic emblem
新しいスタイルのロンシャンバッグが到着し、あなたは、すべてのスタイルと色の ロンシャンバッグを、ロンシャントート、見つけることができます。我々は、ロンシャン アウトレット送料無料を提供します。ロンシャンバッグの魅力やお得情報、おすすめ品情報を配信中!ロンシャンの「マル秘 情報」なども教えちゃいます!
You have defeated my hope; I am totally charmed with your information it will help me in my essay writing services or essay writing services writing. Thank you so much. I will beyond any doubt keep in touch.
erotik hikayeler, good admin thank you site.
We mainly sell these products such asKen Griffey Jr Shoes,Quality can acceptNike Air Max GriffeyAnd there will beKen Griffey ShoesAppear here
The card is adorable. Love the little bunny butt sticking up. Too funny.
I am always trying to find somebody to make trades with and simply thought I’d ask.
He is a man wearing the ball and is a real traitors
Your are a very creative person…thank you for sharing and thank you for the tutorial.
I have to say that your analysis in this article is greatly remarkable. I very much enjoy your article.
It is a good article, and the information is very useful,I like it very much,thanks for sharing!And also welcome to our website, http://www.jerseyshome.me/, we offer many kinds of jerseys, and NIKE NFL jerseys are available now .More than 10 items ,we offer free shipping and we also give you a 10% discount when the quantity over 100 and when you pay by western union, we will also give you a 10 discount . We promise to provide our clients with better products and substantial price. Please feel free to place order.
Great information you write it very clean. I am very lucky to get this tips from you.
It is a vain attempt by the IOC to cause a mutation in your genes so your offsprings don’t end up like you whining about thing you cannot comprehend.
I am happy to find this post very useful for me, as it contains lot of information. I was exploring on the exact same field and your position totally took me off with the way you expound on this field.
oh my god superb publish admin will verify your weblog constantly.
escort
escort bayanlar
escort bayan
moncler ダウン,MONCLERのダウンジャケット2012-13秋冬新作モデル!昨年に続き入荷連絡待ち多数のADOXA(アドクサ)、今年も人気集中のMONCLER S(モンクレール エス)など、世界中からバイマに集まっています本サイトはモンクレール新作や経典スタイルを販売する人気専門店です。2012-2013年秋冬モンクレール ダウン、モンクレール コートなどが簡単に手に入れます。当店のモンクレールは激安価格で販売するだけでなく、全国送料無料です。ぜひご注文をください
EMAIL:[email protected]
HOME:www.moncler-down-shop.com
You are just so durn clever. And those little glittery eggs were a great find and perfect for the darling baskets.
This article is very well written and enjoyable to read! Good wit and humor. it has really peaks my interest. I am going to bookmark your site and keep checking for new information. Welcome to read through my friend’s website homepage from top replica watches, it’s about+++, wish you would like it, if you do please bookmark and recommend to your friends,thank you.
The photos are all very beautiful ,where did you take it? The light, shadow and portion are superb and excellent, wish i could take photos like yours pretty soon! By the way i’d like to recommend a good shopping website, all the http://jewelsblogs.com designer jewelry and handbags are manufactured with 100% real leather,durable hardwares ,excellent craftsmanship, click here right now!
Hi, I just read texts on your blog and I became interested in the topic. I like your site and I am thinking whether I could use your words in my work? Would it be possible? I was about to say something on this topic. But now i can see that everything on this topic is very amazing and mind blowing.
Sexy Accessories Manufacturer is owned by Shiying Sexy Lingerie Co., Ltd and specializes in the wholesale Dear-Lover Sexy Costumes Sexy Lingerie
Car Connector, Source Car Connector Products at Connectors, Electrical Plugs & Sockets from Manufacturers and Suppliers around the World Who Offer High Quality Car connector 100Z
Thank you for all of the enthusiasm to provide such useful info here. I’m really very interested so will retain an eye out for updates!
The baskets are just adorable and very creative, so love the matching card and having the bunny facing down is too cute, pretty Easter projects.
i love this bolg , thx
This is certainly a wonderful display. I want to give you special thank you for this particular beneficial post, I really appreciate sharing this good post.Keep your work and guide us to navigate in a large number of websites. It will save my time searching the site too …
All of the strategies and information happen to be well worthwhile researching. You definitely provided me with effective content.
I am always trying to find somebody to make trades with and simply thought and I’d ask.
Timberland Boots UK http://www.timberlandbootsaleshop.co.uk/ Online shop, Sale Timberland roll top, 6inch boots, Fur Boots, chukka boots with discount price. Next day delivery! Free shipping on over £100
I have learn a few good stuff here. Definitely price bookmarking for revisiting. I wonder how much attempt you set to create any such fantastic informative web site.
The Xperia X10 Blog absolves itself from any responsibility should you decide to carry on and you break your handset. Please proceed with caution and at your own risk.
Türkiyenin en seckin escort bayan ilan sitesidir. Escortların tanıtımları burada yapılmaktadır. İstanbul escort bayan, Ankara Escort Bayan, Eskişehir Escort Bayanlar bu sitede yer almaktadırlar.
I never like when designers bloggers copy each other, and I think that your blog articles are all original and provocative, keep that style and you are gorgeous! About this new top replica handbags, I have just received my +++. They are fabulous, and I got them in under a week,I am quite impressed- especially this is so indistinguishable from the authentic one!
UOBD2 Diagnostic Trouble Code Library. Use this page to quickly define your retrieved Generic and Manufacturer specific DTCs.
This is a good resource, very grateful for providing this article for free. I like to look on the site to understand the higher value of resources provided free of charge. I love reading your articles. Everything you want to know about the personal statement.
cheap designer handbags reflects the American recreational style.cheap handbags are so luxurious,fashionable and unpardonable that they always capture the beauty of the heart of every woman the first time they see them.There are a variety of cheap purses supplied on our online shop,such as,the itsy-bitsy style or the carry-all completely functional and so on.Welcome to our cheap designer purses store.
http://www.lexia3diag.fr/outil-de-diagnostic-pour-voiture/vw-audi-seat-skoda 5054a diagnostic
http://www.lexia3diag.fr/ Lexia 3
http://www.lexia3diag.fr/lecteur-de-code-obdii ELM327
http://www.antalyaescortmodel.com/
Antalya Escort Model Tanıtım sitemiz 7 ayını doldurdu! Sizler için Kaliteli içeriğinden ödün vermeden hızlı bir yükseliş ile zirveye sırtını dayıyan antalyaescortmodel.com Antalya Escort Tanıtım sitemiz büyümeye Hızla devam ediyor. Sizlerle daha iyi bir hizmet vermeyi hedefleyen sitemiz sizlerin sayesinde Türkiye’nin ve Antalya’nın en iyi escort ilan sitesi oldu ve olmaya devam edecek. Günde binlerce Antalyalı beyler tarafından ziyaret edilen gerçek resimli ve iletişim bilgili sitemize Şubat ayı sonuna kadar vitrin ilanı veren Antalya escort bayanlar büyük süpriz ve büyük indirimler bekliyor! Hemen bizimle iletişime geçip antalyaescortmodel.com ayrıcalığı ile Antalya Escort Model Tanıtım sitemizden Antalya Escort vitrin ilanı verebilir, Binlerce kişiye hitap edebilirsiniz.
güzel blog başarılarınızın devamını dilerim
Thank you very much for your good publication. I’ll take the notes you’ve written.
strategy to build as the the hospital primary goal and core competitiveness.
Absolutely everyone encountered this is known as a customer from method or any other. Due to the fact you’ve got a company to market does not mean which you don’t fully understand or simply recognize how marketing and advertising sales messages can usually get irritating when you are the individual who are being targeted. Potential customers are likely to angst appearing mailed strong mail types. Additionally are inclined to do not like fraud email messages besides other options website advertising. Although shoppers complete much like promotional item online marketing. In truth, Eighty three per cent of usa citizens who had been questioned mentioned that they love attaining promotional gifts despite the fact that they’re that has a online marketing subject matter. An alternative Forty percent of these kinds of people choose to experience promotional items more regularly. If you ever give your prospective customers what they including and what want to even more of, they are going to relate your company along with a confident emotional state and are generally prone to have business dealings with an individual through the opposition.
Be aware of which often brand has scary levels of want and even that way of slip on is without a doubt popular with the vast majority of folks. If you should retail outlet for best suited location swimsuit for woman then its involved with positive that you’d a fabulous get the swim suit which can be sufficient costed with a decent good quality only one. As with virtually women of all ages spa swimsuits, many excellent alterations designed to look and feel improved upon in a variety of version creates in comparison to plenty of people. By way of example, do you really need to have a fun filled cutting edge boyish vary exactly where must not lumbar region, system choosing hips are magnified identical dimension, then you need to become just one a major part sweat swimwear that can be expanded gynaecoid around petite pastels choosing bouquets implementing ruffles out lots of bazonga employing stomach, with the similar point in time it brand will cover all the belief relating elevated figure. A lot of assume meant to similar to any bathing suit match is often a obviously excellent slightly bikinis attainable. In spite of this, bear in mind inquiring a lot of men and women regarding appropriate age group males in various age groups bring back and much might articulates that females putting together only one a component sweat swimsuits usually are higher gratification.Discover more about adorable swimwear on the market from Onwer and become sting bikini bermuda available for purchase one piece swimsuit bikini for you to find a better deal in the space. Rather as compared to resistance training believe that revealing naughty brazilian bikinis cause them to appearance docile when comparing several. Also a lot involving characteristic skate boarding connects usually classified for the reason that pretty sexy bikinis are generally noteworthy for any captivating case, occasionally an individual aspect force signs up can be since orgasm given that a great deal of aspect signs up. Only one point tankinis got here simply by on a daily basis, old-style covered clothes units. Which inturn constantly regularly seashore feel referring to sometimes have got at this two pieces swimsuit picked up made out of beautiful, personalised aside from that looks terrific selections. Obtaining some form of halter devised one single part press satisfy gives a great deal greater is extremely a whole lot regarding regardless of what posh meet. Which often device is often called turning into experience turning it into amazing look at around women in the slightest degree matures benefiting from substantial packaging.
As iPhone signs up excellent growth in revenue with each moving day, iPhone app development is usually collecting speed and gaining the interest of developers in the specialized world of mobile app development. iPhone application development is a growing industry and has lots of impact on the quality of human life as a whole.
I am sure this article has touched all the internet viewers, its really really pleasant article on building up new website.
I am looking forward to reading more useful informations from your blog.I can’t wait for to read your more new artical.Must be very attractive.
Comfortably, the article is in reality the greatest on this noteworthy topic. I concur with your conclusions and will thirstily look forward to your upcoming updates.
I must say that this is an interesting article, but there are not many tourists here, there must be more visitors , I will come back.
Thank you for taking the time to converse about this, I feel fervently about this and I benefit from learning about this subject. If possible, as you gain facts, please update this blog with new information. I have found it very useful.
Click on the my home page there will be surprises. Perhaps a story like this can go further.
Want to surprise, click on the my home page. Article write so good still continue refueling. Also look at our products
Good composition is different, can let us to learn. Look at my homepage might you want to surprise
As long as you into my home page there will be a surprise, and you write well worthy of reference study
Good composition is different, can let us to learn. Look at my homepage might you want to surprise.
I like it when people get together and share views. Great website, continue the good work.
Such a good article is really not easy, see so many blogs, I feel this article written in very beautiful, this article can inspire our progress.
Your article is always can reflect real life. Bring good memories and be sentimentally attached to, this is a great writer of as.
So many blogs, I feel this article written by perfect, can give people positive direction, people learn to follow.
Articles written content is very good, very deep, very meaningful, what we need is like this.
No contents to a lot of bloggers are written this blog post is very wonderful, very deep, is very useful to people I like the article, thank you
No matter how many blogs, which are able to stand out, attract the line of sight of people, the article content is very wonderful, continue to come on to write this article.
Thank you to write such a good article, so hard, see the goods in our company, and very affordable and fashionable.
Ninepin bowling can be a incredible metaphor for smalltown camaraderie simply because it’s a game in which person scores are not significant.
The article written by very content, view is also very good I’m very agree, more efforts. By the way, could you also take a look at our products.
Each person to the same thing will have no opinion, but this article writing good I think everyone’s identity. By visiting our website.
There will always be a different feeling, can stand out in so many blogs, so this article is written very well, I like the style.
This article write good I think everyone is identity, let I learned a lot of things, visiting our website, by the way, may be what you want
nice thanks admin
Rich content, unique writing technique, you are bad, take a look at our things.
I just want to see this article, luxuriant content, very unique writing technique, you are bad, take a look at our things.
Is afraid of no good blog but have you ever been in a hurry, then not in focus, what we need is a concern.
The best is always to look behind the patience may make you suddenly enlightened, support for gas.
Perfect the blog is to be able to attract people, like this patient see down there will be what you want, thank you.
We have the cheapest trendy things here, when you won’t regret it, here I hope you’ll like it.
Verygood.What we here will definitely make you high-profile, cheap and very fashionable, you will like it.
eskişehir escort
We always inadvertently missed a lot of good things, have to cherish. After the well will be more wonderful.
Please visit our Turkeys Ankara Escort Gallery, for more details of the girls we have available. We only ever have genuine photos that are always recent and up to date
Please visit our Turkeys Samsun Escort Gallery, for more details of the girls we have available. We only ever have genuine photos that are always recent and up to date
Please visit our Turkeys Manisa Escort Gallery, for more details of the girls we have available. We only ever have genuine photos that are always recent and up to date.
Really happy to read your perfect post ,I noticed you are very wise.I sincerely believe that you will amount to something.
Perfect Idea. We sincerely enjoy with your posting,thank you very much for share info with us ,best wish for you.
While this life-saving gesture is a blessing for the recipient, it can pose challenges on a cheap converse shoes uk number of levels for the donor. The standard practice for removing a kidney is to make a 20- to 30- centimetre incision across the side of the body, go through two to three layers of muscle and remove 10 centimetres of rib. With incurred scarring and several months of subsequent inactivity, the decision to be a donor is understandably daunting for many.
Yet thanks to an innovative medical procedure called laparoscopic or “keyhole” surgery, cheap converse shoes painful incisions and long recovery periods may soon be a thing of the past.
“Compared to traditional means, keyhole surgery is major abdominal surgery without uncomfortable incisions and disfiguring,” said Dr. Joseph Mamazza, lead surgeon and converse shoes uk medical director of the Minimal Access Therapeutic Program at St. Michael’s Hospital in Toronto. “It involves an 8 to10 centimetre cut in the groin area, so there is less chance of infection and other complications. “
Glasses is also a kind of fashion, to bring our glasses must be very cool, let you focus.
Winter is coming, our clothes to keep warm and very stylish but also very cheap, I’m sure you’ll like it.
The future of life, not only I a person like you. I will introduce to my friends, let us together feel your charm. Looking forward to you more.
In the quiet of the morning reading your writing is a very pleasant enjoyment. I will always stick to it.
Do you like sports? If you think that sport is a healthy way of life, is necessary, so the equipment here may be what you want.
Please visit our Turkeys Mersin Escort Gallery, for more details of the girls we have available. We only ever have genuine photos that are always recent and up to date.
Even in winter is very cold, don’t always at home in the nest, you want to go out of our products is warm and fashion.[url=http://www.moncleroutlet-onlineshop.net/][b]Moncler Outlet[/b][/url]
[url=http://www.moncleroutlet-onlineshop.net/][b]Moncler Outlet[/b][/url]
[url=http://www.moncleroutlet-onlineshop.net/][b]Moncler Outlet[/b][/url]
Moncler Outlet
Under the gorgeous appearance and do not break connotation, this is what we always keep the style of work, come here and have a look, you will find that you like.
[url=http://www.rayban-sunglassesoutlets.com/][b]Ray Ban Outlet[/b][/url]
[url=http://www.rayban-sunglassesoutlets.com/][b]Ray Ban Outlet[/b][/url]
[url=http://www.rayban-sunglassesoutlets.com/][b]Ray Ban Outlet[/b][/url]
Ray Ban Outlet
It’s hard to find good quality writing like yours
these days.
I really like it when folks get together and share thoughts.
Great site, continue the good work!
this blog write very meaningful, we all can learn many useful things. we will support you.
It is just the article i have been serching for a long time, tks for your post!good refueling
It’s hard to find good quality writing like yours
these days.1
It is cool!your article is really Great,will come back soon Crazy with your article,
It is just the article i have been serching for a long time,your article is really Great,
Everything you work with a real dating girls who have one female bursa site
Everything you work with a real dating girls who have one female bursa site.
Everything you work with a real dating girls who have one female bursa site…
Everything you work with a real dating girls who have one female mersin site!
Everything you work with a real dating girls who have one female bursa site!..
Eskişehir bayanların ilanlarını sitemizde görebilirsiniz.
wait for your next post,I like you,hope to be your friend!we will support you.
also very reasonable, easy to understand,Great site, continue the good work!
I want to share my friend. Let them to appreciate,really Good,I envy you!
Super!good acticle for me,so interested in the topic,wait for your next post
This blog to write really good, come and support the blogger, Wonderful
istanbul elit escort bayanlar
Ankara Escort Mekanları burda
İstanbul Elit Escort
We absolutely love your writing, Great web site you’ve got here
atasehir escort really good, come and support the blogger, Wonderful
It is cool!your article is really Great,will come back soon Crazy with your article
cool! your article is really Great, Crazy will come back soon with your article
lt is too your article is really Great, Crazy will come back soon with your article
lt is too your article is really Great, Crazy will come back soon with your article…
Please visit our Turkeys Bursa Escort Gallery, for more details of the girls we have available. We only ever have genuine photos that are always recent and up to date.
eskişehir şehrine özel en kaliteli eskort bayanlar sitemizde
nice thanks admin nice blog brawo amk 😀
yeni bursa escort bayan ilan sitesi
Please visit our Turkeys Bodrum Escort Gallery, for more details of the girls we have available. We only ever have genuine photos that are always recent and up to date.
Eskişehir Escort Bayanlar Sitemizde aradığınız escort bayanları bulabilirsiniz
Your article is very good very practical, I will collect up, hope you can also pay attention to my web site, thank you!
ankara acil çilingir servisi
seks ve porno hikaye sitemiz
Eskişehir escort bayan sitesi
Eskişehir Child porn videos
Eskişehir Child porn videos
Eskişehir Child porn videos
Eskişehir Child porn videos
I really like it when folks get together ,thannk you for your share.
Something is out of our control
Please visit our Turkeys Ankara Escort Gallery, for more details of the girls we have available. We only ever have genuine photos that are always recent and up to date.
Thanx You http://www.escortlar1.com
Adana Escort
harika flimler için tıkla
tankyo admin
but still not what I’m looking for sharing teşk helpful
bursa escort bayanların ilan sitesi teşk eder
teşekkür
bursa escort sitesi
adana escort bayan ilan sitesi
mersin vip escort sitesi
kocaeli escort bayan partnerlik sitesidir
izmit escort sitesi
Sitemize hepinizi bekleriz.
bekleriz
porno izle
Adana Eskort web sitesine davetlisiniz.
türk sikiş izle
Adana Escort Sitesi.
bursa escort bayan ilan sitesi
ankara escort bayan ve kızların ilan sitesidir.
ankara yeni escort ilan sitesi
bursa elit escort bayanlar
escort bayan izmit – kocaeli sitesi
adana escort ilanları burada
kayseri’de escort ilanları burada
eskişehir vip escort ilan siteleri
adana escort
Adana Escort Bayan Sitesi.
porno izle, sex izle, türk porno izle
bursa escort bayan
ankara’da escort bayan mekanları ve daha fazlası burada
Merhaba hepinizi web sitemize bekleriz arkadaşlar.
yeaahhh article is really Great, Crazy will come back soon with your article ow nowwww sieee 🙂
the loren of the morens ye like you so good hassiktir lanm 🙂
ataşehir escort bayan ve çevresindeki escort bayanların tam listesi
escort relaxta relax olmaya relaxmısın.. saygılar sevgiler buda blog link olsun
kadıköy escort bayanların bulundugu tek adres…
escort adresim ile escortlar adresinizde yok ebenin amı 🙂
escort bayan sitesi
escort adresi burası tam yeri
kadıköy escortlarıon tam yerş
kadıköy masaj salonu
bugun günler proooooooooooo 😀 isteyen bakabilir
adana escort bayan
Arkadaşlar hepiniz sitemize davetlisiniz.
I was looking for something like this…I found it quiet interesting, hopefully you will keep posting such blogs….Keep sharing.
adana escort 😀 I was looking for something like this…I found it quiet interesting, hopefully you will keep posting such blogs….Keep sharing.
I blog frequently and I seriously thank you for your information. The article has really peaked
my interest. I will take a note of your site and keep checking for new details about once per week.
I opted in for your Feed as well.
escort bayan siteleri
escort bayanlar burada
escort bayan diyaı
vay vay vay cantaya bak
Regardless, continue the blogging and I’ll be back again.Wholesale waist cincher corsets from China with fast delivery now!Pick the sizes & quantity you need!Best prices on Wholesale Corsets.
en güncel olan beylikdüzü escort bayan bilgilerini veren escort beylikdüzü sitesinden elit escort bayan beylikdüzü bilgilerini güncel olarak takip edebilirsiniz..
escort beylikdüzü ve beylikdüzü escort bayan bilgilerini güncel olarak takip edebilirsiniz..
Beylikdüzü Escort Bayan Sitesi..
kaliteli escort beylikdüzü ve beylikdüzü escort bayan bilgilerini veren tek kaliteli escort bayan beylikdüzü sitesidir.
elit escort bayan beylikdüzü sitesidir.
ataköy escort bayan bilgilerini veren güncel olan escort ataköy ilan sitesidir. http://atakoyescort.atakoyescortlar.com/
hadi beyler takipçiye ne dersiniz
nice admin blog thanks
nice admin
kayseri escort bayanlar
Giveaway and Sweepstakes You can collect from here and will be winner. Lucky person will get amazing prizes. Time to time here are visible latest information so you can check. Website work to provide you all the information about Giveaway and Sweepstakes so you can check it easily by the given link.
Allresultinfo providing latest information of result and time table and many more updates. That you can check easily and get updates. Just check the link.
Allresultinfo providing latest information of result and time table and many more updates.
That you can check easily and get updates. Just check the link.
GiveawaynSweepstakes works to provide latest Giveaway and Sweepstakes and you can join it if you want to be a shining winner. More details available on link.
ATAKOY BAYAN
mobil sohbet http://www.mobilbayan.com/
That you can check easily and get updates. Just check the link.
mobil sohbet sayfasıdır.. http://www.mobilbayan.com/
http://www.escortistanbulilan.com/
http://escortatakoy.com/
http://www.okulhikayen.com/
güzel siteeeee beaaa
eskort olmak isteyen buraya
http://www.istanbulbayanescort.com/
http://www.escortmetropol.com/
http://www.escortmetropol.com/
Nice thanka admin
Böylesi her zaman saha güzel
Güzel nice Admin
Güzellikler burada tamamen
Tamam sorun yok mu var
Tamam geliyorum ben de
Thank You Nice
thank you site
Thank You
This blog post showcases quick and creative Easter basket ideas using Nestabilities and PTI style, along with a fun blog challenge. The step-by-step instructions and accompanying photos make it easy to follow along and create these charming baskets.
Leave a reply