Candy Carrot Garden
Feb 15, 2008SO what did you think of the reveal? I can’t believe its over. I doesn’t feel real.
Pretty fabulous stuff huh? I couldn’t get into the forums at all. Insert sad face. I would have loved to chat it up with all of you. Oh well. That what happens when you get a bunch of PTI starvedwomen on one site right-LOL!
If you wonder which stuff is mine-it was posted under gallery administrator. Just a last minute glitch. Im sure it will be fixed soon. Im sure you figured it out anyway, but just thought I’d let you know all the same.
Wait till you have the new things in hand. The ribbon is to DIE for! Seriously. The colors are gorgeous. I can’t wait to play mor with the new colors.
I noticed my friend Tracey Cuccia, and Elisabeth Neumann got an honorable mention! YEAH! Cyber hi-5 girl!
Congrats to the winners and other honorable mentions. I never know HOW Nichole can pick from all the amazing samples she must get. AMAZING.
So speaking of samples here is my Just Hatched project.
Feel free to ask any ?’s. I will edit to answer any here.
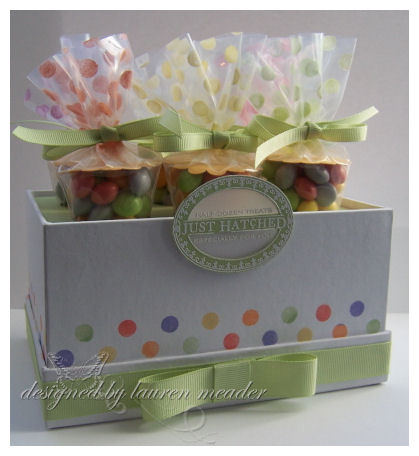
This is my Candy Carrot Box.It is suppose to look like the perfect Candy Garden!Just pluck a candy carrot from the “ground” and you have the perfect treat.
When filling these “carrots”, the possibilities for a themed garden is endless.
This box is a great size. You will notice that I stamped a border, using an image from the Polka Dot Basics set. The box has a matte finish and takes the ink beautifully.
I used various versamagic inks on the project. Kept it clean and SIMPLE!
I stamped my sentiment in versamark onto celery cardstock AND vellum cardstock. I them embossed with white EP.
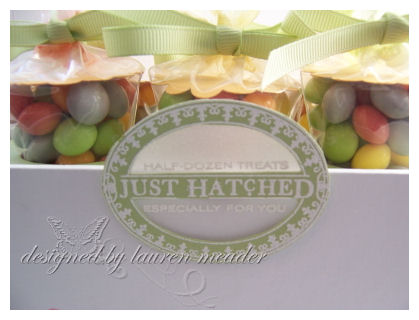
I used a hobby blade to cut out the center pieces, so that the vellum would be seen through the green overlay. A cute way to use the sentiment.
Because my carrots stick out over the top, I put my lid underneath, then decorated with wide grosgrain ribbon
I covered my insert with a celery cardstock, to look like “grass”. Just measure the insert, then trace the holes on back of piece, use the 1 3/8 circle punch-DONE! I moved the egg hole insert, up, and adhered with redline tape.
For the carrots-

I cut down disposable frosting bags, to about 6 inches. I used the polka dot images to stamp the tops of my bag’s with white stazon. I used my Poppin Acetate technique found —>HERE. It really helps take those PLAIN bags, and give them some POP!
I quickly brushed on Pebbles Inc. shimmery pastels, while StazOn was still wet. This made the bag tops co-ordinate with the colors of my candy, and border.
When I filled the bags (I used tropical Skittles) I then punched a scallop circle from a Apricot piece of cardstock-so from the top, the appeared to look like carrots. Tied with celery ribbon and done.
Candy Carrot Garden-Supplies from www.papertreyink.com
Supplies-Just Hatched egg box
Stamps-Just Hatched, Polka Dot Basics
Ink- White StazOn, Versamagic
versamagic ink in Aloe Vera, Spring Pansy, Thatched Straw, Pink Grapefruit and Persimmon
Cardstock-Celery, Cardstock Vellum
Ribbon-wide/narrow celery grosgrain
Disposable frosting bags
White Detail embossing powder
Hobby blade, heat tool, 1 3/8 circle punch, scallop circle punch
Pebbles Inc Shimmery Pastels
Well I hope you liked my version of the Just Hatched boxes. They really do have UNLIMITED possibilities.
Im off to prepare another tutorial for you all, and hopefully work on my blogger’s challenge!
Be back soon.

My Etsy

Who I Designed For
Blogroll
- Alicia
- Alli Miles
- Ally Blankenship
- Amber
- Andi @ crafts on a whim
- Angel R
- Angie Z
- Anne Kranitz
- Becky O
- Bee
- Beth Silaka
- Bethany Paull
- Beverly Nash
- Bobbie
- Cambria
- Cammie
- Card of the Week
- Card Positioning System (CPS)
- Cards for Cancer
- Catherine Doucette
- Charmaine
- Cheryl Sims
- Chriss Rollins
- Christina
- Christine Ewing
- Christine Wooden
- Colleen Schaan
- Craft Critique
- Craft Gossip
- Crystal
- Dawn Easton
- Emily Giovanni
- Geny
- Holly
- Igne Groot
- Inspirational Craft Blogs
- Irene
- Jami Sibley
- Jeanne Streiff
- Jen del Muro
- Jeni Bond
- JenMarie
- Jenn Balcer
- Jenn Diercks
- Jenn O
- Jennifer E
- Jennifer Mick
- Jennifer Pereda
- Jennifer-Sweet Treat
- Joanne Basile
- Jodi Collins
- Julia Stainton
- Julie Masse
- Karen
- Kathryn Berthiaume
- Katie Cotton
- Kelley Holland
- Kendra
- Kim Scholfield
- Kris’s Color Stripes! Get inspired here
- Kristen Dubosque
- Kristin Eberline
- Kristine
- Laura @ Sunshine Stamper
- Laura Turnmire
- Laurie Schmidlin
- Lesa Rapp
- Linda Duke
- Linda-LSN
- Lindsey Botkin
- Lisa (lakind scs)
- Lisa Kind
- Lori Craig
- Maggie
- Mara Campbell
- Maria
- Maria Levine
- Mary
- MaryJo
- Melanie M
- Monique Hansen
- Moxie Fab World
- Pam Imholz
- PaperCrafts Connection
- Peppers and Pollywogs Kids party site
- Rebecca Grohall
- Rita
- Robyn
- Rose Ann
- Sarah Vrolyk
- Sharon Harnist
- Sharon Johnson
- Sharon Rivera (a chemisrty with paper)
- Sherrie
- Sophia Landry
- Storage Units, Ink, & More Blog
- Sue Berker
- Susan (Rainy)
- Tangii Crane
- Tracy
- Tricia Traxler
- Trudee
- Velta
- VivLyn
- Zena
MTME Pretty Palette Color Team
MTME Pretty Patterns Sketch Team
My Time Made Easy TM LLC
Shop till you drop!
Lauren Meader
About Me
Copyrighted material
Subscribe To My Blog
Pages
- About me
- Alexa’s Story!
- My Crafty Corner!
- My Time Made Easy™ LLC
- Our Make A Wish Trip to Disney!
- Resume/Publication List
Calendar
Archives
- August 2013
- July 2013
- June 2013
- May 2013
- April 2013
- March 2013
- February 2013
- January 2013
- December 2012
- November 2012
- October 2012
- September 2012
- August 2012
- July 2012
- June 2012
- May 2012
- April 2012
- March 2012
- February 2012
- January 2012
- December 2011
- November 2011
- October 2011
- September 2011
- August 2011
- July 2011
- June 2011
- May 2011
- April 2011
- March 2011
- February 2011
- January 2011
- December 2010
- November 2010
- October 2010
- September 2010
- August 2010
- July 2010
- June 2010
- May 2010
- April 2010
- March 2010
- February 2010
- January 2010
- December 2009
- November 2009
- October 2009
- September 2009
- August 2009
- July 2009
- June 2009
- May 2009
- April 2009
- March 2009
- February 2009
- January 2009
- December 2008
- November 2008
- October 2008
- September 2008
- August 2008
- July 2008
- June 2008
- May 2008
- April 2008
- March 2008
- February 2008
- January 2008
- December 2007
- November 2007
- October 2007
- September 2007
- August 2007
- July 2007
- June 2007
- May 2007
- April 2007
- March 2007
- January 2007
Categories
- About Me
- All That Scraps
- blogger challenge
- camera/photo play
- Cards
- Contests
- family stuff
- FOR SALE
- Home decor/3-D items
- How to FAKE it!
- Introduction
- JUGS Challenge
- JustRite Stampers
- Lizzie Anne Designs
- My family stuff
- My Stamping Space
- My Time Made Easy
- My Time To Color Challenge
- My Time to Create Challenge
- My Timeless Template Challenge
- My Timeless Templates
- Mytime Mail
- MYTIME MOVIE/VIDEOs
- Papertrey Newsletter
- Pink Cat Studio
- Pretty Palette Challenge
- Pretty Patterns Sketch
- Product Opinions and Must haves
- Recipe's
- Saturday Sketch
- Smilebox Creations
- Stampavie
- Tutorials
- Uncategorized
- videos
Most Popular
- Create your own Onesie Card Tutorial-and important NOTE! PLEASE READ (2529)
- Saturday Sketch-Boxed bag holder (2333)
- Going GREEN! Fancy Flower Flourish-Closure Video (1478)
- Fabulous Favorite - Giveaway! (1336)
- a Prayer Request (1232)
- QUICK-Easter Baskets from Nestabilities-PTI style-and blog challenge (1063)
- Teaser Sketch (999)
- February Release Giveway! (and a little peek) (996)
- Group Post and Rambling Rose Video Tutorial (985)
- GIVEAWAY! Who wants it all?! (895)
Recent Comments (RSS)
- 첫충사이트: 완전히 흥미로운 블로그 게시입니다. 저는
- sarah: Wow, Lauren, what a stunning
- hedie: خرید راهبند
- 야동: Love to read it,Waiting For
- 야동: This seller is in a
- 바카라사이트: 여기 처음 왔어요. 나는이 게시판을
- 야동티비: I was surfing the Internet
- 바카라사이트: 비슷한 주제에 대한 흥미로운 정보를
- 바카라사이트: "여기에 제공해 주신 귀중한 정보와
- 온라인홀덤: 유익한 웹 사이트를 게시하는 데
Copyright © 2007 - My Time, My Creations, My Stampendence - is proudly powered by WordPress
This blog has been Tweaked and Designed by Sara Williams
48 Responses for "Candy Carrot Garden"
Lauren…These are just gorgeous! I just keep staring at them! Loved the new releases! So excited to buy my first stamp set!
butterfly kisses!
I just absolutely love your “carrot garden”. It’s over the top clever and adorable! Thank you for the detailed directions. You are so generous with sharing your ideas with us.
Last night was fun although I couldn’t get in the forums either. It was still fun watching her blog and participating. I had to pay the price when my wee-one woke up in the middle of the night with a fever and cough. Oh well, what are you going to do?
I can’t wait to place my order. I also can’t wait to see what else you have in store for us.
Hope everyone is doing well in the ‘mytime’ household. Have fun on your date tomorrow. Talk to you later!
Hugs,
Renee
You do amazing work. This is just gorgeous.
Yeah…I was never able to get in either but I still managed to spend a nice chunk ‘o change! I absolutely LOVE your box. I didn’t order any of those but now I’m thinking I might order them and use them for my boys as part of their Easter gift basket. That would be fun! Thanks for sharing all your talent!
[…] My Time, My Creations, My Stampendence wrote an interesting post today on Candy Carrot GardenHere’s a quick excerptCandy Carrot Garden Published by mytime under Home decor/3-D items, Uncategorized SO what did you think of the reveal? I can’t believe its over. I doesn’t feel real. Pretty fabulous stuff huh? I couldn’t get into the forums at all. Insert sad face. I would have loved to chat it up with all of you. Oh well. That what happens when you get a bunch of PTI starvedwomen on one site right-LOL! If you wonder which stuff is mine-it was posted under gallery administrator. Just a last minute glitch […]
Absolutely adorable! You combined classy and cute so perfectly!!! Thank you for sharing your creative projects with us!
Lauren, your carrot box was my favorite! I just don’t know how you do it! How and where do you fit all that creativity?:) Great job, I love it, couldn’t be happier for you! Can’t wait to see what tutorial you have up your sleeve;) Have a great Friday!
This is perhaps THE MOST AWESOME project! Congrats on your first PTI reveal. By midnight, I was too tired to check out the gallery, so I’ll be heading there soon.
Need more coffee…………….. oh sorry dozed off there for a second. I’m so tired after I got my order in last night Tyler woke up with bad dreams. Got him to sleep went to bed and then Jason had to get up to go on the road. 6 o’clock came very early this morning. Got some great stuff coming though. I love, love, love this carrot box. I could use some of those Skittles right about now. Going to go to sleep.. I mean watch Diego with Tyler now. He has a blanket all ready for me on the couch. -Molly B
I couldn’t get on the forums either. 🙁 But I loved seeing all the new products!!! Now the tough part deciding what to buy first.
Your candy carrot garden is too cute and you are just too clever!!! Thanks for sharing the directions!
You amaze me Lauren! Your creations are just darling and this is no exception!!! What a great idea and this would make such a cute gift!
Love this box… I saw it on Nicholes blog and just thought it was wonderful.. Yes it was too bad that we couldn’t get onto the customer forum but I did get all that I wanted ordered. Now I have to wait !!!
Thanks for the hi-5 girlie! Right back at ‘cha!!! GREAT projects over at the PTI gallery!!! I totally love this box…it’s way adorable, and the bags came out oh so cute with the polka dots. love it… 🙂
Love this carrot box Lauren – and all of your other projects! Great job, can’t wait for next month:)!
I just love this – it was my favorite of all the boxes! So cute and springy! Thanks for sharing, I’m really looking forward to seeing more of your PTI design team creations!
I’m still in awe of this gorgeous box! I can’t wait to get mine! Your creations are fabulous! Thank you for the wonderful inspiration you bring everyday!!
OH MY GOSH, Lauren, this is the cutest thing EVER!!!!! I LOVE LOVE LOVE what you did with the box….how creative!
Thanks for sharing, what a fun reveal! I can’t wait to get my new stuff from Nichole! WOOHOO! 😀
Excellent, clever, stupendous, creative, beautiful, stunning… I need my thesaurus… 🙂
I knew yours the best!!!! It’s so pretty Lauren!!! You are one talented chick!!!
I loved your idea Lauren..Also the garden on in the eggs. This is going to be so versatile. Have a fabulous weekend. Chris
Gorgeous! I love the carrot idea! So sweet!
I was one of the PTI blog lurkers last night to wait for the new stamps to come up! Yummy!!!
Lauren, the box is absolutely darling!! I instantly think Easter and how fun a gift this will be for family or friends. You always think of the most unique and marvelous things!! Thanks for sharing.
Lauren,
I just love your Carrot Garden!! I placed my order with Papertryink for 10. I plan on doing a “Class” for Easter with these sweet boxes. Can you tell me how long it took you to do this?
I look forward to your blog each day…and I have to say you are quite blessed to be such a wonderful Mommy and talented artist!
SHUT UP! This is soooo great!!! 🙂
Perfection!!! Very sweet idea. 😉
Thanks for sharing.
I won’t feel so bad since I couldn’t get into the forums either. That carrot box is fabulous Lauren, and something I am going to be trying in the near future too. It’s just too cute not to.
These are absolutely beautiful! All of your work is just stunning:)
Laura
This was my favorite egg box. So adorable!! Might have to get one and try it out!
Very, very cute!!
I LOVE this Lauren, I am sure PTI will be very busy with orders after seeing your project!!! Jennifer 🙂
This is totally ADORABLE!!! You are so creative – I wish I had just a few of your creative genes. Great job!
Your carrot box is so adorable, and clever!!! Love it!!
Ya… ummm… You’ve outdone yourself “AGAIN”!!!
Your too much, girl!!! I would love to borrow your brain for “just” a couple of hours!! 😉
Splenderificik job!!!
Breath-taking!!
I always look foward to see what’s next.
This egg box was My favorite too!
Your talent keeps “SHINING”!!!
This is one Outstanding piece of ART!!!
Thanks for sharing.
Dee
Oh my gosh ~~ again with the STINKIN’ cute things!!!! I LOVE this!! I do want you to know that I ordered some boxes and the Just Hatched set because I want to be like you when I grow up!!! LOL!!! Yes, I will be CASEing ~ I’ll give you FULL credit though!!! Great job Lauren!
~Lynda
[…] Read the rest of this great post here […]
OMG. Those are soooo cute! Pepples Inc. should pay you for the advertisment. I went out and bought a set of chalks after your recommendation and am going to make some of these for teacher’s for Easter. Thank you for sharing. I love them!
Where did you get the wonderful printed bags for your carrots? I really love your box and the carrots are an adorable Theme. TFS Ann
THE BLOG IS QUITE GOOD
Cheers for this content, guys, continue to keep up the good work.
It really is good to possess the capacity to examine a great high quality article with practical specifics on topics that plenty are interested on. The stage that the information indicated are all first hand on reside experiences even guide a lot more. Proceed performing what you do as we really like readi?-
Hi! Your publish rocks and can be a great study!
Thank you for your well-thought content. I’m really at perform proper now! So I ought to go off with no reading through all I’d like. But, I place your web site on my RSS feed in order that I can read mor
Very first factor , A large thank you for you to open my eyes.
Many thanks for your good publish. I’ll take the notes you’ve written.
Cheers for the info. Greatly appreciated.
[…] Candy Carrot Garden – My Time, My Creations, My Stampendence […]
I admire the valuable info you offer you inside your articles. I’ll bookmark your website and have my kids examine up the following typically. I am really confident they will understand a lot of new stuff below than anybody else!
Leave a reply