MAKE IT MOVE!!! Tutorial Time :D
Dec 12, 2007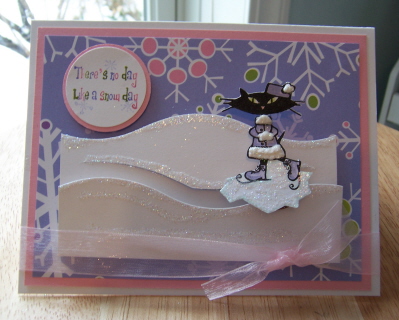
Time has just flown by. I so wanted to get this done earlier, but that doesn’t always work out that way.
Life here has been CRAZY. We had Amber’s Christmas Show-which was over the top CUTE!!! OMWord-proud mom here-wait till I get the Smilebox done! I hope the video thing loads properly. It was just too precious! PRECIOUS I tell you.
We then had a visit from THE Santa himself! I got lots of photos for that! I even began to wish he was real! He was awesome!! I’ll go into that on more when I do that post. AMAZING.
I finally got some stamping done!! YEAH!!! Dog training is hard work people! My little Daisy Doodle is quite the cuddlebug.
I was having such a wave of inspiration, but it was quickly squished with kids and dog training. To be frank-I’m wiped out. Its all worth it though. The kids have been acting in a way the guarantee’s the NAUGHTY list today-so that did NOT help either.
Well I PROMISED you all a tutorial, on how to make a card “in motion”. It is along the idea of a “spinner” card, but it doesn’t spin-it slides along a track. Think of like a train. It has 2 tracks that keep it from sliding off. Along the same idea.
After I posted THIS card, I got OVER 100 personal email messages, asking for a tutorial. WOW, you love me! OK maybe not me, but thanks for the awesome feedback. I cannot tell you how much I appreciate it. Its so rewarding to know that people like this stuff or find it helpful, when you put so much of yourself (and time) into it.
So, now is the time 😀
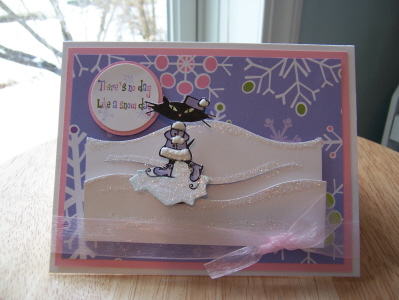
I didn’t want to re-do the exact SAME card, so I decided to show you how versatile it can be 😀 In keeping with the WINTER theme of December, I decided to do Skating scene instead.
Keep an open mind-anything could be done.
I am including step by step instructions. Please click the photos for a larger view. Post your questions here, if any, and I will answer it in the comments section.
Please be aware-it sound difficult, but seriously is easy. Also goes pretty fast 😀 Just try it! If you do send me a link so I can see it.
Here is what you will need
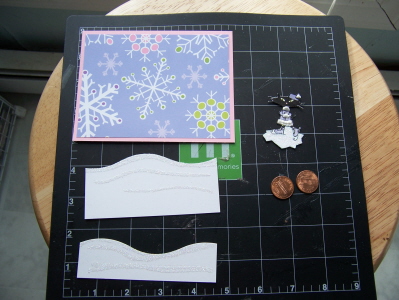
Your main layer (snowflakes here).
A “hill” or land panels. This adds to the “look” that your image is doing something or going somewhere.
A hobby blade/mat
2 Pennies
lots of dimensionals
a little imagination ;D
Step 1-CARD DETAILS- the prep before the “technique”.
I made my card base from white cardstock.
I then cut/matted my snowflake patterned paper (from DCWV).
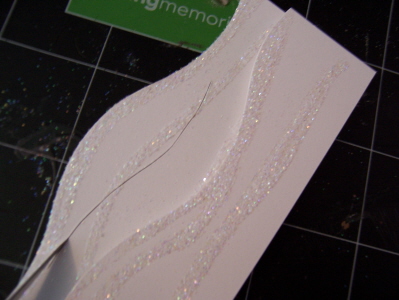
I cut 2 “hills” in different sizes (using my CM Wavy cutter). Added Dazzling diamonds.
The IMAGE- its important to make sure your image allows you to HIDE the pennies. So make sure you check that prior to going all gangbuster’s then getting sad it doesn’t look right!
I stamped my desired image (cat from The Cat’s Pajama’s-Kitty Christmas). I cut her so she was on her own lil ICE patch! Sentiment was done using SU! markers, and is from Wintertime Fun. Colored with Copic’s and added liquid applique (with dazzling diamonds while wet-then heat set) to the fur lining of the outfit.
Step 2
 Layer the snowhills, using dimensionals
Step 3
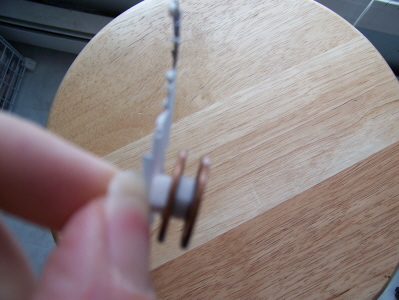 Layer- dimensional, penny, dimensional, penny. In the MIDDLE of the 2 penny “sandwich” is your track, I am referring to.
Step 4
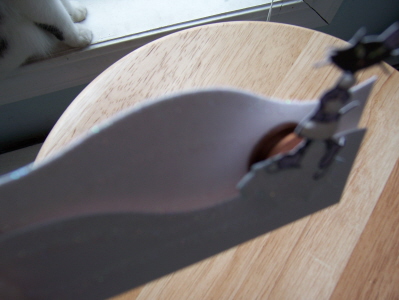
 Place the image on the “track” with cardstock between 2 pennies.
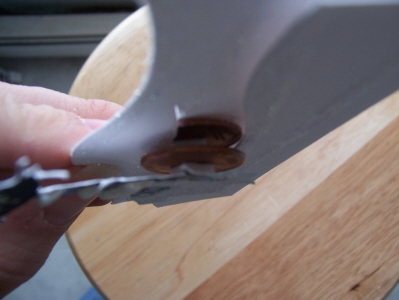
This gives you an idea of where you will need to make a cut for the other end of the pennies to slide into. Don’t make your slice too far apart. Get a little close to the track. Like 1/4 inch along the edge is about right, for a good fit. You can use a pencil and Layer Ease first if you like, and it has to be PERFECT 😀
Use hobby blade, and follow the lines of the bottom track, as seen in photo.
Step 5
 POP the pennies into place.
Put one penny in front of bottom layer. Pop the back penny into cut layer.
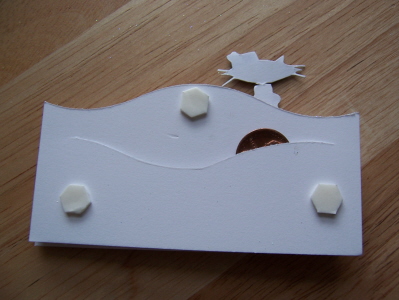 This is how the back may look. Adhere with dimensionals to card base. Careful not to place dimensionals in a spot that will inhibit movement. Area above track will need to double up on dimensionals (in other words apply 2 in the same spot).
This allows the penny to freely flow along the track when pushed/pulled.
 click for larger view
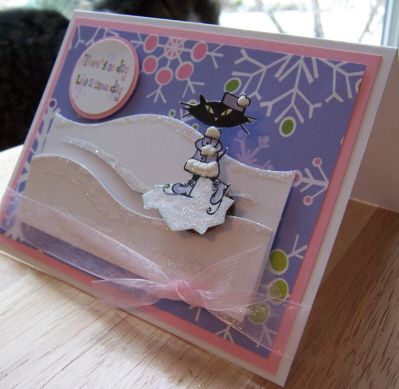 Here is the side view. You simply push her along the hills so she “skates” across the card!
Pretty cool huh?
Now its YOUR turn.
Hope you enjoyed!
Till tomorrow

My Etsy

Who I Designed For
Blogroll
- Alicia
- Alli Miles
- Ally Blankenship
- Amber
- Andi @ crafts on a whim
- Angel R
- Angie Z
- Anne Kranitz
- Becky O
- Bee
- Beth Silaka
- Bethany Paull
- Beverly Nash
- Bobbie
- Cambria
- Cammie
- Card of the Week
- Card Positioning System (CPS)
- Cards for Cancer
- Catherine Doucette
- Charmaine
- Cheryl Sims
- Chriss Rollins
- Christina
- Christine Ewing
- Christine Wooden
- Colleen Schaan
- Craft Critique
- Craft Gossip
- Crystal
- Dawn Easton
- Emily Giovanni
- Geny
- Holly
- Igne Groot
- Inspirational Craft Blogs
- Irene
- Jami Sibley
- Jeanne Streiff
- Jen del Muro
- Jeni Bond
- JenMarie
- Jenn Balcer
- Jenn Diercks
- Jenn O
- Jennifer E
- Jennifer Mick
- Jennifer Pereda
- Jennifer-Sweet Treat
- Joanne Basile
- Jodi Collins
- Julia Stainton
- Julie Masse
- Karen
- Kathryn Berthiaume
- Katie Cotton
- Kelley Holland
- Kendra
- Kim Scholfield
- Kris’s Color Stripes! Get inspired here
- Kristen Dubosque
- Kristin Eberline
- Kristine
- Laura @ Sunshine Stamper
- Laura Turnmire
- Laurie Schmidlin
- Lesa Rapp
- Linda Duke
- Linda-LSN
- Lindsey Botkin
- Lisa (lakind scs)
- Lisa Kind
- Lori Craig
- Maggie
- Mara Campbell
- Maria
- Maria Levine
- Mary
- MaryJo
- Melanie M
- Monique Hansen
- Moxie Fab World
- Pam Imholz
- PaperCrafts Connection
- Peppers and Pollywogs Kids party site
- Rebecca Grohall
- Rita
- Robyn
- Rose Ann
- Sarah Vrolyk
- Sharon Harnist
- Sharon Johnson
- Sharon Rivera (a chemisrty with paper)
- Sherrie
- Sophia Landry
- Storage Units, Ink, & More Blog
- Sue Berker
- Susan (Rainy)
- Tangii Crane
- Tracy
- Tricia Traxler
- Trudee
- Velta
- VivLyn
- Zena
MTME Pretty Palette Color Team
MTME Pretty Patterns Sketch Team
My Time Made Easy TM LLC
Shop till you drop!
Lauren Meader
About Me
Copyrighted material
Subscribe To My Blog
Pages
- About me
- Alexa’s Story!
- My Crafty Corner!
- My Time Made Easy™ LLC
- Our Make A Wish Trip to Disney!
- Resume/Publication List
Calendar
Archives
- August 2013
- July 2013
- June 2013
- May 2013
- April 2013
- March 2013
- February 2013
- January 2013
- December 2012
- November 2012
- October 2012
- September 2012
- August 2012
- July 2012
- June 2012
- May 2012
- April 2012
- March 2012
- February 2012
- January 2012
- December 2011
- November 2011
- October 2011
- September 2011
- August 2011
- July 2011
- June 2011
- May 2011
- April 2011
- March 2011
- February 2011
- January 2011
- December 2010
- November 2010
- October 2010
- September 2010
- August 2010
- July 2010
- June 2010
- May 2010
- April 2010
- March 2010
- February 2010
- January 2010
- December 2009
- November 2009
- October 2009
- September 2009
- August 2009
- July 2009
- June 2009
- May 2009
- April 2009
- March 2009
- February 2009
- January 2009
- December 2008
- November 2008
- October 2008
- September 2008
- August 2008
- July 2008
- June 2008
- May 2008
- April 2008
- March 2008
- February 2008
- January 2008
- December 2007
- November 2007
- October 2007
- September 2007
- August 2007
- July 2007
- June 2007
- May 2007
- April 2007
- March 2007
- January 2007
Categories
- About Me
- All That Scraps
- blogger challenge
- camera/photo play
- Cards
- Contests
- family stuff
- FOR SALE
- Home decor/3-D items
- How to FAKE it!
- Introduction
- JUGS Challenge
- JustRite Stampers
- Lizzie Anne Designs
- My family stuff
- My Stamping Space
- My Time Made Easy
- My Time To Color Challenge
- My Time to Create Challenge
- My Timeless Template Challenge
- My Timeless Templates
- Mytime Mail
- MYTIME MOVIE/VIDEOs
- Papertrey Newsletter
- Pink Cat Studio
- Pretty Palette Challenge
- Pretty Patterns Sketch
- Product Opinions and Must haves
- Recipe's
- Saturday Sketch
- Smilebox Creations
- Stampavie
- Tutorials
- Uncategorized
- videos
Most Popular
- Create your own Onesie Card Tutorial-and important NOTE! PLEASE READ (2529)
- Saturday Sketch-Boxed bag holder (2333)
- Going GREEN! Fancy Flower Flourish-Closure Video (1478)
- Fabulous Favorite - Giveaway! (1336)
- a Prayer Request (1231)
- QUICK-Easter Baskets from Nestabilities-PTI style-and blog challenge (1063)
- Teaser Sketch (999)
- February Release Giveway! (and a little peek) (996)
- Group Post and Rambling Rose Video Tutorial (985)
- GIVEAWAY! Who wants it all?! (895)
Recent Comments (RSS)
- 바카라사이트: 비슷한 주제에 대한 흥미로운 정보를
- 바카라사이트: "여기에 제공해 주신 귀중한 정보와
- 온라인홀덤: 유익한 웹 사이트를 게시하는 데
- 홀덤나라: 나는 당신의 블로그를 정말 좋아합니다.
- lisa: Technology, too, has left an
- 주소모음: 흠 !! 이 블로그는 정말
- FutureGen Apps: Thank You For Sharing fantastic
- 웹툰사이트: 터키에서 온라인 스포츠 베팅을 할
- 툰코: It is a really very
- 온라인홀덤: I’ll be sure to come
Copyright © 2007 - My Time, My Creations, My Stampendence - is proudly powered by WordPress
This blog has been Tweaked and Designed by Sara Williams
28 Responses for "MAKE IT MOVE!!! Tutorial Time :D"
So cool! Thanks so much for the tutorial. I am going to try one of this sometime this week. I’ll send you a link! You rock Lauren!
This is so great, love the glitz and movement, thanks for the tutorial
[…] Check This Out! While looking through the blogosphere we stumbled on an interesting post today. Here’s a quick excerpt: I was having such a wave of inspiration, but it was quickly squished with kids and dog training. To be frank-I’m wiped out. Its all worth it though. The kids have been acting in a way the guarantee’s the NAUGHTY list today-so that did … […]
OMG this is adorable!! How cool and cute!
Lauren, you absolutely amaze me. I’ve never tried this type of card before but I bought the stamps – and this is just too cute not to try. Thanks for being so generous with your time and talent.
OMW – just how stinkin’ cute is this?! Great tutorial, thanks so much. I can’t wait to see the smileboxes. Paulette said that Amber was adorable.
Awesome, awesome, awesome! I cant wait to try this! Thank you so much for taking the time to do this!
A new little puppy is a handful, huh? It’s a good thing they are cute, and make up for all the work!
ohmyheck this is stinking ADORABLE. I can’t even stand it.
I have loved this since the first time I saw it! Thank you so much for taking the time to do this tutorial. I’m definitely going to try this. I have a bunch of neices, nephews, and Godchildren that would get such a kick out of this!
I’m so glad you had a great visit with Santa and that Amber’s show was a success! Can’t wait to see those Smileboxes!!!
Holiday Hugs,
Renee
Sooooooooo gorgeous. We do love YOU! (and your brilliant tricks too.) ;0) Mel
Oh my, Lauren! This is just too cute for words! I love it! Great tutorial! Gonna have to give it a try!
This is stinkin’ cute Lauren! Thanks for the tutorial…will have to try this when I have some spare time!
Glad to hear the visit with Santa went well! Lucky kids!
Lauren, Thank you so much for this tutorial. I think my Dad bought me the sledding Lucky dog after I showed him your first card.. I can’t wait to try this. Hope Daisy is being good. Happy Holidays. -Molly B.
This is so cute! Thanks for the tutorial!!! I will need to try this!
Thank you so much for the tutorial! I was looking forward to make this type of card and now I know how. Again, thanks!
As usual Lauren, you are so sweet to offer such great things for us readers & subscribers…I love the other card too, and this one is super cute for skating..Thanks girl!! c
So super cute! And I LOVE that funky patterned paper. . .very cool!
You are the best for making this great tutorial. Thanks for sharing all your fantastic ideas!
That is TOO CUTE!!! Bless your heart, take some time to BREATHE!!! And remind your kiddles that Santa just came, and he’d better hear they are being GOOD!!! lol
Thanks so much for the tutorial, you totally ROCK!!! You are the best! 🙂
Lauren, Thank you for taking the time to do this for all of us. It’s so much appreciated!
Fabulous project !! Have a great holiday and all the best in 2008.
Janine
thanks for the tutorial Lauren! cant wait to try it!
This is such a sweet card!
What great colors.. love it!
I have never tried this before..
Thanks for sharing your instructions.
I will save them and give this a try.
I’m glad to hear that everyone had a
nice visit with Santa. Can’t wait to see
some pictures…bet the kids were so
excited!!
Holiday Wishes!
Dee
Amazing Lauren! What a great job and how CUTE!! Thanks for sharing your hard work! 🙂
great project! do you have a name for this card yet- track card? train track card? Saving this idea for some cards for my nephews! thanks for the tutorial
What fun!!! I love your style and I am so glad your blog exists for inspiration — both as a card maker and as a human being. I wish you and your family the best holiday ever!
Finally got around to trying this. I had to make a few adjustments but thanks for the inspiration though. Terrbear38.blogspot.com
MARVELOUS PROJECTS! VERY KIND OF YOU TO SHARE ALL OF YOUR COOL IDEAS!
Leave a reply