Make your own-Butterfly Kisses brass stencil! And Learn to use embossing paste :D
Mar 26, 2007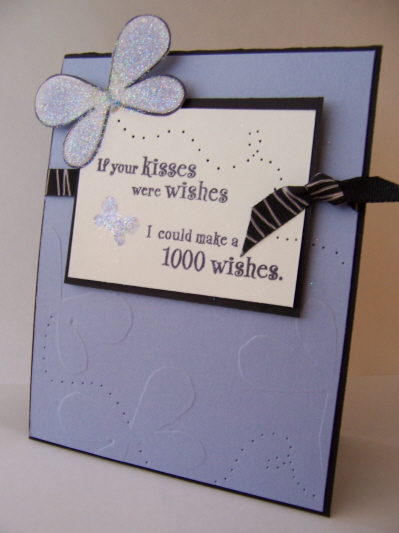
DO you love my card? I was SO happy with it. I love purple and butterflies so, this is SO me! This card was done using the folllowing tutorial. I dry embossed the butterflies, and used embossing paste on the butterfly image in the upper left corner! The image was done on shimmery white cardstock. I had fun piercing the flutter track of the butterflies. The sentiment (by CTMH The gift of love)was perfect for this due to the stamp set name “Butterfly Kisses”. Ribbon is by American Craft.
Well its no secret that I *LOVE* the NEW! Butterfly Kisses stamp set by Papertrey Ink. I finally got to play, and haven’t been able to put it down! More samples to be posted, so stay tuned.
During “playtime”, while exploring my new set I really wanted to try something “different”. Well at my recent stamp clubs I taught them how to use embossing paste. They went CRAZY! I posted this card called Bodacious Embossing paste in my gallery at SCS. That is the card that I used for our technique, and since that posting, I have gotten MANY requests to do a tutorial on that.
Soooooo, that leads me to this extra special tutorial!
I wanted to try this out with my new Butterfly Kisses stamp set. Problem-no brass stencil.
Well, now problem solved. I made my own! Now keep in mind the possibilities for this are ENDLESS, so use your imagination, and if you try it, link your template here!
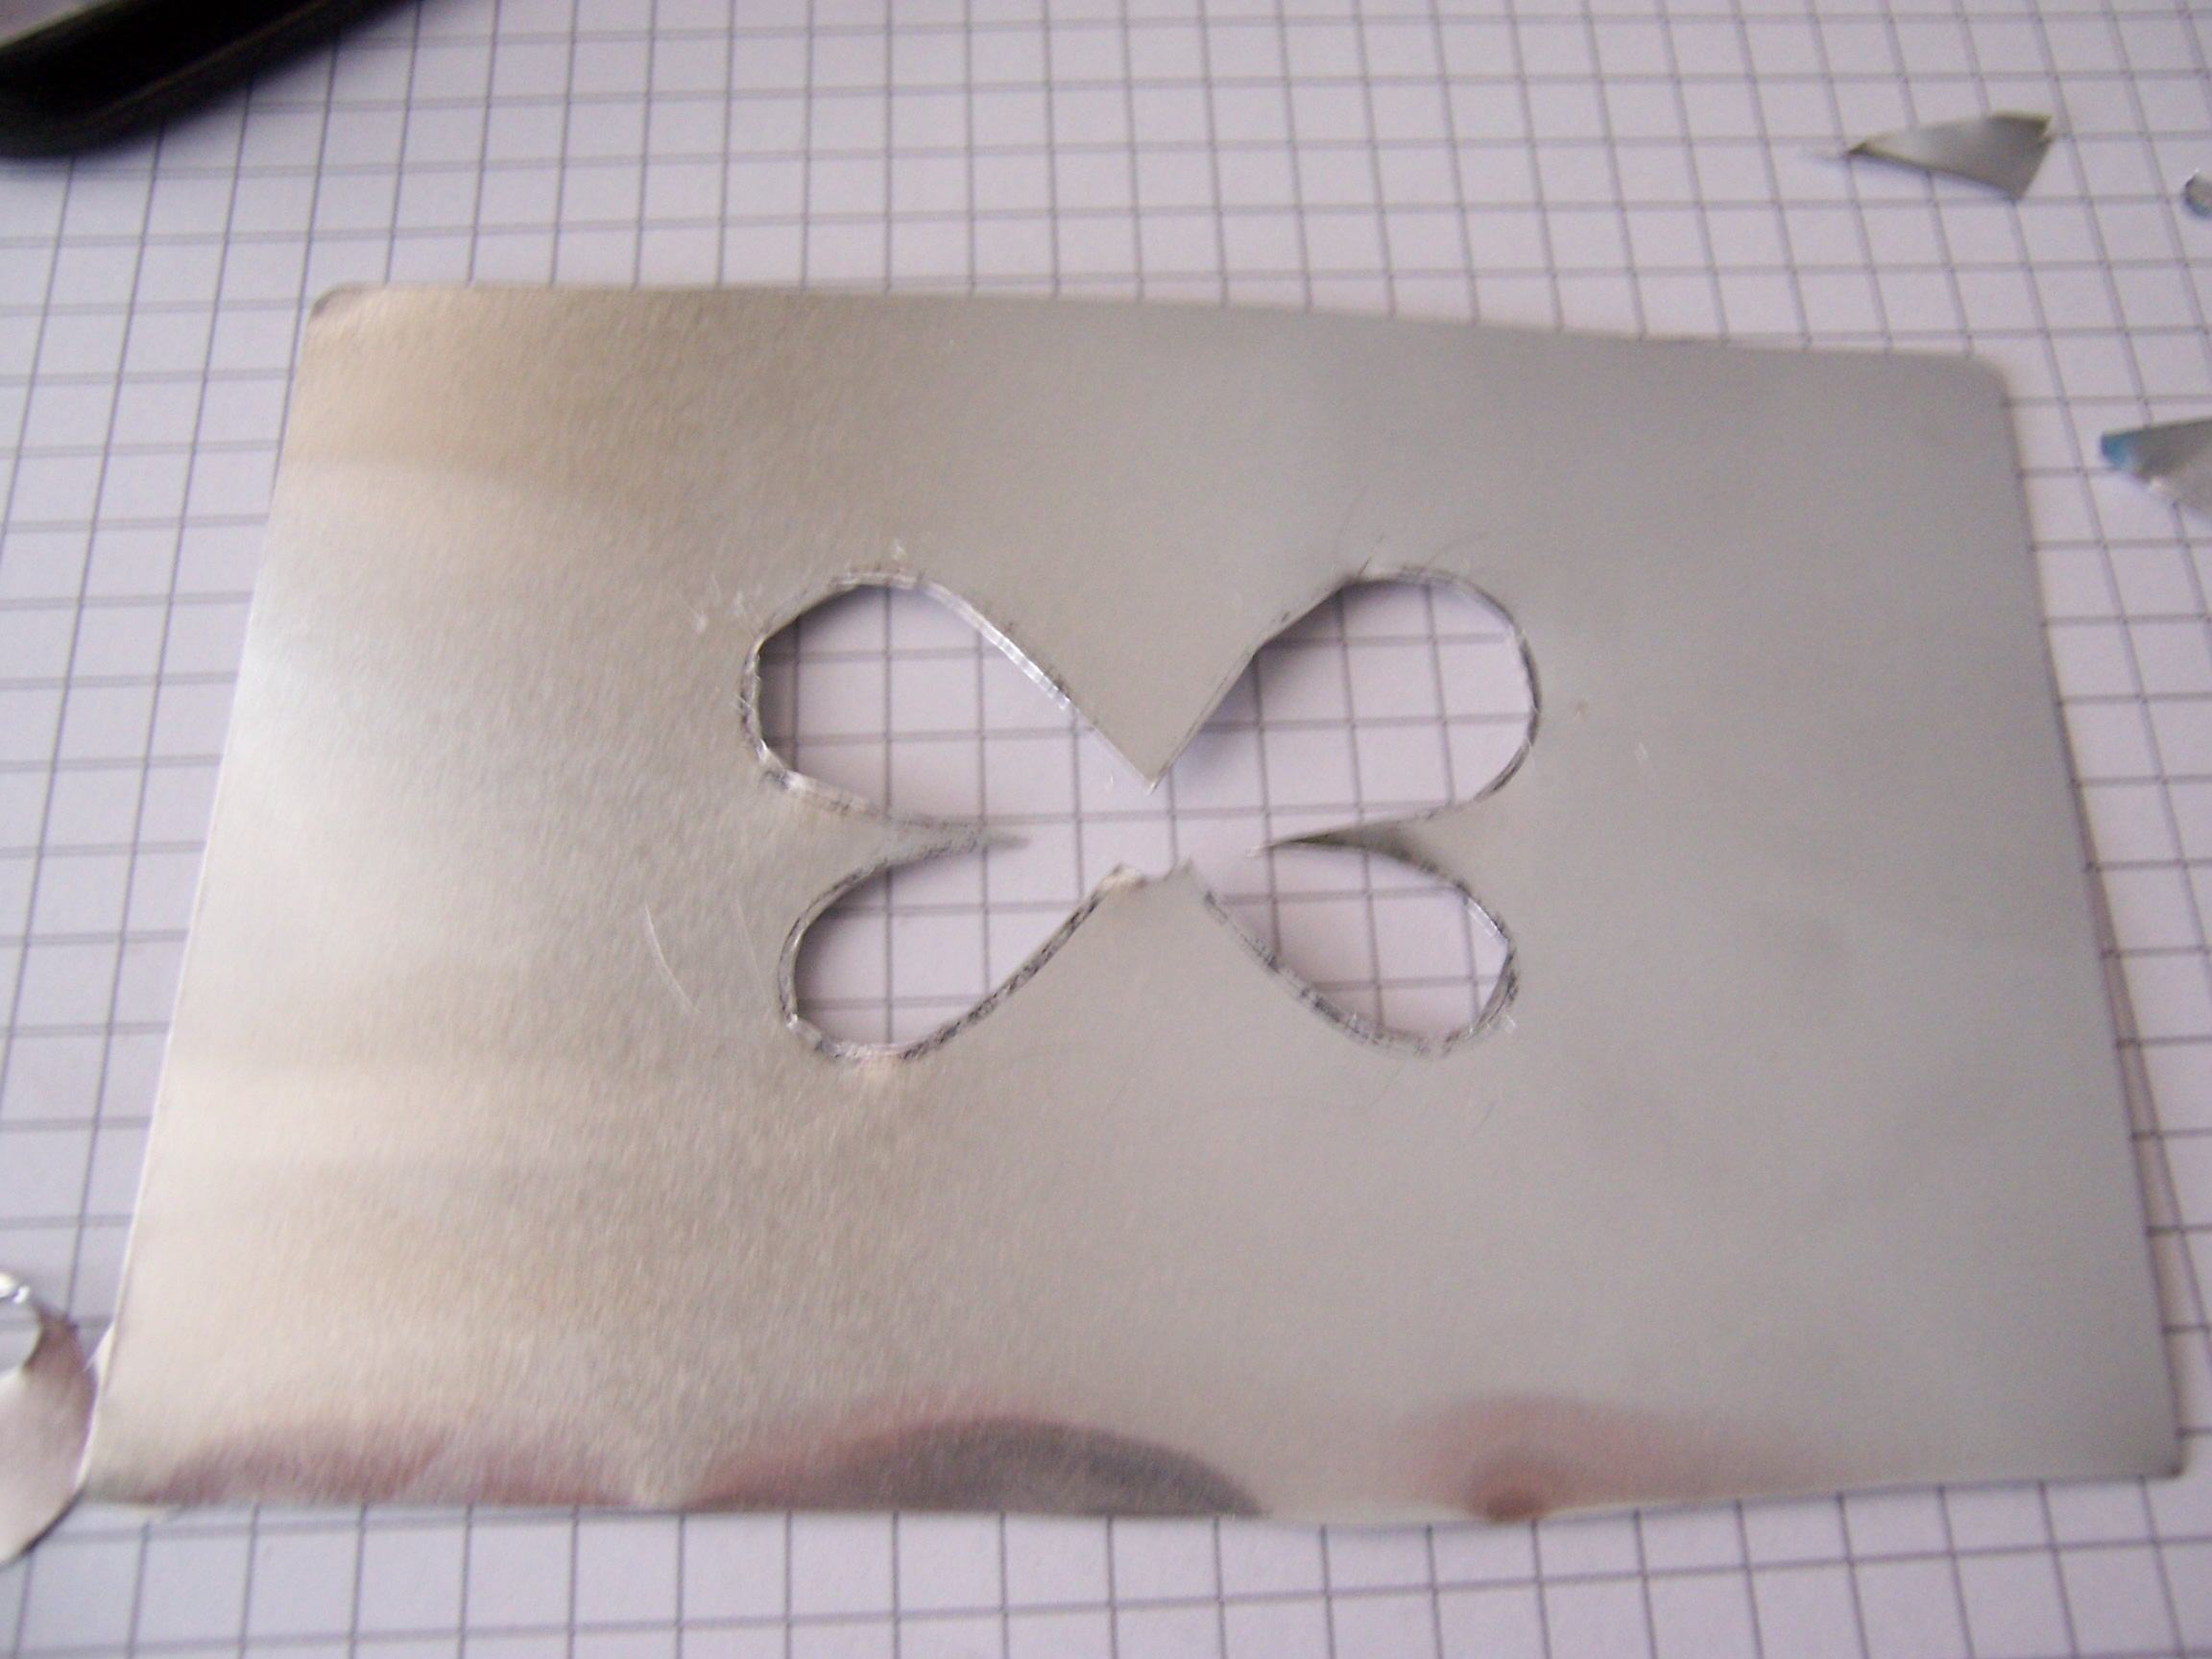
To make Your own metal embossing stencil
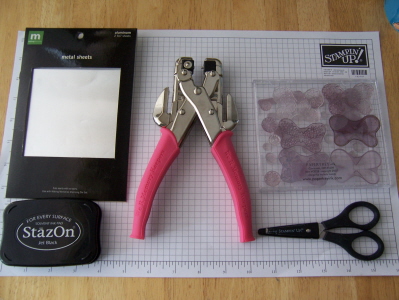
Metal sheet, StazOn ink, crop-a-dile, sharp scissors or tin snips, and of course a open line image.
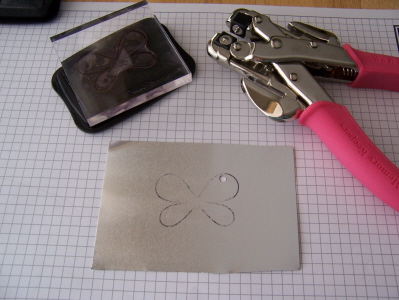
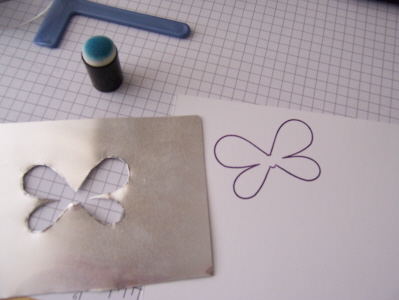
Step 1- Stamp your image on tin sheet, using StazOn.
Step 2- Use a crop-a-dile to punch a hole in the image. This allows you to get your scissors in the center without bending the soft metal. A Crop-a-dile is good cause it can punch through the metal unlike most punches.
Step 3-Cut out the center of the image. Once done you have a nice metal stencil that will allow you to dry emboss OR use embossing paste!
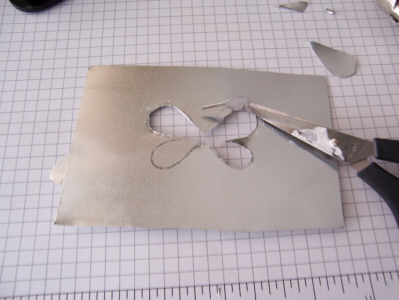
Pretty cool huh?
Now onto the embossing paste fun!
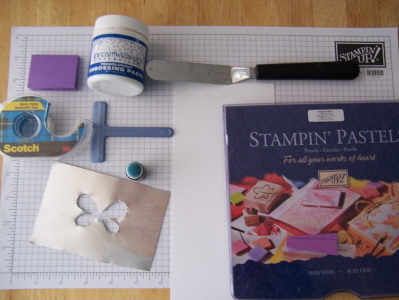
Here is what you need-
Your handmade metal stencil (or other embossing stencil)
Dreamweaver TRANSULCENT emossing paste (if you don’t get the clear your colors won’t show through when dry!)
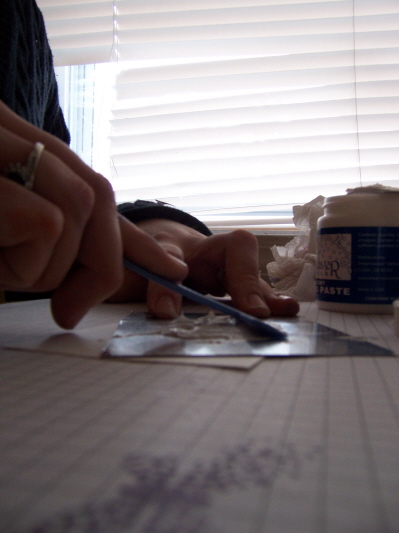
Scraper thingy (the blue scrapper you see in the photo)
Spreader (mine is a Pampered Chef one,and spreader will do)
3M removabletape (mainly for anchoring the stencil to the paper/surface)
Post-it notes (mainly used when using template with other images. You cover the ones you don’t want used, so the paste doesn’t get in)
Pastels with applicator
Step 1-Use removable tape to adhere paper to working surface. You don’t want it to slide around-trust me on this!
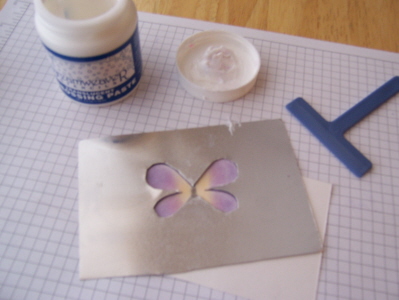
Step 2- Stamp outline image (optional). Then position stencil where desired. Tape down to card-stock. Cover any images not being used so they don’t get paste on them. If you made your own template this may not be necessary (see my photo)
Step 3- Use applicator or stipple brush to apply chalk to image. (Do not use ink as it will run unless its a waterproof ink, pastels absorb into the paste)
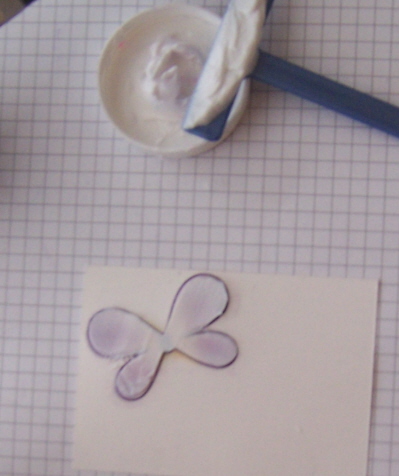
Step 4- Apply a thick layer of paste over enitre image on stencil, using spreader.

Step 5) Use scrapper, and go across image with a smooth even motion, in ONE direction. Toward you is best. Don’t scrap too much off.
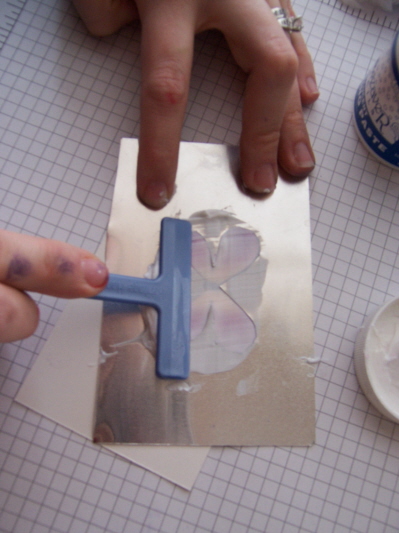
Step 6- Remove post it notes, and removable tape. CAREFULLY Lift off stencil in an upward motion.
Step 7- Sprinkle dazzling diamonds over image for some extra “bling”
NOTE- it takes about an hour to dry. Don’t freak when you cannot see the color immediately! Bright colors do work best.
Now go have fun!

My Etsy

Who I Designed For
Blogroll
- Alicia
- Alli Miles
- Ally Blankenship
- Amber
- Andi @ crafts on a whim
- Angel R
- Angie Z
- Anne Kranitz
- Becky O
- Bee
- Beth Silaka
- Bethany Paull
- Beverly Nash
- Bobbie
- Cambria
- Cammie
- Card of the Week
- Card Positioning System (CPS)
- Cards for Cancer
- Catherine Doucette
- Charmaine
- Cheryl Sims
- Chriss Rollins
- Christina
- Christine Ewing
- Christine Wooden
- Colleen Schaan
- Craft Critique
- Craft Gossip
- Crystal
- Dawn Easton
- Emily Giovanni
- Geny
- Holly
- Igne Groot
- Inspirational Craft Blogs
- Irene
- Jami Sibley
- Jeanne Streiff
- Jen del Muro
- Jeni Bond
- JenMarie
- Jenn Balcer
- Jenn Diercks
- Jenn O
- Jennifer E
- Jennifer Mick
- Jennifer Pereda
- Jennifer-Sweet Treat
- Joanne Basile
- Jodi Collins
- Julia Stainton
- Julie Masse
- Karen
- Kathryn Berthiaume
- Katie Cotton
- Kelley Holland
- Kendra
- Kim Scholfield
- Kris’s Color Stripes! Get inspired here
- Kristen Dubosque
- Kristin Eberline
- Kristine
- Laura @ Sunshine Stamper
- Laura Turnmire
- Laurie Schmidlin
- Lesa Rapp
- Linda Duke
- Linda-LSN
- Lindsey Botkin
- Lisa (lakind scs)
- Lisa Kind
- Lori Craig
- Maggie
- Mara Campbell
- Maria
- Maria Levine
- Mary
- MaryJo
- Melanie M
- Monique Hansen
- Moxie Fab World
- Pam Imholz
- PaperCrafts Connection
- Peppers and Pollywogs Kids party site
- Rebecca Grohall
- Rita
- Robyn
- Rose Ann
- Sarah Vrolyk
- Sharon Harnist
- Sharon Johnson
- Sharon Rivera (a chemisrty with paper)
- Sherrie
- Sophia Landry
- Storage Units, Ink, & More Blog
- Sue Berker
- Susan (Rainy)
- Tangii Crane
- Tracy
- Tricia Traxler
- Trudee
- Velta
- VivLyn
- Zena
MTME Pretty Palette Color Team
MTME Pretty Patterns Sketch Team
My Time Made Easy TM LLC
Shop till you drop!
Lauren Meader
About Me
Copyrighted material
Subscribe To My Blog
Pages
- About me
- Alexa’s Story!
- My Crafty Corner!
- My Time Made Easy™ LLC
- Our Make A Wish Trip to Disney!
- Resume/Publication List
Calendar
Archives
- August 2013
- July 2013
- June 2013
- May 2013
- April 2013
- March 2013
- February 2013
- January 2013
- December 2012
- November 2012
- October 2012
- September 2012
- August 2012
- July 2012
- June 2012
- May 2012
- April 2012
- March 2012
- February 2012
- January 2012
- December 2011
- November 2011
- October 2011
- September 2011
- August 2011
- July 2011
- June 2011
- May 2011
- April 2011
- March 2011
- February 2011
- January 2011
- December 2010
- November 2010
- October 2010
- September 2010
- August 2010
- July 2010
- June 2010
- May 2010
- April 2010
- March 2010
- February 2010
- January 2010
- December 2009
- November 2009
- October 2009
- September 2009
- August 2009
- July 2009
- June 2009
- May 2009
- April 2009
- March 2009
- February 2009
- January 2009
- December 2008
- November 2008
- October 2008
- September 2008
- August 2008
- July 2008
- June 2008
- May 2008
- April 2008
- March 2008
- February 2008
- January 2008
- December 2007
- November 2007
- October 2007
- September 2007
- August 2007
- July 2007
- June 2007
- May 2007
- April 2007
- March 2007
- January 2007
Categories
- About Me
- All That Scraps
- blogger challenge
- camera/photo play
- Cards
- Contests
- family stuff
- FOR SALE
- Home decor/3-D items
- How to FAKE it!
- Introduction
- JUGS Challenge
- JustRite Stampers
- Lizzie Anne Designs
- My family stuff
- My Stamping Space
- My Time Made Easy
- My Time To Color Challenge
- My Time to Create Challenge
- My Timeless Template Challenge
- My Timeless Templates
- Mytime Mail
- MYTIME MOVIE/VIDEOs
- Papertrey Newsletter
- Pink Cat Studio
- Pretty Palette Challenge
- Pretty Patterns Sketch
- Product Opinions and Must haves
- Recipe's
- Saturday Sketch
- Smilebox Creations
- Stampavie
- Tutorials
- Uncategorized
- videos
Most Popular
- Create your own Onesie Card Tutorial-and important NOTE! PLEASE READ (2529)
- Saturday Sketch-Boxed bag holder (2333)
- Going GREEN! Fancy Flower Flourish-Closure Video (1478)
- Fabulous Favorite - Giveaway! (1336)
- a Prayer Request (1232)
- QUICK-Easter Baskets from Nestabilities-PTI style-and blog challenge (1063)
- Teaser Sketch (999)
- February Release Giveway! (and a little peek) (996)
- Group Post and Rambling Rose Video Tutorial (985)
- GIVEAWAY! Who wants it all?! (895)
Recent Comments (RSS)
- 첫충사이트: 완전히 흥미로운 블로그 게시입니다. 저는
- sarah: Wow, Lauren, what a stunning
- hedie: خرید راهبند
- 야동: Love to read it,Waiting For
- 야동: This seller is in a
- 바카라사이트: 여기 처음 왔어요. 나는이 게시판을
- 야동티비: I was surfing the Internet
- 바카라사이트: 비슷한 주제에 대한 흥미로운 정보를
- 바카라사이트: "여기에 제공해 주신 귀중한 정보와
- 온라인홀덤: 유익한 웹 사이트를 게시하는 데
Copyright © 2007 - My Time, My Creations, My Stampendence - is proudly powered by WordPress
This blog has been Tweaked and Designed by Sara Williams
27 Responses for "Make your own-Butterfly Kisses brass stencil! And Learn to use embossing paste :D"
Wow…this is terrific. I am so going to order this set when it becomes available again…this will be something to re-read at that point!
Beautiful card!! Thanks for the awesome tutorial! Very cool!
I love this technique, Lauren. Thanks for showing it so clearly! I love how you made your own stencil – pure genious! Your card is gorgeous!
great tutorial Lauren! You are making it harder and harder for me to resist these butterflies!! They should recruit you for sales! Your own stencil…brilliant!
This is awesome!!! Great job…. Where do you get the metal sheets?
How creative you are! Nifty tutorial! May I put it and any other tutorials you do on my Great Tutorials page?
Laurens a Dirty Girl (sorry, couldn’t resist)! Wow…this is why you’re a Dirty Girl! Absolutely brilliant! Thank you for sharing this. Now off to go find some metal sheets! You and I are like minded. I love butterflies and my favorite card is purple. It’s almost like you made this card for me!
Linda
How cool! Love your blog!
Very pretty card! Thanks for sharing your tutorial with us!
beautiful card. thanks for the tutorial.
Brilliant!!! Now let’s just see if I am brave enough to try it! lol!
What a great tutorial, Lauren! I have waffled about getting a crop-o-dile, but now I really do think I need one. I am looking forward to trying this.
Sharon
Okay, you make this look way too easy. Is it really? It looks really cool.
Where do you get this embossing paste? At M’s, where would it be – with the stamping/scrapping area?
Your card is great. I’m really intrigued by this. Thanks for doing such a great tutorial.
This is a really good read for me, Must admit that you are one of the best bloggers I ever saw.Thanks for posting this informative article.
coach outlet handbags’s special design and fashion is certainly and so eye-catching, I hope you are able to get much more attention towards the Cheap Coach Crossbody.The hottest new traditional and seasonal coach outlet store online. Keep up to date with the latest trends. Look at this zip top closure with colorful C logo printed fabric bag.You may find the most affordable Bags here.I got the information of Coach Outlet Online from my close friends. They often buy bags, purses and other accessories from this outlet
coach outlet has become necessary in everyday life of women seeking fashion and simple designs simple and elegant to look at very affordable and practical.If you have enough leisure time, you may go to the mall or go to the Coach franchised store to have a good look at varieties of coach outlet store online the diverse styles and rich colors of the purses with low cost will surely impress you a lot!The black bag from the coach outlet online adds the new design that you may love it! Find more new arrivals that you like.
The latest fashion collection contains those bags suitable to be worn in both casual and formal environment. We provide the best quality louis vuitton uk with the most reasonable price we can offer as you see in our online store.louis vuitton Store Online Handbags can also bring great accuracy as well as practical applicability and fashionable.Want to become more charming and faddish? Go to visit louis vuitton outlet webpage and select the most suitable products for yourself.
Coach handbags with double-stitched seams and handles, added inside pockets, and only the finest leathers. we guarantee the toppest handbags at low price you will find from Coach Outlet Online. Once visit, you will be unable to restrain loving it. Warmly welcome all of you to the Summer Sales Promotion on Coach Factory Outlet. coach outlet handbags You can not just save your cash but also your time inside a convenient way to obtain the exact same bags product and do not be concerned the shippment of one’s products.
These cards are really pretty
This can be a great website write-up and I defer to you what you’ve said below. I’ve previously subscribed for a RSS feed in Firefox and are going to be your regular reader. Many thanks for the time in writing the submit.
Many thanks for your good publish. I’ll take the notes you’ve written.
One more new write-up with powerful points, I’ve been a lurker below for any brief time but wish to become a great deal much more engaged inside long term.
It really is good to possess the capacity to examine a great high quality article with practical specifics on topics that plenty are interested on. The stage that the information indicated are all first hand on reside experiences even guide a lot more. Proceed performing what you do as we really like readi?-
It really is good to possess the capacity to examine a great high quality article with practical specifics on topics that plenty are interested on. The stage that the information indicated are all first hand on reside experiences even guide a lot more. Proceed performing what you do as we really like readi?-
Americanmade products.Johnson concluded by saying: Los Angeles local time jeckluckp North Face Outlet on May 29,the The North Face Outlet leading U.S.apparel manufacturer American Apparel The North Face Outlet announced that the The North Face Outlet company ‘s first mobile phone the The North Face Outlet supermarkets North Face Outlet Store will debut in Japan.Phone the The North Face Outlet mobile supermarket domain name for
The picture shows the interior of the facelifted automatic models of the Pentium B50 Pictured cash Pentium B50 Interior AUTO
I used to be suggested this web site by my
cousin. I’m no longer positive whether or not this post is written by him
as no one else recognize such specific about my trouble.
You are incredible! Thank you!
Leave a reply