Archive for March 20th, 2007
My three little monkey’s
Mar 20, 2007 Author: mytime | Filed under: My family stuff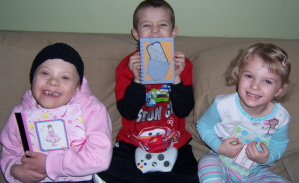
Alexa’s set Contest!! DEADLINE EXTENDED!
Mar 20, 2007 Author: mytime | Filed under: ContestsDue to more people ordering Alexa’s stamp set-
THE DEADLINE FOR CONTEST ENTERIES IS NOW BEING EXTENDED TO APRIL 3rd. WINNERS WILL BE ANNOUNCED APRIL 5th!
So you are probally wondering why my last 2 posts had stuff with Alexa’s set. Well there is a good reason for that. Are you ready? Can you say FREE goodies?
Well I have been dying to get everyone using their Alexa set. So if you have it, and you want some MYTIME MAIL (aka free goodies) then you have to enter the contest!
Yup! You read it- a contest.
What’s in it for you. Well there is a humongo pack of designer paper, by Rob & Bob studio, the Alexa purse & wallet set shown blow on my blog, and a $10 gift certificate to ECLECTIC PAPERIE.
Want in? Well comment on this post, and send a link to your card, no matter where its posted, your own blog, SCS gallery, wherever! If you are computer savvy and can post a photo here thats great too. Contest ends March 31st! Winner will be announced here on April 2nd! “I” will not be judging any of the enteries, but will have my husband sit with the kids and pick. Alexa of course has the final say. So, think like a 7 year old! LOL! There will be 3 winners total. I will try to get photos of the placement prizes uploaded here in a day or two. Alexa has ALOT of appointments Wednesday and I will be away from my computer!
1st place- Rob & Bob super slab, Alexa set w/gift card for $10 to eclectic paperie
2nd place- Black tote photo holder (holds 5 photo’s on front)
3rd place-misc $1 stamps (acrylic) from Mikes and Joann’s
I can’t wait to see what you all come up with!
Happy Stamping!
Pretty as a Princess
Mar 20, 2007 Author: mytime | Filed under: Home decor/3-D itemsI have been having fun challenging myself since starting with the Dirty girls on SCS. Secret is, I really stink at 3-D items. Well, Alexa wants her room re-done in a princess theme. Especially with Disney coming in a few weeks. So, I went to Michaels and got her this mirror for a whopping $3! I found the Once Upon a Time patterned paper by DCWV, in this end cap of the store. I knew I could do “something” with it. So home I went.
I painted the mirror with White MM craft paint. I then took a sponge, and sponged craft pretty in pink, bashful blue, and almost amethyst to creat the look of the paper. So here is the framed mirror!
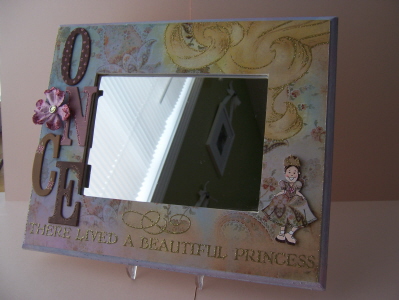
It really shimmer’s IRL! The letters are chipboard I already had on hand by Marcella by K. I got the prima flower from Jacksonbelle’s ebay store. Its from the baby girl line. I used my glue pen and went happy, then rolled it in some old SU! Glitter from back in the day! LOL! Matches perfectly.
Alexa’s princess dress is paper pieced. I made the crown myself. She LOVES her new mirror.
Thanks for looking.
Alexa’s Set
Mar 20, 2007 Author: mytime | Filed under: Tutorials
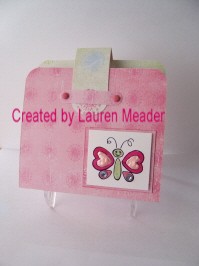
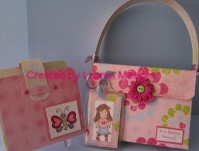
Well I have been getting overloaded with PM’s on Splitcoast asking me for instructions on how I made this Purse & Wallet gift set.
So I figured my new blog would be the perfect place for your step by step instructions! My very first tutorial! How exciting. I found it fun to use my daughter Alexa’s stamp set since I love it so much, and in hopes that those of you who dont have it, will want it! LOL!
I would also like to do a contest, so see next post!
You can make ANY holder, purse or gift box just by adjusting your measurements!The important thing to remember is make sure your front/back panels are the same, as well as your bottom and sides.If this explaination is unclear, think of the 2-4-6-8 box instructions. Because the box around is 2 inches, you score from the bottom 2 inches.This rule applies to the dimensions of any square item! Any size!Now for rectangle items like my purse, you can choose to make the opening as wide as you like! Just adjust the entire measurements!It really is easy once you get started.Clear as mudd?Well go grab your cutter, and scorer and follow along step by step! It should make sense once you are finished.
If you are confused, email me and I’ll be happy to help you out!
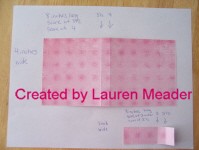
Instructions for purse
Finished size 5 1/2 x 4 with 1 inch opening/side panel.
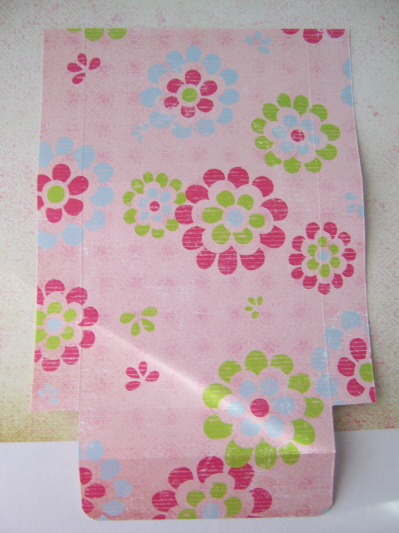
Cut doublesided cardstock 7 1/2 x 11.
Along the 11 inches- score at 4, 5, 9, 10. This makes the front, bottom, back, and top closure flap.
Along the 7 inches- score at 1, then 10. This will make the side panels.
Now snip the bottom seam corners, and trim excess from top purse flap. (see photo)
Ahere using redline tape.
For flap closure I used magnets by Basic Grey.
Handle- cut strip 1 x 12. Score an inch on both end. Fold , and adhere under purse top flap.
Decorate as desired!
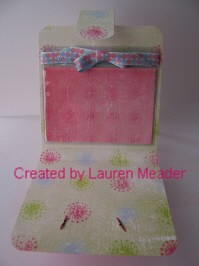
Wallet
Cut doublesided cardstock 4 x 8 1/2.
Score at 4 and 4 1/2.
Cut 1 x 3 scrap piece. Score at 2 and 2 1/2.
Attach at the small scored end to wallet.
Punch a piece from the word window. Lay out where it best holds the strap in place.
One comfimed place to attach, use brads to hold in place.
Now your stap will easily slide in and out of wallet, and hold it closed.
Adhere plastic lugguage tag inside wallet using redline tape.
Place a piece of coordinating cardstock inside holder, and adhere inside. This is to cover the view of the redline tape.
Now you can put in a gift card, certificate or cash!
Supplies
Double sided cardstock-I used Fancy Pants Keylime Pie series in Delightful and Delicious
Pink brads, Word Window punch, corner rounder, liquid pearls, jewels, Prima daisy,
button, round tab punch, magnetic closure by Basic Grey,plastic luggage tag
ribbon by American Crafts, Key chain $1 spot @ Target, redline tape
Stamp set-Alexa’s set, celebrate in style by SU!
Ink-Basic Black, positively pink, pretty in pink, bashful blue, blush blossom, creamy caramel
certain celery, choc. chip
My Etsy

Who I Designed For
Blogroll
- Alicia
- Alli Miles
- Ally Blankenship
- Amber
- Andi @ crafts on a whim
- Angel R
- Angie Z
- Anne Kranitz
- Becky O
- Bee
- Beth Silaka
- Bethany Paull
- Beverly Nash
- Bobbie
- Cambria
- Cammie
- Card of the Week
- Card Positioning System (CPS)
- Cards for Cancer
- Catherine Doucette
- Charmaine
- Cheryl Sims
- Chriss Rollins
- Christina
- Christine Ewing
- Christine Wooden
- Colleen Schaan
- Craft Critique
- Craft Gossip
- Crystal
- Dawn Easton
- Emily Giovanni
- Geny
- Holly
- Igne Groot
- Inspirational Craft Blogs
- Irene
- Jami Sibley
- Jeanne Streiff
- Jen del Muro
- Jeni Bond
- JenMarie
- Jenn Balcer
- Jenn Diercks
- Jenn O
- Jennifer E
- Jennifer Mick
- Jennifer Pereda
- Jennifer-Sweet Treat
- Joanne Basile
- Jodi Collins
- Julia Stainton
- Julie Masse
- Karen
- Kathryn Berthiaume
- Katie Cotton
- Kelley Holland
- Kendra
- Kim Scholfield
- Kris’s Color Stripes! Get inspired here
- Kristen Dubosque
- Kristin Eberline
- Kristine
- Laura @ Sunshine Stamper
- Laura Turnmire
- Laurie Schmidlin
- Lesa Rapp
- Linda Duke
- Linda-LSN
- Lindsey Botkin
- Lisa (lakind scs)
- Lisa Kind
- Lori Craig
- Maggie
- Mara Campbell
- Maria
- Maria Levine
- Mary
- MaryJo
- Melanie M
- Monique Hansen
- Moxie Fab World
- Pam Imholz
- PaperCrafts Connection
- Peppers and Pollywogs Kids party site
- Rebecca Grohall
- Rita
- Robyn
- Rose Ann
- Sarah Vrolyk
- Sharon Harnist
- Sharon Johnson
- Sharon Rivera (a chemisrty with paper)
- Sherrie
- Sophia Landry
- Storage Units, Ink, & More Blog
- Sue Berker
- Susan (Rainy)
- Tangii Crane
- Tracy
- Tricia Traxler
- Trudee
- Velta
- VivLyn
- Zena
MTME Pretty Palette Color Team
MTME Pretty Patterns Sketch Team
My Time Made Easy TM LLC
Shop till you drop!
Lauren Meader
About Me
Copyrighted material
Subscribe To My Blog
Pages
- About me
- Alexa’s Story!
- My Crafty Corner!
- My Time Made Easy™ LLC
- Our Make A Wish Trip to Disney!
- Resume/Publication List
Calendar
Archives
- August 2013
- July 2013
- June 2013
- May 2013
- April 2013
- March 2013
- February 2013
- January 2013
- December 2012
- November 2012
- October 2012
- September 2012
- August 2012
- July 2012
- June 2012
- May 2012
- April 2012
- March 2012
- February 2012
- January 2012
- December 2011
- November 2011
- October 2011
- September 2011
- August 2011
- July 2011
- June 2011
- May 2011
- April 2011
- March 2011
- February 2011
- January 2011
- December 2010
- November 2010
- October 2010
- September 2010
- August 2010
- July 2010
- June 2010
- May 2010
- April 2010
- March 2010
- February 2010
- January 2010
- December 2009
- November 2009
- October 2009
- September 2009
- August 2009
- July 2009
- June 2009
- May 2009
- April 2009
- March 2009
- February 2009
- January 2009
- December 2008
- November 2008
- October 2008
- September 2008
- August 2008
- July 2008
- June 2008
- May 2008
- April 2008
- March 2008
- February 2008
- January 2008
- December 2007
- November 2007
- October 2007
- September 2007
- August 2007
- July 2007
- June 2007
- May 2007
- April 2007
- March 2007
- January 2007
Categories
- About Me
- All That Scraps
- blogger challenge
- camera/photo play
- Cards
- Contests
- family stuff
- FOR SALE
- Home decor/3-D items
- How to FAKE it!
- Introduction
- JUGS Challenge
- JustRite Stampers
- Lizzie Anne Designs
- My family stuff
- My Stamping Space
- My Time Made Easy
- My Time To Color Challenge
- My Time to Create Challenge
- My Timeless Template Challenge
- My Timeless Templates
- Mytime Mail
- MYTIME MOVIE/VIDEOs
- Papertrey Newsletter
- Pink Cat Studio
- Pretty Palette Challenge
- Pretty Patterns Sketch
- Product Opinions and Must haves
- Recipe's
- Saturday Sketch
- Smilebox Creations
- Stampavie
- Tutorials
- Uncategorized
- videos
Most Popular
- Create your own Onesie Card Tutorial-and important NOTE! PLEASE READ (2529)
- Saturday Sketch-Boxed bag holder (2333)
- Going GREEN! Fancy Flower Flourish-Closure Video (1478)
- Fabulous Favorite - Giveaway! (1336)
- a Prayer Request (1232)
- QUICK-Easter Baskets from Nestabilities-PTI style-and blog challenge (1063)
- Teaser Sketch (999)
- February Release Giveway! (and a little peek) (996)
- Group Post and Rambling Rose Video Tutorial (985)
- GIVEAWAY! Who wants it all?! (895)
Recent Comments (RSS)
- 첫충사이트: 완전히 흥미로운 블로그 게시입니다. 저는
- sarah: Wow, Lauren, what a stunning
- hedie: خرید راهبند
- 야동: Love to read it,Waiting For
- 야동: This seller is in a
- 바카라사이트: 여기 처음 왔어요. 나는이 게시판을
- 야동티비: I was surfing the Internet
- 바카라사이트: 비슷한 주제에 대한 흥미로운 정보를
- 바카라사이트: "여기에 제공해 주신 귀중한 정보와
- 온라인홀덤: 유익한 웹 사이트를 게시하는 데
Copyright © 2007 - My Time, My Creations, My Stampendence - is proudly powered by WordPress
This blog has been Tweaked and Designed by Sara Williams